
-
I'm obsessing with that discovery. I even took grabs from various videos on vimeo shot with the GH3 and applied the same hue change on the grab. It really gets the contrast of the skin back in play and on par with the contrast of the overall image.
First pic corrected

 H1.jpg1277 x 716 - 719K
 1.png1277 x 716 - 1M
 H2.jpg1278 x 720 - 746K
 2.png1278 x 720 - 1M
 -
One last thing for today, I wanted to see how the GH3 with the hue adjustment would look next to a 5Dmk3. When I first saw that footage on vimeo I thought the gh3 had way better DR in the shadows... but look like the red channel of the GH3 is just to bright. When correct (just a hue brightness adjustment) The GH3 and MKIII look pretty much alike, only more details and resolution on the GH3.

 5DvsGH3.png1247 x 722 - 1M
 5DvsGH3hue.png1246 x 723 - 1M
 -
@yak Nice tests and research. I think you've really narrowed it down with the "red channel" findings. I use RGB curves in Premiere Pro as a final adjustment to compensate for the red channel. I have an interview to film in the next two weeks. Really looking forward to it while applying your latest advice. Thanks much. Attached are much better results on my end in this recent interview. Quite difficult at times as the GH2 and GH3 do not shoot the same at all. You'd think they'd at least be in the same ball park! Not true.
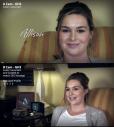
 Comparison1.jpg853 x 954 - 433K
 Comparison2.jpg853 x 958 - 409K
 -
@maddog15 Glad someone is going to use my findings... Very nice grade btw, I haven't been able to correct the issue with the RGB curves... it's really the red channel brightness the problem, when adjusting the RGB your changing the colors and not when you adjust the brightness.
Applied the change on your still... I'll be working hard to make some sort of a "LUT" for premiere and fcp.

 35d642292ee926dac8039db1e11349.jpg853 x 958 - 537K
 -
@yak do you think filmconvert, which to my understanding applies a camera and colour profile specific LUT (i.e GH3 natural) correct any red channel brightness issues that the GH3 might have?
-
@yak excellent research and findings, so valuable!
-
@mat33 I don't think it does.
-
-
@yak thanks and great work. To correct the red channel brightness in FCPX could you create a secondary colour mask set to red, and then adjust saturation/exposure just for that colour?
-
Looks as though something along the lines of this more or less does the job in Premiere (should work in FCP too): http://i.imgur.com/QUtE05F.jpg
More flexible than a Lumetri LUT etc. Can use it to further adjust skin tones after the fact.
-
Here is a quick test using fcpx colour mask -set to red with global saturation -10% and global exposure to -5% -probably could do with some fine tuning of mask and also adjustments.

 FCPX.jpg1920 x 1080 - 351K
 -
@mat33 That should work, I tried it... and it seems I can only pick a color that is in the image not a general hue... my results have been very inconsistant that way.
@wgtwo I don't have premiere but it could work, In AE it's very easy: Hue/Saturation tool, select RED channel and down lightness by -25 or so.
-
This red channel thing makes sense to me too. I had figured this thing another way. I calibrated my high end plasmatv to show a little less red saturation and lightness. I thought that my plasma had bad calibration but I think this issue is a part of the matter. Thank you for your study.
-
I got a good solution for everyone, I created a .cube LUT in after effects. If you are on fcpx you will need lut buddy to install this LUT in fcpx. It's 29$, but free trial with watermark.
Here is the .cube file!

 GH3 Red Channel.cube.zip107K
 -
I go to try that, I follow this topic since any time, todays my GH3 is standard -2,-2,-1,-5 after tried standard -5,-5,-5,-5, what are better ? and after I used resolve to the red... You make a good job, in waitting an hack.
-
@yak So, for you the manual wb is reliable for the correct color of skin? Is not it better moved a few point toward the magenta?
-
@surfculture at -2 the red channel problem is less apparent but the same amount hue adjustment is needed to correct to skin tones. If we find a good way and apply the exact amount of adjustment needed (hard to figure out right now) there will not be a problem shooting at -5 (in fact will be better for gradability)
I'll continue experimenting with the hue adjustment to create a good LUT .cube file, my first file as too much red saturation. I think the way to do it is to compare the channel of the .mov against the red channel of a RAW picture. As I don't see that problem when shooting raw pictures.
The second step, would be to have the same adjustment in camera, but no hack for now and I don't even know if that is going to be possible...
@lumixmaxgh3 I have not experimented too much with moving the wb ajustment, for the little I did it does not seem to reduce the "brightness" of the red channel, as the red seems to be too bright in the mid tones.
-
Yak, thanks for putting that .cube file together. For Premiere CC users, you can load this file using the 'Lumetri' video effect. When you load the effect, just point it to the .cube file and it appears in the Effects Control. Much better than Magic Bullet LUT Buddy.
-
You are talking about red channel problem but is it more correct to talk about red colors problem. Your correction affects only for red colors, not for all red channel if I have understand correctly.
I am still thinking that part of the solution might be a slight underexposing because that leads to less saturated and darker colors. Then I can use flatter (-5 natural) profilr. It works for me with my displays but I am not sure if my calibration is absolutely perfect. I can add saturation to my plasmatv and there is no skin tone issue for me. I dont still underestimate your issues.
-
@superset thanks for the info
Testing against raw. Look at the magenta channel behavior vs raw with and without red channel LUT
A better .cube file soon. I'll try to make it final.
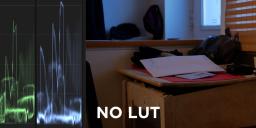
 1 - NO LUT.jpg1647 x 570 - 135K
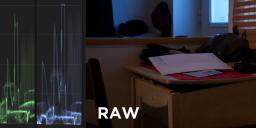
 2 - RAW.jpg1649 x 570 - 122K
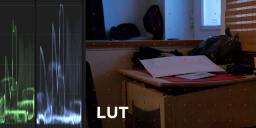
 3 - LUT.jpg1645 x 569 - 154K
 -
I've trying shooting underexposed, still the red are too bright. The issue with GH3 for me was that I've seen hundreds of gh3 footage on vimeo and I've never seen a footage with good skin tone (without crushing the midtones) the skin tones contrast never matches the overall contrast... It's a knows issue that the skin tones comes out a bit chalky.
Now Canon have always had better skin tones, when I apply my "LUT" to a GH3 still, it makes it very easy to match canon skin, did panasonic wanted to have a different video image than Canon?? Maybe...
GH3 | GH3 corrected | Mark3

 GH3.jpg1919 x 789 - 707K
 GH3 corrected.jpg1919 x 789 - 750K
 MARK3.png1920 x 789 - 1M
 -
It is strange that I get never so red faces like in your examples. This latest looks also very contrasty. Is it standard/contrast 0. The corrected version has better color but contrast between face/black parts like beard is too hard for my eye/monitor. How you do these frame samples? Are there all video levels in JPG photo?
Here is the first picture with heavy gamma setting. There is crushed blacks. I dont see those in my videos even when I underexpose.

 yak-gamma.jpg717 x 789 - 154K
 -
@vesku I don't have a mark3 it was a test using a video on vimeo... explains the crushed everything, it was just a quick skin tone exemple...
I'll agree it's not the best test, but still... if you look at the colors on the scarf the reds are at a good level vs mark3
-
OK. that explains something about contrast. Vimeo and Youtube seems to crush GH3 exellent dynamic range.
Must we compare to 5D3. In my opinion it has too contrasty video and skin tone. I think that GH3 skin tone is more natural looking with its open and pleasant shadows. Is it so that people/customers want contrasty look?
-
I agree the GH3 as better DR than 5D. As for skin tones, gh3 is very bad, you need a very aggressive grade to get normal looking skins. I like to grade flat, in fact I LOVE the flat look and when my GH3 image is flat the skin looks like chalk. And when you grade your image the red is may too bright. Try to shoot a RAW picture and compare it to your .mov, you'll notice that the reds are less bright.
I love the RAW colors of the GH3, the jpeg and video colors not so much... until now.
Howdy, Stranger!
It looks like you're new here. If you want to get involved, click one of these buttons!
Categories
- Topics List24,049
- Blog5,725
- General and News1,380
- Hacks and Patches1,153
- ↳ Top Settings33
- ↳ Beginners256
- ↳ Archives402
- ↳ Hacks News and Development56
- Cameras2,385
- ↳ Panasonic995
- ↳ Canon118
- ↳ Sony156
- ↳ Nikon96
- ↳ Pentax and Samsung70
- ↳ Olympus and Fujifilm102
- ↳ Compacts and Camcorders300
- ↳ Smartphones for video97
- ↳ Pro Video Cameras191
- ↳ BlackMagic and other raw cameras133
- Skill1,960
- ↳ Business and distribution66
- ↳ Preparation, scripts and legal38
- ↳ Art149
- ↳ Import, Convert, Exporting291
- ↳ Editors191
- ↳ Effects and stunts115
- ↳ Color grading197
- ↳ Sound and Music280
- ↳ Lighting96
- ↳ Software and storage tips266
- Gear5,420
- ↳ Filters, Adapters, Matte boxes344
- ↳ Lenses1,582
- ↳ Follow focus and gears93
- ↳ Sound499
- ↳ Lighting gear314
- ↳ Camera movement230
- ↳ Gimbals and copters302
- ↳ Rigs and related stuff273
- ↳ Power solutions83
- ↳ Monitors and viewfinders340
- ↳ Tripods and fluid heads139
- ↳ Storage286
- ↳ Computers and studio gear560
- ↳ VR and 3D248
- Showcase1,859
- Marketplace2,834
- Offtopic1,333


