It allows to keep PV going, with more focus towards AI, but keeping be one of the few truly independent places.
-
anyone who has tried a warming filter which is good for skintones, to see any difference?
-
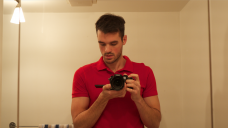
@Vesku Look at how much the skin tones are flat looking in a contrasty image in second pic, and how you can recover that in 3rd.
First Picture: RAW from camera. Second Picture: .MOV graded to match RAW Third Picture: .MOV graded to match RAW + Hue adjustment
 RAW.png1264 x 711 - 1M
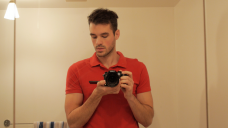 GH3 GTMR.png1270 x 712 - 1M
 GH3 mov GTMR LUT.png1270 x 712 - 1M
 -
I see the problem if one wants to make some video product and the goal is normal looking rich color and contrasty result that looks good in every average monitor or tv.
I watch my clips usually straight without editing and I have been very happy with every aspects of IQ and colors. Maybe GH3 videos benefits of high end colorful displays I have. Personal tastes matters too. I like flat look with good dyn range. If too flat I adjust gamma a bit in player.
Do you use standard or natural profile. In my opinion standard profile causes problems with skin tone in artificial lightning. Too colorful, yellowish or reddish faces. Natural is more neutral in electric light like smooth also in GH2 in electric light.
I think in last example that first photo is best but too red. How you do it? Profile, settings,WB... 2 last one has bad sharpness, why is that?
-
First photo is ungraded RAW picture straight from cam...so yes sharper, richer, everything else... 2 last one Natural -5 -5 -5 -5 WB tungsten
-
Sorry. I though "RAW (ungraded)" video. Are you always using -5 color. That may leed chalky look. I use 0 color. I also prefer auto WB most of the time.
-
@yak I'm on a mac and for some reason i can't download the .cube file. Only lets me "copy" the image. Haven't had this problem before. Any suggestions? Really want to try it out.
Thanks much
-
Never mind. Figured it out.
-
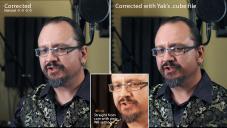
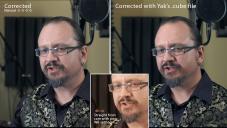
That .cube file is not so good the LUT doesn't preserve the highlights of the skin tones... here is a much better one. (Been working on it all day) Feedback from you would be much appreciated.
 CBLHUE.cube.zip97K
 -
@yak Great thanks. 3:14 am where i am. I'm shutting down but I'll get back to as soon as possible tomorrow. Going to test it on an interview I shot last month. For some reason this guys skin was brutal to color correct.
Thanks again for all you effort. I know this camera can do it. It's just a matter of figuring out the finer tweaks of the camera's personality. Check this link. Shot with the GH3 by Gary Orona and yes.... skin is possible!
Here's his reply to my comments: " Thanks Frederick. Yes skin tone is always a challenge especially since a lot of my work involves a lot of skin! Adobe Speedgrade works pretty well and gives ridiculous amount of control. SpeedLooks is a company that has these amazing settings you can buy for Speedgrade that are fantastic."
-
Mmm, pity that SpeedyLooks has patches for every camera on earth except Panasonic GHx:
Camera Patches included with every SpeedLook:
Arri Alexa Canon 1D C GoPro-5800K Canon C300
GoPro-3200K Canon 5D Panazonic HPX3700 Canon 5D UEX Nikon D800 Canon 7D
Nikon D800 UEX Canon 7D UEX
Sony F55 AXS RED
Sony F55 SR RED UEX
Sony FS700 Rec. 709 Normal BMC DNxHD Rec. 709 Warm BMC ProRes -
@maddog15 From what I have seen, some skins are harder than others to correct like Asians skin, while darker skin seems to be the easiest.
-
Racist camera the GH3 ... :)
-
@flablo Yep I know. But to be honest with you I don't believe in any kind of "quick click color correction", patches or effects. Im my humble opinion those are a lazy man's or just flat out amateur's tools. Things like FilmConvert and the rest are just ways for me to spend more money, not learn and be lazy. Don't get me wrong, I think using these to get you close or "in the ball park" is great. But if I can't adjust color, saturation, tonality by understanding the theory of color and light.... I should choose another passion. Again... this is just my humble opinion. Not trying to offend anyone so please accept my apologies if I have.
-
I even gave it try on philip bloom's Genesis, shot on GH3. LUT tested on dark scene where the skin tone looks too light and not contrasty enough in relation to the rest of the frame. It's really not a big difference but too my eyes, it's night and day.
 genesis.jpg1270 x 713 - 508K
 genesis LUT.jpg1270 x 713 - 505K
 -
@yak Ok. I've applied your LUT to this corrected footage in Premiere Pro by loading it as a Lumetri setting. Seems to bring back the darker tones within the Red channel giving a bit more shape and definition to the shot. I used the latest file you posted. 3-way color corrector, Fast color corrector and RGB curves used with your LUT. Thoughts?
-
Thx alot @maddog15, To me it looks way better, I like the eyes, ears forehead better... looks weird at the jaw. Maybe balancing toward "red" maybe part of the problem. More tests to do!!
Can you adjust the intensity of the LUT in premiere? Wondering if I should make it stronger so one can choose the intensity...
EDIT: Just tried something... upped the opposite hue brightness +green +blue since it was shot toward red... brings noise in the background, seems to add more colors to the face... what do you think?
 eccee4c6ca15f91410d7946c5c9931-1.jpg1135 x 641 - 849K
 -
Is there any way to achieve this with Resolve 10?
-
@joethepro Yes and no, you can use the "hue vs lum" tool, but for some reason just a small change and the whole codec breaks down...
-
-
I did the hue-brightness pluses to green and blue after applying the previously posted LUT and crushed the mids a bit because it boosted the blue and green mids.
I may make a LUT out of that to for those cases... the best would be to have both settings on the same file with an intensity cursor.
What sucks is that no video program can boost hue the same way, I did those LUT using a 10$ photo editing application and a complicated process to end up with a .cube file.
-
@yak I saw the same issue when using the hue vs lum adjustment in Resolve, but I think that is not the proper way about it. When we do that, it is just looking at those specific red pixels, and nothing else. Thats why it gets funky because there is no gradient between the adjusted pixels and the neighboring pixels. When you did your red brightness level adjustment, werent you affecting the red component of ALL the pixels, and EVERY color? You weren't just selecting the red-ish pixels on the screen and adjusting those. This is what we need to figure out in Resolve.
-
@joethepro it should be affecting every pixels containing red... but it does not, maybe I'm doing it wrong but even when I'm selecting a wider range of hue to adjust, the same thing happens. Is it the .mov, should it be encoded in prores before? I don't know.
-
-
@yak Well, when selecting red in the hue vs lum adjustment, it does not look at the red content of every pixel, or the red "channel". It just picks out the pixels that have a red value in the range specified (or something). Its just not the right tool for this. We need to be able to isolate the entire red channel, I think.


Howdy, Stranger!
It looks like you're new here. If you want to get involved, click one of these buttons!
Categories
- Topics List23,992
- Blog5,725
- General and News1,354
- Hacks and Patches1,153
- ↳ Top Settings33
- ↳ Beginners256
- ↳ Archives402
- ↳ Hacks News and Development56
- Cameras2,367
- ↳ Panasonic995
- ↳ Canon118
- ↳ Sony156
- ↳ Nikon96
- ↳ Pentax and Samsung70
- ↳ Olympus and Fujifilm101
- ↳ Compacts and Camcorders300
- ↳ Smartphones for video97
- ↳ Pro Video Cameras191
- ↳ BlackMagic and other raw cameras116
- Skill1,960
- ↳ Business and distribution66
- ↳ Preparation, scripts and legal38
- ↳ Art149
- ↳ Import, Convert, Exporting291
- ↳ Editors191
- ↳ Effects and stunts115
- ↳ Color grading197
- ↳ Sound and Music280
- ↳ Lighting96
- ↳ Software and storage tips266
- Gear5,420
- ↳ Filters, Adapters, Matte boxes344
- ↳ Lenses1,582
- ↳ Follow focus and gears93
- ↳ Sound499
- ↳ Lighting gear314
- ↳ Camera movement230
- ↳ Gimbals and copters302
- ↳ Rigs and related stuff273
- ↳ Power solutions83
- ↳ Monitors and viewfinders340
- ↳ Tripods and fluid heads139
- ↳ Storage286
- ↳ Computers and studio gear560
- ↳ VR and 3D248
- Showcase1,859
- Marketplace2,834
- Offtopic1,320


