-
Driftwood's video, exploring the different Scene and Creative Modes. High Dynamic is about 6:05 in.
-
These examples are frames from VIDEO. I am not talking about still photography. Yes the exact term is "creative mode/high dynamic" not iDynamic or HDR. And yes exposure is automatic but you can control FPS, color amount (WB-button), and EV. There is also some kind of limiter - iso is not going up much.
It is annoying that GH3 wants to decide so many things itsef and not even show what it is doing. Like exposure values or iso value when automatic modes.
I have VIDEOd nice dark city scenes with A 1.7 lens and I am going to VIDEO Christmas lights with this feature. Shiny and bright colors remain in shots much better with this option.
-
Yep I think HDR is being confused with HD - High Dynamic and IR - Intelligent Resolution. HDR is for exposing and layering stills... I'm pretty sure. I've tried it a couple of times but I use my GH3 for video 95% of the time. Someone correct me if I'm wrong. If this is the case, since this thread is about best GH3 video settings, this is off topic. @Vesku You should start a new topic on HDR. I'm sure many would enjoy this discussion and your findings regarding photography. :)
-
I would prefer a hack to use the advantage of 60p in 1080 to split them in 30+30 with alternating iso then blending in camera or in post, I dont mind :)
-
Yeah, I think we're talking about HIGH DYNAMIC and IIRC, it's available only in Creative Mode and not Manual Movie mode. So, there are some things you can't control, which is an issue. Still, knowing that the option exists in the camera means it would be an awesome option to hack, if possible.
-
I thought this was only for stills, yep, it's fun, unfortunately the exposure is auto
-
Do you have GH3? Arent you discovered the features GH3? There is lot of fun stuff. This feature is under "artistic filters (in mode dial artist board and brush). Lot of these are crap but this HDR is useful sometimes. It is not real HDR wich builds of several exposures. It uses hole sensor dynamic to make photo or video (must use video button). Picture profile is hard but in post you can get reasonably results. I wont load any video because of data limitations and in this case it wont add more info to this matter.
-
Does he mean I dynamic mode?
-
@Vesku I cannot understand the way you made your hdr video, can I see the video instead of frames?
-
Here are better examples of GH3 HDR video filter. I shooted a RAW-photo, HDR video and normal video in same situation. Then I graded them to match colors. I digged maximum amount of dyn range from RAW photo.
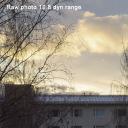 RawPhoto-sample.jpg663 x 663 - 164K
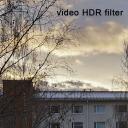 HDRvideo.jpg663 x 663 - 152K
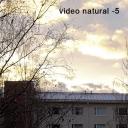 Natural-5.jpg659 x 659 - 187K
 -
a fast try for a kind of hdr video, a huge curve in mids with luma curve and then unsarp mask with high radius for clarity and some cc with 3waycc in leaves to be more green, unfortunately neat video is needed because the balcony was black
-
@maddog15 No worries! Glad you're busy and working. Feel free to PM me if you want any additional info.
-
Glad to hear that this might help someone. There are limitations using High Dynamic filter. Exposure and WB is automatic and it uses horrible standard sharpening and nr. So you must do something in post but there is more information to handle with.
-
@Vesku Pretty cool findings. After thinking it through I guess it makes sense. Darker lighting needs a boost vs perfect lighting. I've fought that battle while trying to color correct or grade my footage. Especially regarding saturation. You can crank up the saturation in post all you want but if there's no color there.... there's no color there. duhh. Thanks for posting you results with pics. Really helps.
-
I was surprised that artistic Mickey Mouse filter High Dynamic is usable in some situations. It increases dynamic range almost raw photo level. In my tests about 12.5 steps of dynamic range. It has very light tone curve and it is not good for normal shooting. But sunsets and city lights benefits of it.
Here samples:
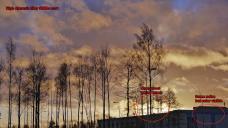 HighDynamic-mov.jpg1920 x 1080 - 316K
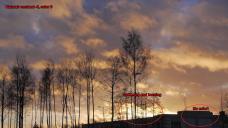 Natural-5contrast.jpg1920 x 1080 - 283K
 -
@5thwall Thanks man! (FWIW: Been meaning to respond to your last few posts. Sorry.... slammed with work and holidays. Great findings in your posts to say the least.)
-
@maddog15 looks great!
-
Four Roses Ultimate Egg Nog Recipe. Shot with GH3 for a Maxim Magazine web video. Standard -5 -5 -5 -5. Edited and graded in Premiere Pro CC. All sound design done in Logic Pro X.
-
I don't have gh2 but watching some videos I see that gh2 with bandwidth hack has much better color than without hack, can you tell me why it looses sharpness when shoot with hack?
-
@maddog15 - I tested all this out with my Ikan D5W monitors which have built-in scopes. I used only 5600k lights (which, I discovered were actually closer to 5200k). Besides that messy little detail, I set the cameras to 5200k while shooting a gray card and also my face. I noticed that the colors were a bit off and flat. So I went into the color settings on the GH3 and added some magenta or red or whatever and got the vectorscope closest to the center when shooting gray. I re-shot the test and it looked much better.
But then I thought, hey, this is a LOT of work! I might as well just get a BMCC and shoot raw. And THEN I thought, uh, DER I could just balance this thing on a white card. Well, after lots of testing I determined that skin tones looked better when the cameras were both auto-balanced to a gray card.
I'm finding that the uncorrected GH3 image is more magenta than red. Skin tones are better reproduced. But they are still flatter out of the box than the GH2.
Also, the GH2 has a much sharper image, so I found that it looks better in closeup - my personal taste. Others may differ.
-
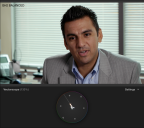
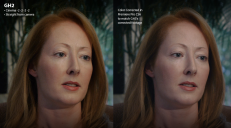
@maddog15 here is an interview I shot last week on the GH2 & GH3 at Standard 0,0,0,0 on both cams. I shot a DSC one shot chart before each interview. Balanced both cameras off the gray card on the back. Skin tones are much easier to match.
Used FCP X, wvl_RGBbalance, and the color board. I matched the RGB based on the 50% gray box on the chart inside FCPX with the wvl_RGBbalance effect (found on fcp.co). This brought the contrast levels pretty much in sync.
Then, I did a selective CC on his skin tone on the GH3 to add a touch more magenta (aka minus-green).
I've included stills of the corrected shots, as well as uncorrected shots of the charts.
GH2 lens: Panny 35-100 set to 2.8, ISO 200 GH3 lens: Voigtlander 25mm set to 1.4, ISO 200
 GH2 Intvw.png1197 x 1061 - 1M
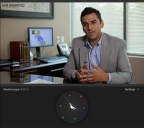 GH3 Intvw.png1197 x 1061 - 1M
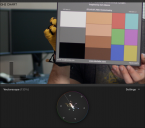 GH2 Chart.png1198 x 1060 - 1M
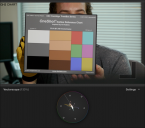 GH3 Chart.png1198 x 1061 - 1M
 -
Here's where I am on the intro of a documentary I'm producing. 85% of the footage is GH3. It's a rough at this point and the link is private but I thought I'd go ahead and share it with this group. (FYI: The quick interview shots here are purposefully desaturated and blown out a bid for mood and visual tone. The actual interviews will be color corrected and true as apposed to graded for a stylistic look.)
Shot Natural -5 -5 -5 0. Edited and Graded in Premiere Pro CC. Music bed composed in Logic Pro X.
-
@5thwall Thanks for the input. I've not tried setting WB off a gray card. I'll give it a shot. Regarless whether I set via a white card or visually dial it way down it's still "red" for me. Do you think that snapping a card vs dialing down manually makes a difference? I mean that's what the camera's is doing when you shoot a white card to set the WB right? Perhaps I need to take a step back and start over....with a beginners eyes.
-
Regardless of all -5 the GH3 shoots really red as @starios has indicated before. It's always been really frustrating with skin tones. It became even MORE apparent when I did a multi cam interview using my GH2 as the close up B cam. Getting the two camera's footage corrected so the tone and color is the same when cutting from one to the other in the interview is proving to be.... challenging. Notice how far off the GH3 is before CC compared to the GH2. (Same white balance, both cams shooting 1080p 24fps, Same White Balance, SS and ISO, GH2 - Moon T5 @ 148Mb/s, GH3 - 50Mb/s IPB.
 GH2.png1348 x 748 - 1M
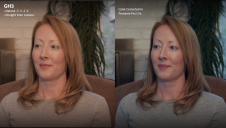 GH3.png1337 x 756 - 1M
 -
@maddog15 btw one thing i found is that i got much better skintones when i white balanced off a gray card. on my gh2, i can set the color temperature to whatever the light source is and the faces have nice dynamic range and color. but not so on the gh3. really have to dial it in with the white balance. i tested it out with a live scope and saw the difference. it's not always possible, of course, but time permitting, it's a good idea.


Howdy, Stranger!
It looks like you're new here. If you want to get involved, click one of these buttons!
Categories
- Topics List23,992
- Blog5,725
- General and News1,354
- Hacks and Patches1,153
- ↳ Top Settings33
- ↳ Beginners256
- ↳ Archives402
- ↳ Hacks News and Development56
- Cameras2,367
- ↳ Panasonic995
- ↳ Canon118
- ↳ Sony156
- ↳ Nikon96
- ↳ Pentax and Samsung70
- ↳ Olympus and Fujifilm101
- ↳ Compacts and Camcorders300
- ↳ Smartphones for video97
- ↳ Pro Video Cameras191
- ↳ BlackMagic and other raw cameras116
- Skill1,960
- ↳ Business and distribution66
- ↳ Preparation, scripts and legal38
- ↳ Art149
- ↳ Import, Convert, Exporting291
- ↳ Editors191
- ↳ Effects and stunts115
- ↳ Color grading197
- ↳ Sound and Music280
- ↳ Lighting96
- ↳ Software and storage tips266
- Gear5,420
- ↳ Filters, Adapters, Matte boxes344
- ↳ Lenses1,582
- ↳ Follow focus and gears93
- ↳ Sound499
- ↳ Lighting gear314
- ↳ Camera movement230
- ↳ Gimbals and copters302
- ↳ Rigs and related stuff273
- ↳ Power solutions83
- ↳ Monitors and viewfinders340
- ↳ Tripods and fluid heads139
- ↳ Storage286
- ↳ Computers and studio gear560
- ↳ VR and 3D248
- Showcase1,859
- Marketplace2,834
- Offtopic1,320


