-
@5thwall Great post! Thanks for taking the time to do it. Looking forward to reading about more of your findings. Currently running Natural -5, -5, 0, -5 but am open to running something better for grading and skin tones.
-
@SuperSet Once I get my second Ikan monitor back from them with the updated firmware, then I can see what's going on with both cameras live. Hopefully in a couple weeks!
-
-
@SuperSet No. Much of these are observations and need to be tested. My knowledge of resolve is minimal and my tests have just begun to scratch the surface. Right now, I'm just trying to find the best overall look for skin.
In a test I just performed with both cameras using the same lens, both set to all 0's, the GH2 looked far more yellow on the skin tones even after balancing. The GH3 had a rosier, more magenta cast.
Wish I really knew a lot more than I do. So a lot is trial and error.
I can confirm that Vibrant -4, 0, -2, 0 is the most accurate of the settings based on my tests.
-
One additional note on that last test. In Resolve, I shifted the yellow hue curve up to what I would consider the "wrong" territory, just balancing by eye to math the GH2 to the GH3 skin tones. I was able to get skin tones remarkably accurate when compared to the GH3. Since it was just my face and a black background, I'd need to test this a little further to see if I can get an overall "LUT" or grade, I guess, to match GH2 to 3.
If something like this worked, then I could make a LUT in Resolve and import it into FCP X with Denver Riddle's LUT Utility. Again, much more testing on this.
I've attached the GH3 and GH2 LUTs. These were made in white-balanced 5200k conditions. You can download the LUT Utility demo for free. Test it out and see if it works for you all.
Initial tests under different lighting conditions don't yield the same balance. But cool, nonetheless. A very easy way to use Resolve while editing and throw those looks back into your NLE.
Happy I got this far with it, but now it's time for a 2-day vacay! Talk to you guys when I get back.
 GH3 balanced for OneShot chart.png2588 x 1447 - 1M
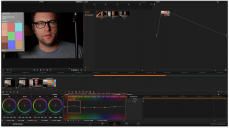 GH2 balanced for GH3.png2588 x 1447 - 1M
 GH2 vs GH3.png1317 x 742 - 1M
 GH2+GH3_LUTS.zip566K
 -
Ok, I was having too much fun. LUT Utility works great. Wow. Here was a test under different lighting conditions (top light fluorescents, around 5600K, I think). Cameras were balanced off the same gray card. They were very different beforehand. LUT applied to each clip and then a slight hue change added to the GH3 clip.
 GH2 with LUT applied.jpg2668 x 1528 - 424K
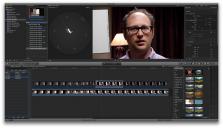 GH3 with LUT and Hue applied.jpg2668 x 1528 - 412K
 -
Very Nice @5thwall I'll give it a try.
Here is a video I made with 0,0,-5,-5. and an old minolta lens. This is my go to config with these lens. And I really think you loose less DR with contrast set to 0.
-
@yak the key is to make sure both or either (if just shooting one) the gh2 and 3 have been white balanced on the same source gray card. If you can, test it outdoors during the day or in tungsten light. If white balanced beforehand, you won't see much of a difference on the gh3 as it is just straightening out the primary and secondary hues.
My current feeling on this is that skin tones look good but the color hits all the yellow spectrum. So anything yellow goes toward orange. When I get back, I want to see if I can thin it out to just skin tones, which might be difficult to achieve on a global setting.
Also, I'm sure different lenses will provide different results. My hope is that a global hue change can compensate for that. If shooting a person, after applying the lut just try to line up the skin tones around the skin line.
-
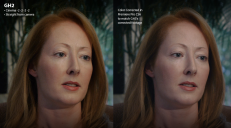
Here's some shot of a LUT I made myself with Motion for FCPX when I'm shooting Neutral 0 contrast. I recover just enough details il the dark areas look at the guy's hair. While getting more contrast in the neutral areas, (which I think is the biggest problem with the GH3)
And it removes the GH3 magenta cast.
A = without de "LUT" B = with the "LUT"
By getting more contrasty mid tones, you get the impression of better resolution too, I feel that the GH3 matches the GH2 now.
 2A.png1395 x 793 - 2M
 2B.png1395 x 793 - 2M
 B.png1409 x 792 - 2M
 A.png1408 x 792 - 2M
 -
shot with gh3 'scenery' all dialed down to -5 before and after color correction in Filmconvert.
 Schermafbeelding-2013-11-23-om-00.41.29.jpg2543 x 1174 - 240K
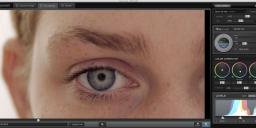 Schermafbeelding-2013-11-23-om-00.18.38.jpg2545 x 1172 - 299K
 -
I just discovered a reason for shooting with saturation -3 or better -4 in good light. Looks like the only way to balance greens with reds in post, otherwise, when shooting with saturation close to 0 reds are always on top in a fake way. Am I right??
-
This is the first thing I have filmed with the GH3. Lens is Oly 12mm f2. Filmed at 50Mbps IPB, 60p, with Natural -5's after grading I'm pretty happy with the look but it still feels like it could be sharper, and I have seen a few videos where vivid looks pretty good. Can anyone offer insight as to what the best straight out of camera profile is? Is natural with -5 across the board the best setting for grading this type of scene? Does this footage look sharp for the GH3? My GH2 seems a bit sharper.
Thank you!
-
@gh3pilot You are correct that the GH2 provides a sharper image. I did some side-by-side comparisons a few pages back on this thread.
I've been shooting Standard all 0's. I found that's the easiest way to match the GH3 and GH2 image. I use a color chart and Resolve to get the two in line. Then I save out the 3D lut and import into FCP X using LUTutility. Even then I have to tweak a little more with the color board.
Regarding the sharpness, I've tried a few things, from iResolution on high to sharpness all the way up. I think the sampling from the sensor is just different. When comparing directly to the GH2 image, yep, it's softer. But when you look at the GH3 image on it's own - not comparing - it holds its own.
-
gh3pilot First off, nice footage! As far as "best straight out of camera profile" it's hard to say simply because the answer is subjective. That comes down to personal preference IMHO. The one thing I can attest to is the -5 settings across the board. I've found that this is an accepted truth to shooting and grading regardless of what camera you use. Personally I shoot with Natural with all at -5. I use natural because (before setting all to -5) I point the camera at a scene and quickly run though all the presets. Natural has the least amount of contrast and saturation than any of the other settings. Then I take everything to -5 to flatten out the contrast and saturation even more. This gives me the most dynamic range to work with in post. The flatter the footage the more I'm able to really push and pull the color and contrast in post. See attached.... This footage was shot in my studio where the walls are warm yellow and I'm using tungsten lights (adding even more warmth). Makes getting a good white balance tough. As you can see the footage straight from the camera is still way Red/Yellow even with the white balance set to 3700K and saturation at -5. But because the footage is shot so flat (-5 -5 -5 0) I had much more "wiggle room" to get the graded/color corrected image below it. The good news to me is that the GH3 can capture the information. The blues are there... just need a little TLC and they'll reveal themselves.
 Screen Shot 2013-10-20 at 12.35.02 AM.jpg1751 x 1618 - 1M
 -
@maddog15 btw one thing i found is that i got much better skintones when i white balanced off a gray card. on my gh2, i can set the color temperature to whatever the light source is and the faces have nice dynamic range and color. but not so on the gh3. really have to dial it in with the white balance. i tested it out with a live scope and saw the difference. it's not always possible, of course, but time permitting, it's a good idea.
-
Regardless of all -5 the GH3 shoots really red as @starios has indicated before. It's always been really frustrating with skin tones. It became even MORE apparent when I did a multi cam interview using my GH2 as the close up B cam. Getting the two camera's footage corrected so the tone and color is the same when cutting from one to the other in the interview is proving to be.... challenging. Notice how far off the GH3 is before CC compared to the GH2. (Same white balance, both cams shooting 1080p 24fps, Same White Balance, SS and ISO, GH2 - Moon T5 @ 148Mb/s, GH3 - 50Mb/s IPB.
 GH2.png1348 x 748 - 1M
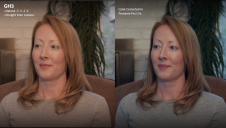 GH3.png1337 x 756 - 1M
 -
@5thwall Thanks for the input. I've not tried setting WB off a gray card. I'll give it a shot. Regarless whether I set via a white card or visually dial it way down it's still "red" for me. Do you think that snapping a card vs dialing down manually makes a difference? I mean that's what the camera's is doing when you shoot a white card to set the WB right? Perhaps I need to take a step back and start over....with a beginners eyes.
-
Here's where I am on the intro of a documentary I'm producing. 85% of the footage is GH3. It's a rough at this point and the link is private but I thought I'd go ahead and share it with this group. (FYI: The quick interview shots here are purposefully desaturated and blown out a bid for mood and visual tone. The actual interviews will be color corrected and true as apposed to graded for a stylistic look.)
Shot Natural -5 -5 -5 0. Edited and Graded in Premiere Pro CC. Music bed composed in Logic Pro X.
-
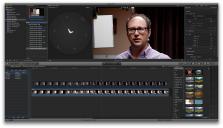
@maddog15 here is an interview I shot last week on the GH2 & GH3 at Standard 0,0,0,0 on both cams. I shot a DSC one shot chart before each interview. Balanced both cameras off the gray card on the back. Skin tones are much easier to match.
Used FCP X, wvl_RGBbalance, and the color board. I matched the RGB based on the 50% gray box on the chart inside FCPX with the wvl_RGBbalance effect (found on fcp.co). This brought the contrast levels pretty much in sync.
Then, I did a selective CC on his skin tone on the GH3 to add a touch more magenta (aka minus-green).
I've included stills of the corrected shots, as well as uncorrected shots of the charts.
GH2 lens: Panny 35-100 set to 2.8, ISO 200 GH3 lens: Voigtlander 25mm set to 1.4, ISO 200
 GH2 Intvw.png1197 x 1061 - 1M
 GH3 Intvw.png1197 x 1061 - 1M
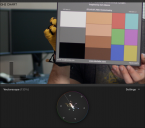 GH2 Chart.png1198 x 1060 - 1M
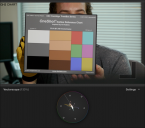 GH3 Chart.png1198 x 1061 - 1M
 -
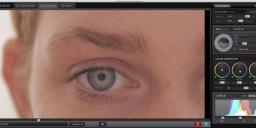
@maddog15 - I tested all this out with my Ikan D5W monitors which have built-in scopes. I used only 5600k lights (which, I discovered were actually closer to 5200k). Besides that messy little detail, I set the cameras to 5200k while shooting a gray card and also my face. I noticed that the colors were a bit off and flat. So I went into the color settings on the GH3 and added some magenta or red or whatever and got the vectorscope closest to the center when shooting gray. I re-shot the test and it looked much better.
But then I thought, hey, this is a LOT of work! I might as well just get a BMCC and shoot raw. And THEN I thought, uh, DER I could just balance this thing on a white card. Well, after lots of testing I determined that skin tones looked better when the cameras were both auto-balanced to a gray card.
I'm finding that the uncorrected GH3 image is more magenta than red. Skin tones are better reproduced. But they are still flatter out of the box than the GH2.
Also, the GH2 has a much sharper image, so I found that it looks better in closeup - my personal taste. Others may differ.
-
I don't have gh2 but watching some videos I see that gh2 with bandwidth hack has much better color than without hack, can you tell me why it looses sharpness when shoot with hack?
-
Four Roses Ultimate Egg Nog Recipe. Shot with GH3 for a Maxim Magazine web video. Standard -5 -5 -5 -5. Edited and graded in Premiere Pro CC. All sound design done in Logic Pro X.
-
@maddog15 looks great!
-
@5thwall Thanks man! (FWIW: Been meaning to respond to your last few posts. Sorry.... slammed with work and holidays. Great findings in your posts to say the least.)
-
I was surprised that artistic Mickey Mouse filter High Dynamic is usable in some situations. It increases dynamic range almost raw photo level. In my tests about 12.5 steps of dynamic range. It has very light tone curve and it is not good for normal shooting. But sunsets and city lights benefits of it.
Here samples:
 HighDynamic-mov.jpg1920 x 1080 - 316K
 Natural-5contrast.jpg1920 x 1080 - 283K


Howdy, Stranger!
It looks like you're new here. If you want to get involved, click one of these buttons!
Categories
- Topics List23,992
- Blog5,725
- General and News1,354
- Hacks and Patches1,153
- ↳ Top Settings33
- ↳ Beginners256
- ↳ Archives402
- ↳ Hacks News and Development56
- Cameras2,367
- ↳ Panasonic995
- ↳ Canon118
- ↳ Sony156
- ↳ Nikon96
- ↳ Pentax and Samsung70
- ↳ Olympus and Fujifilm101
- ↳ Compacts and Camcorders300
- ↳ Smartphones for video97
- ↳ Pro Video Cameras191
- ↳ BlackMagic and other raw cameras116
- Skill1,960
- ↳ Business and distribution66
- ↳ Preparation, scripts and legal38
- ↳ Art149
- ↳ Import, Convert, Exporting291
- ↳ Editors191
- ↳ Effects and stunts115
- ↳ Color grading197
- ↳ Sound and Music280
- ↳ Lighting96
- ↳ Software and storage tips266
- Gear5,420
- ↳ Filters, Adapters, Matte boxes344
- ↳ Lenses1,582
- ↳ Follow focus and gears93
- ↳ Sound499
- ↳ Lighting gear314
- ↳ Camera movement230
- ↳ Gimbals and copters302
- ↳ Rigs and related stuff273
- ↳ Power solutions83
- ↳ Monitors and viewfinders340
- ↳ Tripods and fluid heads139
- ↳ Storage286
- ↳ Computers and studio gear560
- ↳ VR and 3D248
- Showcase1,859
- Marketplace2,834
- Offtopic1,320


