It allows to keep PV going, with more focus towards AI, but keeping be one of the few truly independent places.
-
I got a good solution for everyone, I created a .cube LUT in after effects. If you are on fcpx you will need lut buddy to install this LUT in fcpx. It's 29$, but free trial with watermark.
Here is the .cube file!
 GH3 Red Channel.cube.zip107K
 -
This red channel thing makes sense to me too. I had figured this thing another way. I calibrated my high end plasmatv to show a little less red saturation and lightness. I thought that my plasma had bad calibration but I think this issue is a part of the matter. Thank you for your study.
-
@mat33 That should work, I tried it... and it seems I can only pick a color that is in the image not a general hue... my results have been very inconsistant that way.
@wgtwo I don't have premiere but it could work, In AE it's very easy: Hue/Saturation tool, select RED channel and down lightness by -25 or so.
-
Here is a quick test using fcpx colour mask -set to red with global saturation -10% and global exposure to -5% -probably could do with some fine tuning of mask and also adjustments.
 FCPX.jpg1920 x 1080 - 351K
 -
Looks as though something along the lines of this more or less does the job in Premiere (should work in FCP too): http://i.imgur.com/QUtE05F.jpg
More flexible than a Lumetri LUT etc. Can use it to further adjust skin tones after the fact.
-
@yak thanks and great work. To correct the red channel brightness in FCPX could you create a secondary colour mask set to red, and then adjust saturation/exposure just for that colour?
-
-
@mat33 I don't think it does.
-
@yak excellent research and findings, so valuable!
-
@yak do you think filmconvert, which to my understanding applies a camera and colour profile specific LUT (i.e GH3 natural) correct any red channel brightness issues that the GH3 might have?
-
@maddog15 Glad someone is going to use my findings... Very nice grade btw, I haven't been able to correct the issue with the RGB curves... it's really the red channel brightness the problem, when adjusting the RGB your changing the colors and not when you adjust the brightness.
Applied the change on your still... I'll be working hard to make some sort of a "LUT" for premiere and fcp.
 35d642292ee926dac8039db1e11349.jpg853 x 958 - 537K
 -
@yak Nice tests and research. I think you've really narrowed it down with the "red channel" findings. I use RGB curves in Premiere Pro as a final adjustment to compensate for the red channel. I have an interview to film in the next two weeks. Really looking forward to it while applying your latest advice. Thanks much. Attached are much better results on my end in this recent interview. Quite difficult at times as the GH2 and GH3 do not shoot the same at all. You'd think they'd at least be in the same ball park! Not true.
 Comparison1.jpg853 x 954 - 433K
 Comparison2.jpg853 x 958 - 409K
 -
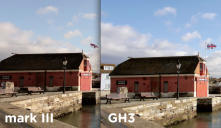
One last thing for today, I wanted to see how the GH3 with the hue adjustment would look next to a 5Dmk3. When I first saw that footage on vimeo I thought the gh3 had way better DR in the shadows... but look like the red channel of the GH3 is just to bright. When correct (just a hue brightness adjustment) The GH3 and MKIII look pretty much alike, only more details and resolution on the GH3.
 5DvsGH3.png1247 x 722 - 1M
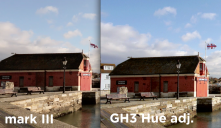 5DvsGH3hue.png1246 x 723 - 1M
 -
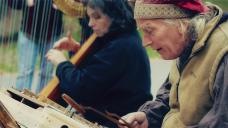
I'm obsessing with that discovery. I even took grabs from various videos on vimeo shot with the GH3 and applied the same hue change on the grab. It really gets the contrast of the skin back in play and on par with the contrast of the overall image.
First pic corrected
 H1.jpg1277 x 716 - 719K
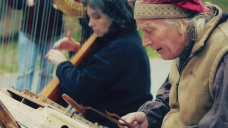 1.png1277 x 716 - 1M
 H2.jpg1278 x 720 - 746K
 2.png1278 x 720 - 1M
 -
@wgtwo if you do it after it will trow your grade off.
Here is a grade using natural -5 -5 -5 -5, I like the look the of the red channel, especially the skin tones at :47.
Dirty lens and shaky footage sorry...
-
Why after you do your usual grade? Surely you'd want to do it beforehand, in case it throws something out of whack?
-
It's not only a saturation ajustment, but a light ajustment on the channel also.
I can't do it with the "channel mixer" in motion, I can only do it with a keying tool, trying to key out some red, still it's not the same.
As for resolve you can do it, but for some reason only a small ajustment of the hue vs luminance trows everything off it looks like a a drawing in "paint"
Here's what I want, less saturation in the red and less brightness too. Before grading I want the most neutral image possible, and it's not the case coming out the gh3 as the red channel and the skin tones are glowing.
 nosatadj.jpg1270 x 714 - 957K
 satadj.jpg1270 x 714 - 939K
 -
ok, so its actually only a saturation adjustment for the red channel. Yes easy in AFX using hue/saturation on the red channel only. In FCPx you'd need a plugin to do this. Motion has a 'Channel Mixer' plugin which enables you to take colour out of specific channels so that might do the trick. Resolve would obviously do this no problems also.
-
@nobbystylus No it's not the same thing, if you grade with after effect you have to go to hue/saturation, chose only the red channel, and put in -25 to red lightness.
After you do your usual grade.
I'm working on a way to get the same effect in fcpx using motion but it might impossible.
-
when you say 'reduce the exposition' do you mean nudge down the highlights of the Red channel? With a basic RGB Curve tool i would roll off the top highlights of the RED channel, or with a colour wheel i would select the highlights and move it away from the red / magenta towards its opposite.
-
Have to correct something, it's not magenta, the problem is the red channel, to get the skin tones back you need the desaturate and reduce the exposition of the red channel.
-
@yak having quickly done a grade test on some footage, I definitely think that Magenta highlights need reducing for correct skin tones on GH3 footage. i still feel that some essential 'detail' is lost in skin tones colour when using -5s across the board so i've gone to -2s for now (apart from NR), but reducing Magenta Highlights by about 7% has certainly brought back a better looking skin tones for me.
-
Video test GH3 natural -5 -5 -2 -2 grade with davinci resolve 10
please comment anything
-
@flablo Never saw that post before, makes so much sense now... The magenta would carry more noise being the most luminescent. For my point of view, I cracked the skin tones issue. I've been applying the same hue brightness setting on lots of different footage, always came up with a more uniform and natural looking image (not only in the skin tones)
@wgtwo I'm sure it will better the rest of the image too
Here one last test, one a "red room" the wood having lots of the red hue. Look at A the skin tones being more natural looking and B the way the light falls off very nicely on the corrected image.
first image corrected, second straight from cam.
 21.jpg1374 x 776 - 1M
 22.png1374 x 776 - 1M
 Graded A.jpg1382 x 773 - 1M
 Graded B.jpg1382 x 773 - 1M
 -
Hm, I'll trawl through my footage and find some stuff to test this on myself. A little worried that it might throw the rest of the image out of whack, but I'm guessing it'll be fine.


Howdy, Stranger!
It looks like you're new here. If you want to get involved, click one of these buttons!
Categories
- Topics List23,992
- Blog5,725
- General and News1,354
- Hacks and Patches1,153
- ↳ Top Settings33
- ↳ Beginners256
- ↳ Archives402
- ↳ Hacks News and Development56
- Cameras2,367
- ↳ Panasonic995
- ↳ Canon118
- ↳ Sony156
- ↳ Nikon96
- ↳ Pentax and Samsung70
- ↳ Olympus and Fujifilm101
- ↳ Compacts and Camcorders300
- ↳ Smartphones for video97
- ↳ Pro Video Cameras191
- ↳ BlackMagic and other raw cameras116
- Skill1,960
- ↳ Business and distribution66
- ↳ Preparation, scripts and legal38
- ↳ Art149
- ↳ Import, Convert, Exporting291
- ↳ Editors191
- ↳ Effects and stunts115
- ↳ Color grading197
- ↳ Sound and Music280
- ↳ Lighting96
- ↳ Software and storage tips266
- Gear5,420
- ↳ Filters, Adapters, Matte boxes344
- ↳ Lenses1,582
- ↳ Follow focus and gears93
- ↳ Sound499
- ↳ Lighting gear314
- ↳ Camera movement230
- ↳ Gimbals and copters302
- ↳ Rigs and related stuff273
- ↳ Power solutions83
- ↳ Monitors and viewfinders340
- ↳ Tripods and fluid heads139
- ↳ Storage286
- ↳ Computers and studio gear560
- ↳ VR and 3D248
- Showcase1,859
- Marketplace2,834
- Offtopic1,320


