-
Hello guys and girls. At first just want to say that if someone feels that this is self advertising feel free to delete this thread or move it where it is appropriate. After some thoughtful moments I decided that it is interesting for you to see, as it was my research in making the digital video look as more as film as possible and i wanted to share what i came up with.
Since the introduction of Digital Cameras it became easy to film and to learn making indie films, you just grab your camera and experiment with it. However the look of the digital footage(even color corrected and graded) still leaves amateur and domestic camera impression, the digital footage doesn't look as good as straight out of the film camera.
What is it about film that people like so much? Simple - it's color. Maybe some will say dynamic range, some will say the motion and flares. But the best feel about the film is that it looks unique and cinematic. People say that film has a unique color processing that can never be achieved by a digital camera. I take a more scientific approach and after many researches I found some breaking points in simple After Effects effects profiles and LUT usabilities and achieved unique fake color caps which gives that beloved film feel. The limited color brightness is one of the most important things when trying to emulate film look.
The hardest part in grading Digital footage is that it needs to be RAW or LOG, that means a flat footage taken out of expensive cameras. Then it is graded digitally by shifting colors of keyed parts, adding tints and editing curves. Amateur and Indie filmmakers sometimes doesn't have all those REDs and Black Magics and ARRIs and other beautifully named machines and anyway they want to look pro, so what we all indie filmmakers do is not called grading we just do the color correction - just create some interesting looks by shifting and tinting video. But there is certain points and colors that will leave that digital and domestic feel in the DSLR video even when it is color corrected. The colors overbright, and oversaturated areas doesn't change with color correction. Many of indie filmmakers lowers the saturation, but what happens is that they desaturate all areas of the footage so colors in shadows becomes undersaturated. I tried to fix it by collecting some unique braking points of Adobe After Effects CS6 as known as ColorGhear techniques but instead of doing it manually I tried to automate the process. The process is not grading nor color correction - it's something very different and unique and is used as a simple preset for After Effects CS6, which will be available soon for just a few dollars ($5-$10).
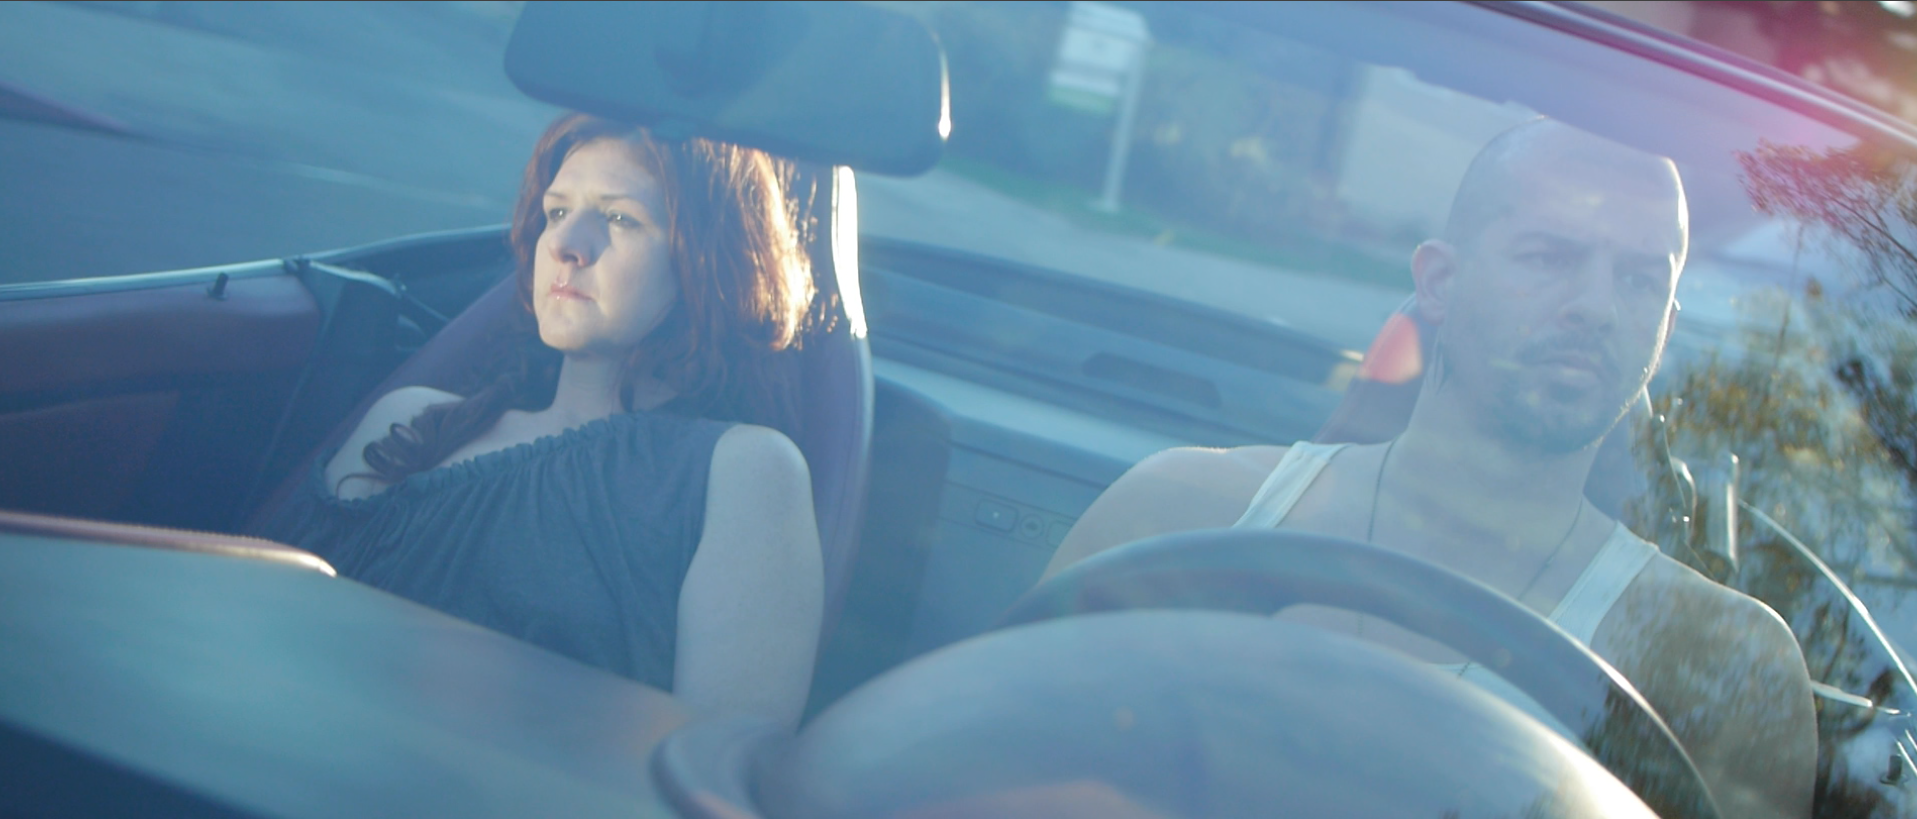
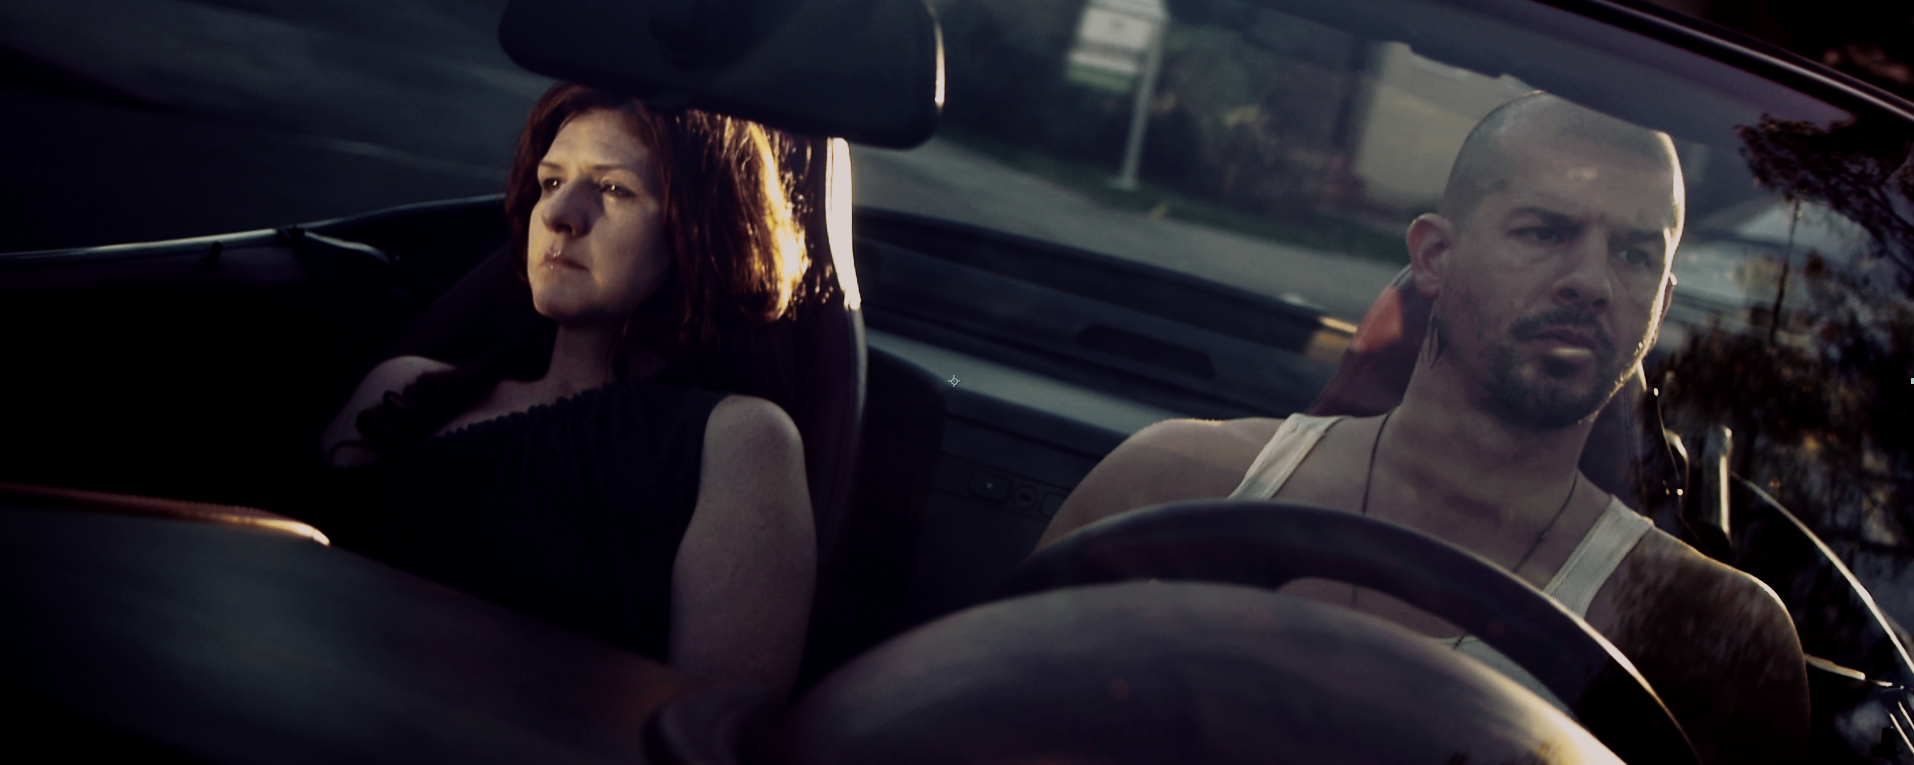
So I made some tests. At first I didn’t even think that I would come up with something interesting but now I actually need your opinion, it is usable? Does it really make a difference and most important – does it make the footage look like FILM (kodak). It does certain things to a simple footage: adds color bright limit, adds saturation limit ONLY to oversaturated areas, increases saturation to undersaturated areas, makes overbright colors(not whites) more visible and appealing on screen (for human eye).
There was a guy who tried to create and then disappeared his plug-in known as "Filmvision plug-in" I think he used similar techniques.
What do you think ?
Also I will make a video with just original color limiting process because the current video also affects the overall saturation and makes it more blockbuster Blue Orange type of thing.
-
Film Convert (http://www.filmconvert.com/)
Done.
-
I really hope the people who respond to this thread do so without being jerks about it. If you want people to join and "stay" as a part of this community then try to keep it civil.
BTW @cyzercraft @BurnetRhodes does have a point with Film Convert. It's basically doing the same thing (and more) than what it seems your idea is. IMO if you can match what that does then the real big difference would be price. I admit though...I have not tried either.
-
Not a bad start, it's definitely got something going for it, but I feel the yellow and amber tones are not very pleasing to my eye.
Other options include the Osiris LUTs, which come in log and rec709 flavours (rec709 being the ones you'd use with DSLR footage). Also, Juan Malera has some nice Kodak print film stock emulation LUTs too, and they are free. You might want to give them a shot.
http://juanmelara.com.au/print-film-emulation-luts-for-download/
Really though, getting as close as possible to the look of film is more than just a plugin or LUT, I recommend spending a little time in Resolve working on some power looks built off of a LUT to get the best results.
Some people swear by FilmConvert, it IS good, but personally, I prefer a little more control, so I like Resolve and some LUT options to build from.
-
Film Convert isn't a replacement for grading. You can line up ten films shot on Kodak 500T and see ten completely different looks.
Getting digital imagery in the realm of looking like it originated on film could be the end game, going for a "one light" look but there's nothing at all precluding you from running a Film Convert pass and then crafting the imagery from there in Resolve and any and all grading techniques there are.
After all, modern DI techniques were first used on scanned film. What Film Convert does is take the subjective guesswork out of where most of your effort will be spent, letting you instead focus on your creative grade. It's not an either-or.
-
That's a good point Burnet and an interesting workflow, I haven't spent too much time evaluating any destructive nature of filmconvert, but one of the reasons I prefer to use film emulation LUTs in Resolve on a node close to the end is I can mitigate some of the image destruction from the filmstock emulation on nodes before it. Applying Filmconvert first, then grading from there doesn't really give me that option, though, as I said, I haven't evaluated FCs destructive nature, so maybe it's a moot point.
edit: I didn't realize you could use FilmConvert INSIDE Resolve, I thought it was just standalone or Adobe plugin (which has been my experience with it). Being able to use it inside Resolve changes my perspective on it for sure.
-
Also, If you're using it in a floating point workflow there's nothing destructive. Destruction would realistically only be an issue if you were mapping from high to low, not from low to high, in terms of fidelity and gamut. This transformation could highlight relative limitations in the source material in the process but that's not really destruction and you can work to de-emphasize these artifacts when/if they present themselves (grain helps, though their defaults are generally too strong and too large).
The folks at Film Convert are trying to present their standalone as a viable alternative to doing your total grade but after some experimentation I've found you get much better results from their software when used as a plug-in within a full float environment. Skies show a marked difference in quality. The standalone, to me, is only useful at quickly previewing different looks and not much more.
-
Thanks guys, I will try those osiris LUTs, also will do some more research. You see my main target is to make it all possible for amateur users who cant purchase resolve or doesnt know how to use luts or whatever stops them from using those PRO grading techniques. I try to make it all possible inside AE without external plugins - simply using ffx file. Sure I know its much different and not as versatile as filmconvert, and it's great! I am not trying to invent another bicycle I want to give people a possible way to make footage look cool without shooting it as flat as possible and without knowing how to use resolve or anyother external coloring engine.
-
@BurnetRhoades Yes, the skies is where i noticed I was losing information in the standalone. I'm excited to give it a shot as a plugin to see the differences. @cyzercraft Full Resolve may be too expensive for hobbyists, but you could always try Resolve lite, it is free
-
Well, there likely isn't anything being done in the Film Convert plugin that you couldn't do in an AE pre-comp. Same goes for Magic Bullet, in fact, I know MB was all prototyped in AE as some very complex composites, including all the now more-or-less defunct operations that cleaned up DV colorspace artifacts, did the 60i to 24P conversion, etc. Once you get the process and formula down, however, deployment becomes much more practical if you can reduce all that you did to streamlined code as a plug-in.
AE isn't very efficient, after all. Quite a few steps might include an AE operator where only one of a dozen controls is modified from its default, but the whole thing had to be loaded and processed. This is how the AE version of Shian Storm's ColorGHear functions. I use it a lot but I bet his Davinci version is a lot faster and more efficient doing the same exact things.
What Film Convert also did was separate the objective from the subjective as much as they could. You can't really make something that "emulates film" when you use finished film as a reference. That's a conflation of the inherent qualities of the film stock, possibly one or more film-to-film optical processes, color timing and grading and the perceptual differences inherent in each type of exhibition.
Removing all of the playback variables, you still are likely trying to come up with a formula that is tainted by the colorist and DP. For instance, above I mentioned Kodak 500T (Vision3), a really popular stock with lingering film production. Take a look a The Place Beyond the Pines, The World's End from earlier in the year along with the recent The Secret Life of Walter Mitty and the new Coen Bros film Inside Llewyn Davis. They all used the 500T stock. Hell, just compare any of the others to the Coen Bros film, or just compare that to The Place Beyond the Pines.
Where does the look of the Kodak stock (not to mention their different lens packages) end because I only see the work of the colorists + DP and they all look entirely different. You just can't build a meaningful "look" even for a single film stock based on observing the end results. You can emulate specific movies, however, hence Magic Bullet Looks and DaVinci Power Grades.
That's why the Film Convert folks based their conversion on controlled photography of known color and value scales, calculating the delta between results from target film stocks and popular camera + profile combinations. After that the look is up to you.
edit: Examples
 Ben-Mendelsohn-and-Ryan-G-025.jpg640 x 360 - 83K
 PHPQEKgpDkz5TR_1_m.jpg450 x 300 - 37K
 the-place-beyond-the-pines-252.jpg1389 x 579 - 110K
 the-place-beyond-the-pines-1024.jpg1024 x 576 - 470K
 tptpttpp.png720 x 304 - 268K
 16764841001_2710211240001_inside-llewyn-davis-carey-mulligan.jpg656 x 354 - 149K
 DKR-30304r.jpg570 x 381 - 77K
 Inside-Llewyn-Davis.jpg600 x 300 - 43K
 InsideLlewynDavis_gaslightcafe_620.jpg620 x 350 - 17K
 Localrevibe-InsideLlewynDavis994-636.jpg1248 x 702 - 87K
 Oscar-Isaac-in-a-still-fr-008.jpg460 x 276 - 24K
 -
@JuMo yes, I was rather shocked using it on some Driftwood Moon Trial 3 footage some months back. In the standalone it just tore the skies up, introducing weird discoloration. The same footage, in After Effects using a linear-float, color managed project, looked good and had no such problems. The skies didn't look like a bad DVE effect anymore.
-
Here's some more test ;))
-
Some of those are pretty "iffy" but there were some nice, interesting looks in there.
-
LOG grades differently from rec709. Osiris also comes with a rec709 to LOG conversion LUT. To my eyes, a direct rec709 film LUT seems more intense than the same LUT designed for LOG which is applied downstream from a rec709 to LOG conversion.
Osiris LUTs do a lot with skin tones, they also change the DR and create a smoother highlight roll off which is another characteristic of film.
These are just starting points of course, for further grading.
-
Looked around for rec709->log LUT's ... didn't find any, really. Did find a number of comments in various cine sites strongly suggesting NOT converting to log just to have to convert back to rec709 for delivery ... different strokes for different folks, I guess ...
Neil
-
@rNeil Here's a video2log LUT for download: http://juanmelara.com.au/downloads/video2log_lut.zip
Conversion to LOG just expands the color space for grading, some LUTs only work on LOG footage. As with anything, YMMV
-
@cyzercraft I'm buying it! Great job in my opinion. It fixes that "digital color cast" I sometimes find annoying with my GH2 and adds some good vibrancy. Seriously, let me know and I'll be glad to purchase. My only concern is that it could "fuzz" when applied to low light footage, just like some extreme secondary color correction effect. If you have more low light footage samples that would be great. Are they are made only for GH2 or do they come in "GH3 flavor" also?
-
@Mistas something "odd" came out that LUT, is Melara's? I compared it with the one I posted in @maddog15 's GH3 Best Video Settings thread, checked it also in AE with different bit depths. At 8 bits gave same lines, with 16 and 32bpc was not noticeable, worked best with 422. In photoshop was like that despite any colour depth; it's like it had the shadows pushed too hard. So to be in the safe side, I'll venture to say IF to be used in AE, only in 16 or 32bpc, do not use it in photoshop, davinci dunno, probably is where would work best

-
@maxr I believe that LUT is designed for Davinci - which explains the bizarre results!
-
I will probably start a shit storm here, but with the exception of BMD and other raw camera formats which are much easier to remap, remapping linear video into a log type environment is as much an art as a science. I know cuz It's been my job to explore this for the past 8 years.
The thing to keep in mind, and I did this with CGP, is that different film emulsions respond differently to each color channel of light with a different curve. And so the process is much like the process of audio sampling. To accurately remap the "line" of your video to this curve you will need somewhere between 16-32 sample points for each channel along each channel's curve, and a way to squish your original video into a faked log environment and then "project it onto" or remap it along the various curves.
This is how my LUTs work, and how Film Convert works (behind the curtain). I can't say which is better, or easier. I'm not here to sell you anything. only to tell you, that in order to do it accurately by hand you'll first need to know what those curves are, what their "inverse" is, and how each channel correlates not only to linear light, but to the unique color channel response of your particular camera. And then to finally bring them back into "white balance" because all of this will cause a noticeable color shift. And that's the magic ingredient. That is the hardest thing to accomplish. And the most misunderstood. Different film stocks will color your images differently. Fuji stocks sometimes produce ultra pink skin tones... like fuschia, and bluer than blue skies. Kodak stocks deliver a more red tone on the same skin without the blue burst, as I call it...and the idiosyncrasies go on and on. Or you need a shortcut, where someone else has figured this out and crammed into a LUT or series of LUTs like I have with CG Pro. And/or film convert. Osiris is a joke.
BUT
Be aware that most simple solutions are not gonna get you there. In my experience you need to "develop" your images in a 3-4 step process just like developing film, before you get an accurate result. And then there's grain which is a whole other can of worms.
http://www.flickr.com/photos/76276262@N04/sets/72157632784156675
-
@shian that didn't sound too controversial to me
-
Oops, sorry. That's cuz I left out the snarky remarks about how most of what has been discussed here is just people talking out of their depth (sometimes referred to as talking out of one's ass)... I decided to be civil for a change. I apologize. I don't know what came over me. It won't happen again. :)
-
Ah, well, hopefully I wasn't one of the intended targets ;)
edit: since you mentioned it, it's too bad it looks like Fuji is getting out of the game. Whenever I see it picked over Kodak stock it's almost always used to highlight the differences. Like how it turned dirty subway flo lights into swimming pool blue-green for the American Hustle production. More and more we're going to see films shot on film using what they can get versus what they'd rather, in some cases.
I hope some fine fellows are busy mapping all those curves before there's no more film to measure.
-
@BurnetRhoades - [copied from a response to a PM from another user] LOL no worries - It wasn't directed at anyone in particular, it's just a subject where everyone is looking for an easy fix, and everyone has opinions on how best to do it, but I did it at the highest level possible. I worked at Lowry Digital for 3 years as a Film Restoration Specialist and a Colorist where part of my daily duties was research and development for processes such as these.
Unfortunately those processes are patented by the company (Now Reliance Mediaworks) and I can't use them, so I had to go back to square one and develop my own processes. The rough basis of which I laid out in the post. I laugh at all those Osiris LUTs and people saying, "just download this Kodak LUT and apply it and it'll look like film." It won't. The footage has to be prepped, then remapped, then graded. It's very much like developing film. There is no other way. Film Convert does 1 and 2 for you. CG Pro gives you a lab in which to do all 3 in a way that gives you custom control over the "development" process from start to finish.
Reading that thread just made my roll my eyes. And it's a little like listening to a bunch of pre-teens talking about the best way to please a woman, when they've got no idea what the clitoris is, or where to even begin looking for it.
-
Agreed for the most part. I think it's the remapping part that most don't understand or the need to have a reality-based, non-subjective target or it's all just a lot of wanking.
The mechanics of Film Convert (and I'm assuming the CGPro mappings) are like a simplified, mini version of the ACES workflow. Both the digital camera + profile mappings as well as the scanned film stocks could be considered analogous to IDTs but rather than do the RRT to ODT through ACES color steps it just does the RRT from one IDT to a second, essentially, substituting the second IDT for ACES/OCES and without a proper ODT, leaving that up to the host application and operator.
I'm hoping they see the benefit of possibly migrating their work to an ACES compliant workflow in the future rather than building these little black boxes that try to do too much inside one tool. There standalone, for example, delivers lesser results than the plugin because it doesn't operate in a linear-float colorspace like you can within After Effects (used in an editor the results aren't as good also).
-
For actual results here is a comparison of raw GH2 footage shot in available light at golden hour with Pancake 20mm lens - with different film stocks applied - Vision 2 and the other with EXR. Created using the remapping process I discussed earlier, and then pushed down a bit to get the blacks to be inky.

 Screen Shot 2013-02-16 at 1.42.01 PM.png1917 x 819 - 2M
 Screen Shot 2013-02-16 at 1.42.41 PM.png1919 x 819 - 2M
 Screen Shot 2013-02-16 at 3.32.10 PM.png1914 x 765 - 1M


Howdy, Stranger!
It looks like you're new here. If you want to get involved, click one of these buttons!
Categories
- Topics List23,992
- Blog5,725
- General and News1,354
- Hacks and Patches1,153
- ↳ Top Settings33
- ↳ Beginners256
- ↳ Archives402
- ↳ Hacks News and Development56
- Cameras2,367
- ↳ Panasonic995
- ↳ Canon118
- ↳ Sony156
- ↳ Nikon96
- ↳ Pentax and Samsung70
- ↳ Olympus and Fujifilm101
- ↳ Compacts and Camcorders300
- ↳ Smartphones for video97
- ↳ Pro Video Cameras191
- ↳ BlackMagic and other raw cameras116
- Skill1,960
- ↳ Business and distribution66
- ↳ Preparation, scripts and legal38
- ↳ Art149
- ↳ Import, Convert, Exporting291
- ↳ Editors191
- ↳ Effects and stunts115
- ↳ Color grading197
- ↳ Sound and Music280
- ↳ Lighting96
- ↳ Software and storage tips266
- Gear5,420
- ↳ Filters, Adapters, Matte boxes344
- ↳ Lenses1,582
- ↳ Follow focus and gears93
- ↳ Sound499
- ↳ Lighting gear314
- ↳ Camera movement230
- ↳ Gimbals and copters302
- ↳ Rigs and related stuff273
- ↳ Power solutions83
- ↳ Monitors and viewfinders340
- ↳ Tripods and fluid heads139
- ↳ Storage286
- ↳ Computers and studio gear560
- ↳ VR and 3D248
- Showcase1,859
- Marketplace2,834
- Offtopic1,320


