
It allows to keep PV going, with more focus towards AI, but keeping be one of the few truly independent places.
-
The reality of an independent film maker is -- 'it's always harder than it looks'!
How many times do we watch a scene and think - they're lazy - I can do that, it's just package/tool/software/technique.
I find myself thinking the same thing, then I try to get the same results (of course with a lot less resources). Then I find this stuff is hard!
It's not the same as photography, where getting professional results is so much easier. With video it's a case of the weakest link is the one that stands out most. For example you get a great chroma key and you're really proud of the blend on the hair line - then you notice that yellow logo has become a brown logo.
I thought I'd use this post to document some the processes that I'm going through in order to build skills, sometimes a video on PV just unlocks an idea - other times it's a five hundred hour journey. This is where Yak shaving comes in, you set out to do a specific thing, but along the way you end up going down so many sub-tasks that one of them is bound to be shaving a yak.
I'll start with Camera Tracking. So far I've put about 20 hours in, including grabbing various clips to experiment on. Of course it's not just the tracking but the integration of the new objects afterwards.
Anyway, here's the very first attempt:
It's 12 seconds and it's rubbish, but it's enough for me to learn about:
- setting up the tracking points
- what a point cloud is and why some points are pointless
- setting the camera parameters to give the tracker a lock onto the physical measurements
- setting up and moving the ground plane
- making the ground plane invisible (and later making just the shadow of the object visible)
- adding an object in the 3D space
- solving, re-solving (*N) and exporting the rigs
But perhaps mostly, so far it has taught me that long clips are a double extra triple piggy to track.
-
Yesterday, the Beta6 of Resolve15 was released. It seems that this version is faster and more stable. I've just done a couple of hours without a single crash.
It also means that the cycle time is faster, so more chances to find the right settings.
The big news here is that I finally got a solve that was below 1 pixel error (0.8) so far the best I'd managed was 8 pixels.
Here's some screenies:
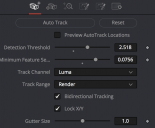
 Screen Shot 2018-07-06 at 19.20.09.png760 x 626 - 84K
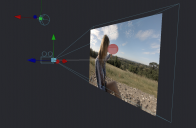
 Screen Shot 2018-07-06 at 20.02.05.png1170 x 764 - 512K
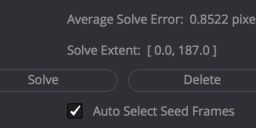
 Screen Shot 2018-07-06 at 20.06.20.png644 x 248 - 31K
 -
And here's the rendered video:
From the screenies above you can see that getting the perspective right is going to be an issue. The back plate is not at infinity. The sphere can't really go past the back plate (or can it -- will have a go shortly!).
Now I'm beginning to see which shots will work with this approach.
-
More Yak shaving:
This time with a change from Cheetah3D to Blender. The main reason being that I can have a render farm to work off-line. This improves my iteration time, which was in days, is now overnight.
I can see how a render is going by reviewing the individual PNGs. This helps with composition and materials, but not so much with physics, which is why reviewing a full render at normal speed gives you the right impression.
Blender is a journey, out of the box it works, but there are many add-ons that need to be enabled to get anywhere near a filmic effect. You also need to understand that there is a choice of three rendering systems by default and about 6 available as add-ons. The choice of renderer affects the choices you can make in materials.
My favourite resource has been the BlenderGuru YouTube channel. I try to do an hour a day on Blender, however I managed to get 16 hours over two weekends which really helped to get me in the flow.
I'm using the cycles render engine and in some places PBR materials like 'Car Paint' which look beautiful. It took me a while to realise that you need to set the colour space in Blender to get a filmic affect -- and that was another add-on.
Blender can be Python driven -- this is double extra good! In means that I can override all the settings in a blend file for the render farm. So if I submit a blend file with low quality or the wrong sample side or light bounces set too low, the python script will correct these. This means I can work with a fast interface and still run high quality renders in batch.
I've bumped up against some limitations, for example 5 million ngons with all the quality settings high will cause a seg-fault. The UI can crash occasionally. I've ordered more memory for the render farm system!
Here's a work in progress:
Howdy, Stranger!
It looks like you're new here. If you want to get involved, click one of these buttons!
Categories
- Topics List23,992
- Blog5,725
- General and News1,354
- Hacks and Patches1,153
- ↳ Top Settings33
- ↳ Beginners256
- ↳ Archives402
- ↳ Hacks News and Development56
- Cameras2,367
- ↳ Panasonic995
- ↳ Canon118
- ↳ Sony156
- ↳ Nikon96
- ↳ Pentax and Samsung70
- ↳ Olympus and Fujifilm101
- ↳ Compacts and Camcorders300
- ↳ Smartphones for video97
- ↳ Pro Video Cameras191
- ↳ BlackMagic and other raw cameras116
- Skill1,960
- ↳ Business and distribution66
- ↳ Preparation, scripts and legal38
- ↳ Art149
- ↳ Import, Convert, Exporting291
- ↳ Editors191
- ↳ Effects and stunts115
- ↳ Color grading197
- ↳ Sound and Music280
- ↳ Lighting96
- ↳ Software and storage tips266
- Gear5,420
- ↳ Filters, Adapters, Matte boxes344
- ↳ Lenses1,582
- ↳ Follow focus and gears93
- ↳ Sound499
- ↳ Lighting gear314
- ↳ Camera movement230
- ↳ Gimbals and copters302
- ↳ Rigs and related stuff273
- ↳ Power solutions83
- ↳ Monitors and viewfinders340
- ↳ Tripods and fluid heads139
- ↳ Storage286
- ↳ Computers and studio gear560
- ↳ VR and 3D248
- Showcase1,859
- Marketplace2,834
- Offtopic1,320


