-
Years in the making, this technique works in almost every situation and makes almost everyone look great. That’s about the best you can hope for when shooting talking heads on a tight schedule.
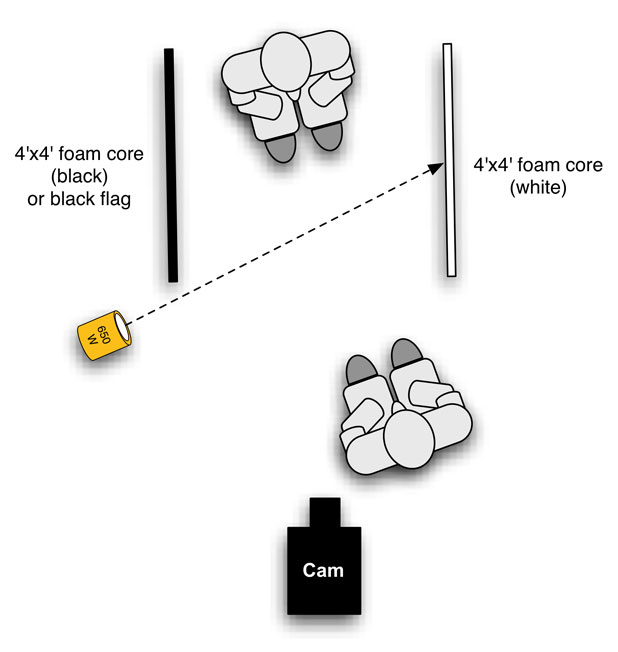
Yes, it looks simple. Deceptively simple. Believe it or not, it takes a long time to learn to light so simply. There was a time when I used every light on the truck (or the van) on my shoots, but as I’ve matured the number of lights I use has dropped dramatically.
That’s very important, because it’s not enough to be able to do great work as a DP. You have to do it in a very short period of time. Creating the prettiest lighting setup in the world doesn’t help anyone if it takes so long that the director only has five minutes to get what they need. Lighting is important, but it’s not the most important thing.
The seed of this idea formed during my search to make talking head interviews interesting for me to shoot. The bar for corporate marketing videos is often quite low, so I found myself able to experiment with lighting setups without getting in trouble for it. If I couldn’t find a fast, pretty way to light something to my satisfaction most of my corporate clients were still very happy with what I came up with, so I took those opportunities to examine what worked and what didn’t when lighting a human face under unpredictable circumstances. (Anyone who shoots these kinds of corporate projects knows there’s usually no scout and no technical pre-production at all: you show up, see the locations for the first time, and make the most of the hand you’re dealt.)
Read the rest at: http://provideocoalition.com/index.php/aadams/story/the_simplest_fastest_interview_lighting_setup--ever/ -
Thanks, some good tips in here.
-
Can you put up some more advanced set-ups? Like with a soft box, or back light?
-
I love me some negative fill. That set up sorta depends on the bg, though...
-
Tip my hat to him.
This setup would need a short tele lens like 85/100/135mm on 2x crop.
I guess this is the smile line portrait. The nose shadow falls along the smile line. Quite stunning.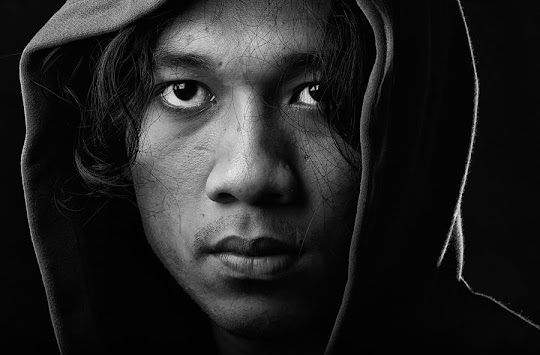
-
@disneytoy you want more interview setups? What kind of stuff are you doing?
here's one: (sorry no drawings or images) classic fashion/glamour portrait look (also, funnily enough rap video look... go figure) is a softbox or octabank smack over the lens. High, frontal. Get it high enough that you start to feel the cheekbone shadows and the eyebrow shadow cuts into the eyes, but not so much that you kill the glint in the eye from that light. If you go higher and get a more contrasty shadowy dramatic look, then you might want to put something smaller over your lens to put the glint back in the eye. Dead center, high. Works great on people with pronounced cheekbones, good skin, good makeup. Don't do it to anyone whose eye-areas are starting to show the years.
For that, I love my joker 800 witha 5' octaplus on it.
So basic. They ALL do it. source gets bigger and smaller, use/don't use backlights, use/don't use negative or positive fill, but that's the basics of glamor lighting. Big soft bag over the camera.
If you go higher and get a more contrasty shadowy dramatic look, then you might want to put something smaller over your lens to put the glint back in the eye. keep the intensity down on the smaller eyelight. it can be hard, don't worry. If you get the intensity right, you won't really see it except for a small ping in the eye. You will see the shape of the light in the eyeball, so I don't recommend a kino. Square or round source.
So proceeding from there, go with two matched backlights, one on each side. soft or hard, your pick; hard can make some distracting glares on shiny hair or shoulders, but it's much easier to cut and control off of your lens etc. IF yo're going hard, lekos or dedos with focal spots are always winners because you can slice them so precisely with no grip equipment. Soft can be a little nicer; not so intense. be aware that a primary purpose of backlights is just to separate your subject from the background, not necessarily make things gleam. you can get good separation also by lighting the background right behind an unlit part of the subjects head, especially if there is color contrast. Black hair on black bg, you pretty much have to light the hair.
Then go decorate your background with whatever you have left.
Found an example: 4k Aurasoft over the lens, about 8' high, (could have gone a little higher), hard leko backlights. No fill.
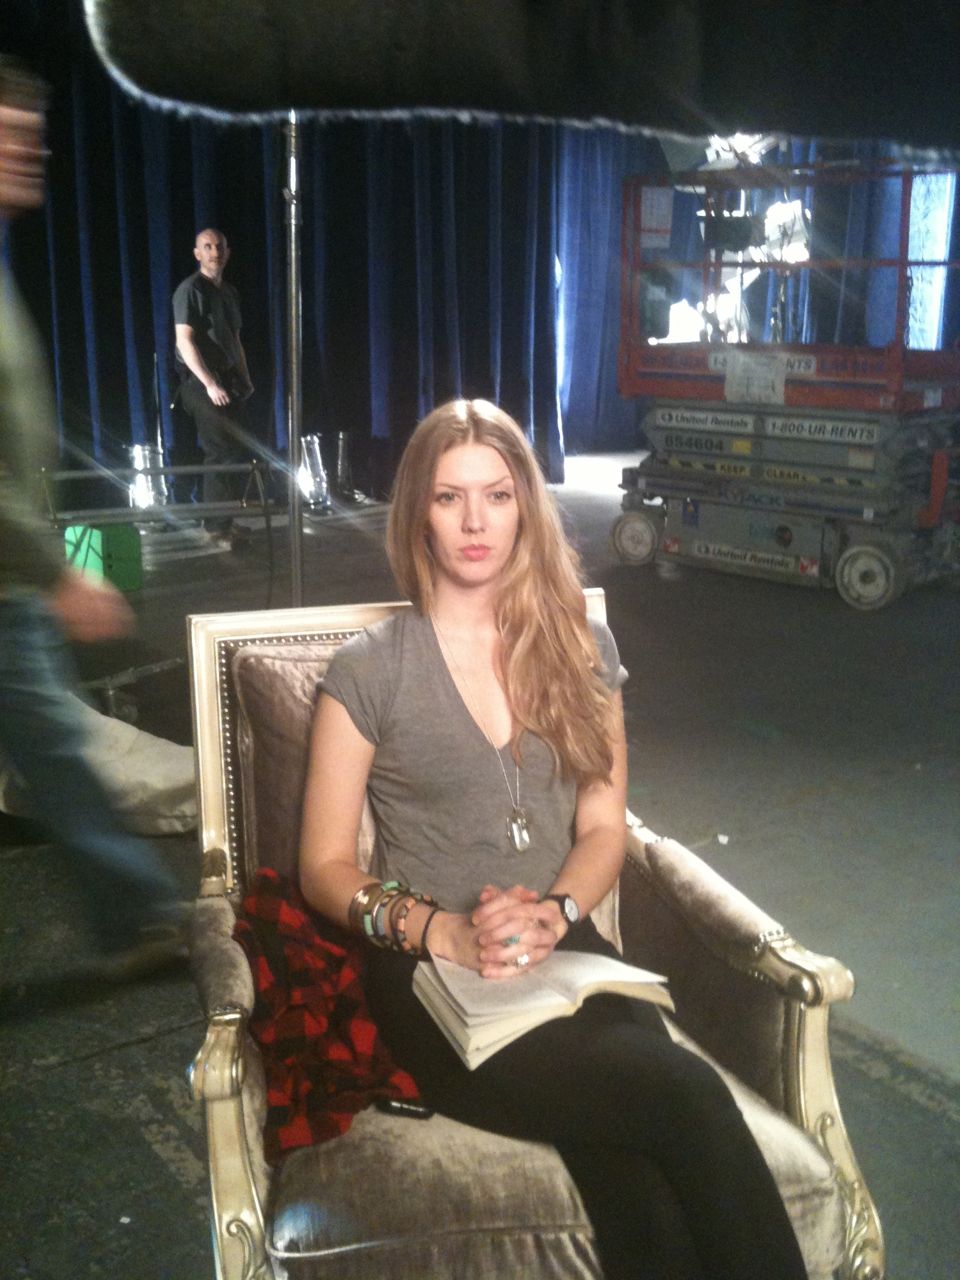
 stand in for model.jpg480 x 640 - 50K
 standin lrg.jpg960 x 1280 - 161K
 -
that was an iphone crappy photo.


Howdy, Stranger!
It looks like you're new here. If you want to get involved, click one of these buttons!
Categories
- Topics List23,992
- Blog5,725
- General and News1,354
- Hacks and Patches1,153
- ↳ Top Settings33
- ↳ Beginners256
- ↳ Archives402
- ↳ Hacks News and Development56
- Cameras2,367
- ↳ Panasonic995
- ↳ Canon118
- ↳ Sony156
- ↳ Nikon96
- ↳ Pentax and Samsung70
- ↳ Olympus and Fujifilm101
- ↳ Compacts and Camcorders300
- ↳ Smartphones for video97
- ↳ Pro Video Cameras191
- ↳ BlackMagic and other raw cameras116
- Skill1,960
- ↳ Business and distribution66
- ↳ Preparation, scripts and legal38
- ↳ Art149
- ↳ Import, Convert, Exporting291
- ↳ Editors191
- ↳ Effects and stunts115
- ↳ Color grading197
- ↳ Sound and Music280
- ↳ Lighting96
- ↳ Software and storage tips266
- Gear5,420
- ↳ Filters, Adapters, Matte boxes344
- ↳ Lenses1,582
- ↳ Follow focus and gears93
- ↳ Sound499
- ↳ Lighting gear314
- ↳ Camera movement230
- ↳ Gimbals and copters302
- ↳ Rigs and related stuff273
- ↳ Power solutions83
- ↳ Monitors and viewfinders340
- ↳ Tripods and fluid heads139
- ↳ Storage286
- ↳ Computers and studio gear560
- ↳ VR and 3D248
- Showcase1,859
- Marketplace2,834
- Offtopic1,320


