-
I said here what color tools I need for a log space.
-
it also needs to have the right kinds of color tools for dealing with a log space, namely, global offset, individual R, G, and B channel offsets with fine granularity, and contrast as a straight-line slope with the right pivot.
By "global offset", I take it you mean master pedestal? That and individual RGB pedestals wouldn't be a problem, but I can see an issue with contrast controls. Color Finesse's Contrast control uses a non-linear S-curve and its linear Gain control always pivots at zero.
-
By offset I mean adding a number to the R, G, and B channel sample values - individually for white balance, or the same number to all three for exposure compensation. White balance needs fine granularity, like 0.001. 1% is way too coarse. And yes, there's an issue with contrast. You might think contrast is a simple adjustment you can do any old which way, but I've found it's quite special just how well it works when you do it this specific way in the log space: straight-line slop pivoting at the middle grey value, which if I remember correctly is equivalent to a gamma adjustment in linear. And when you start doing curves you see how curves in log are a lot nicer to use than in a power space or in linear. Exposure compensation and white balance are nice, but it's really this contrast adjustment that brings it all together to make a complete color correction system. I tried everything to make it work in Premiere, and it just wasn't going to work, not with Premiere's built-in effects, not with any of the third-party plugins I tried, not with SpeedGrade, not with After Effects or Color Finesse. I tried log spaces, power spaces, and linear spaces. None of them gave me everything I wanted in Premiere. Premiere support is something I can revisit later, but it's going to require a custom plugin to make it work. Logarist works in DaVinci, Vegas Pro, and FCPX because the math of those color effects is doing exactly what I need. It's all about the math. Premiere just didn't have the right math.
-
@balazer thank you. What would be a good repetitive workflow to normalize white balance then. Figuring out RGB offsets for different shooting conditions and pasting the nodes over?
-
I still fail to grasp math and logic behind this approach.
As you are using LUT, later use editor build in transforms and later use another LUT to return to original values (not space!).
-
You didn't mention Lumetri with Premiere - did you try it? Your workflow looks almost exactly like how Lumetri works - apply camera-specific input LUT, apply basic adjustments, apply output LUT and add some additional parameters - and IIRC Lumetri also has options for higher dynamic range video which may be applicable.
-
@radikalfilm, you should try to get the white balance fairly close to correct in the camera, and then make whatever corrections you want using Logarist in post. I always do the corrections by eye. It's not difficult. It's a what-you-see-is-what-you-get workflow in which the adjustments are based on your own aesthetic judgments. It doesn't need to be based on any measurement of the scene. But if you aren't sure how to get started with the adjustments then I suggest you shoot a white or grey card, bring the footage into your video app, bring up an RGB parade scope or vector scope, and then do the white balance correction in Logarist to bring that white card to white. It's the same idea for exposure compensation: you can shoot an 18% reflectance grey card and then adjust the card to 38% RGB in BT.709 (with Logarist LUTs applied). I think you'll find that after doing that a couple of times you won't need to bother with the card or the scopes again.
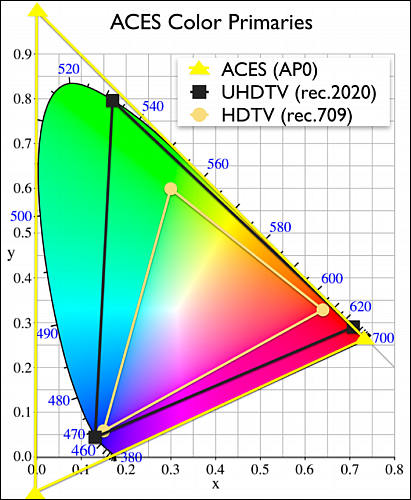
@Vitaliy_Kiselev, you can read this white paper: http://cinematiccolor.com/ My approach is fundamentally the same as what's in that paper, and also fundamentally the same as ACES. Compared to ACES I've just made some different design decisions for the color space and display rendering, and I've covered more camera color spaces than just the ones with ACES IDTs. There's a lot of math behind it, too. If you're really interested in the math part of it, you'll need to get a good understanding of the CIE 1931 color model. Here's a decent little paper: http://dougkerr.net/Pumpkin/articles/CIE_XYZ.pdf Another resource: http://onlinelibrary.wiley.com/doi/10.1002/9780470175637.ch2/summary I use the RIMM/ROMM gamut: http://www.photo-lovers.org/pdf/color/romm.pdf Many of the formulas I used are from http://www.brucelindbloom.com/ . For white point adaptation I use linearized Bradford as described in http://www2.cmp.uea.ac.uk/Research/compvis/Papers/FinSuss_COL00.pdf .
@eatstoomuchjam, yes, I tested Lumetri extensively. It's not the same workflow. In Lumetri, the first LUT is a camera-to-display LUT. You make all of the adjustments in the display color space. Lumetri's color adjustments assume a gamma-type display encoding. The last LUT is a look LUT. Also Lumetri doesn't provide the kind of contrast adjustment that I use.
-
Big thanks for links. I have good knowledge of displays, spectrums, CIE models and basic spaces. But this is slightly another field and interesting also.
ACES concept is simple as hell
as you just mathematically can always put any visible color inside it (and many invisible also :-) ).
 sample251.jpg411 x 500 - 51K
 -
Just recently saw this thread and the Logans'wrist stuff. I was testing/comparing a workflow between ACES and standard within resolve. Like ACES all our LUT collection is rendered pretty useless and 'cause of that I thought that was probably not worth it. But just to be sure and being free, pv user's stuff and all that saliva I gave it a light spin. Must say I'm very very impressed; both with the ease of use, the math behind the CTGs (colour transform's gremlims), the accuracy, speed and fine adjustments that allows. In resolve this was already pretty clear, but in FCPX the "difference" is astounding.
So congrats @balazer and thank you for sharing your work =)
I'll come back with questions
-
Thanks, @maxr. Glad to hear it. Which cameras are you using?
How were you using your LUTs before? If they're look LUTs, you can still use them with Logarist. Just put them after the BT.709 LUT. But if your LUTs were meant to be applied to a camera log space (S-Log, Canon Log, etc.) then Logarist doesn't give you a way to use them and properly take advantage of the corrections in Logarist. The Logarist color space is not similar to a camera log space.
-
GH2 but it's been all -2 smooth since the beggining; actually that's one of the questions I had:
is there anything I can change to optimize the GH2 standard 0 0 initial LUT to before mentioned settings?
So if I understand correctly it is ok to use other LUTs after the Logarist BT.709? If so those are very good news =)
Another thing that's not quite clear to me - and I've read your Logarist's page (which would improove in readeability if had some sort of center delimitation/format for the body of text) and watched the video several times - other than exp compensation, WB (offset) and contrast with pivot at .5, which tools are "optimized" to work with Logarist? Say inside of davinci and given the series of nodes you talk about, what can I use and what should I not?
In one of my carnage WFs I separate chroma and luminance (which I set to use only info from the green channel, R > G , B >G), is it okay to implement this before the 709back-to-earth Logarist LUT node?
Same scenario as before but I change the colour space of one of the nodes?
For cafe con leche or milky blaks it seems curves or low/low soft doesn't work so well, where should I tweak the deep african no-tomorrow blacks?
That's enough for 1 tray, love the HL roloff high five natural looking and the math behind it +)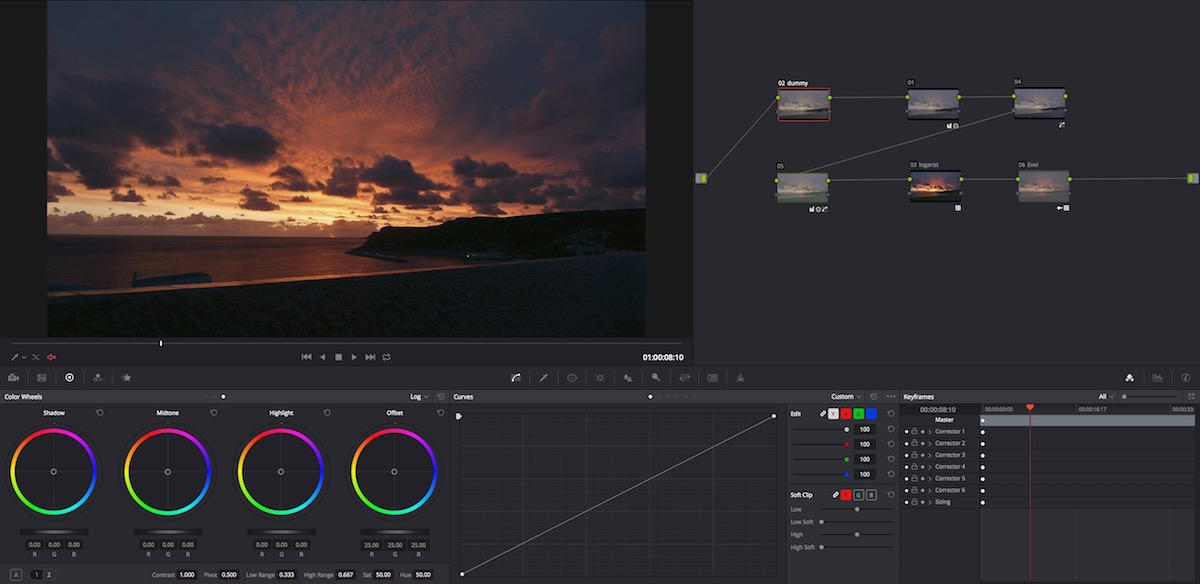
-
On the GH2 for Logarist you should shoot in Standard with contrast=0 and saturation=0. Those are the settings I used when I profiled the camera. If you change the film mode or contrast or saturation in the camera, Logarist won't be able to properly transform the footage to linear. It's not going to totally break if you change those settings in the camera, but the colors won't be quite right. The whole point of this approach is that all decisions about contrast are deferred until the editing stage. You can set sharpness and noise reduction in the camera however you want.
Yes, you can put look LUTs after the BT.709 LUT. Any type of color correction, filter, or plugin that you used before on a display-ready image you can still do with Logarist and get the same effect. Just apply it in the display color space, after the Logarist-to-BT.709 LUT.
In DaVinci Resolve, the additional tools that will work well in the Logarist color space are the Highlights and Shadow color wheels, and curves. There's no rule about which tools you can or cannot use in the log space. If a tool does what you want, by all means, use it. Just bear in mind that color tools you are used to using on display-rendered images won't have exactly the same effect in the log space. Lift, gamma, and gain, for example, had become sort of standard tools for adjusting shadows, midtones, and highlights. They aren't the best tools to use in a log space, and they won't adjust shadows, midtones, and highlights in the way you might be used to. You'll do much better to use Offset as your global & midtones control, and then with the color wheels set to log mode, use the Shadow and Highlight tools to adjust shadows and highlights. You might need to adjust the Low Range and the High Range. The default High Range in particular, is too high for Logarist. It probably needs to be brought down to about 0.6. In the Logarist space, 0.5 is middle grey, and 0.68 is the BT.709 white clipping point.
Similarly, in the FCPX Color Correction effect, the exposure and color tools labeled as Shadows, Midtones, and Highlights won't have the expected effect in the Logarist space. If you want to use those tools in the usual way, add another Color Correction effect after the second mLut plugin and make the corrections in that one. Unfortunately FCPX doesn't have a built-in curves effect or a log-friendly shadow & highlight effect.
I don't know what your carnage WF (?) is doing. I think you'll just have to try it before and after the BT.709 LUT and compare.
With curves you can get your shadows as dark or as light as you want. Though if you are working in Resolve, I'd suggest using the log Shadows color wheel & master wheel instead. (and same for the Highlights color wheel & master wheel) They are usually easier to use than curves.
In curves, try adjusting just the Y-channel instead of YRGB. That will alter the brightness without changing the hue or saturation.
-
@balazer much appretiated. I'll mess, test, compare more and surely implement your suggestions while searching my own ways too... and change the GH to standard 0 0. Cheers
PS
Yes FCPX's colour board controls are much more finicky or abrupt if you will and no curves, arrows' use needed -
@Balazer - Would it be possible to use Logarist with Premiere Lumetri, even though Lumetri isn't designed to be used that way? I imagine using the initial LUT as the Camera-Display LUT (even though in this application it would be transitioning into your wider colorspace) and then using the Display LUT in Lumetri's "Look LUT" slot. Then making corrections between these. Would this work?
-
No, it won't work. Lumetri can load the LUTs, but Lumetri doesn't provide the color correction tools you need for a log space.
-
@balazar . Your Logarist tutorials are greatly appreciated! Thank you very much. Before I found your Logarist for Vegas Pro, I was using your ACEScc workflow with gamma Cine 1/ color mode S-Gamut3.Cine settings on Sony's A6300 and used the same recommended Bright/Contrast and Channel Blend filters. Would the end result be any different when I switch to the Logarist workflow and use the LUT's ?
thanks wslagter
-
Hi, @wslagter. I never had settings for S-Gamut3.Cine in my ACEScc config. If you were shooting with the camera set to S-Gamut3.Cine color, the colors would not have been quite right in ACEScc. Logarist does support S-Gamut3.Cine with Sony Cine1 gamma, and also Sony Cine1 gamma with the standard sRGB/BT.709 gamut. The Cine1 profile in my ACEScc config is the same as in Logarist.
On the Sony A6300, I recommend shooting in Cine1 gamma with Still color. You can also shoot in Cine1 gamma with S-Gamut3.Cine color if you really want the wider gamut. Just choose the matching Logarist input transform. (Cine1 with or without S-Gamut3.Cine)
The workflow in ACEScc is very similar to, but not identical to Logarist's. Logarist uses different primaries and a different log scale. So you can't just take your existing ACEScc project and switch it to Logarist and have everything look the same. But the color correction process is the same. Use the same filters, just with slightly different correction values, and you'll get a nearly identical result, assuming it's the same output transform. The Logarist BT.709 output transform is the same as the "Standard Rec.709" transform in my ACEScc config. It's not the same as the ACES RRT.
-
Hi, jbalazar Sorry. correction, indeed I use your ACEScc Cine 1 setting with color Still or Pro successfully. So in order to use S-Gamut3.Cine color and Cine 1 with Logarist, I can disable ACEScc by setting View Transfer to OFF (in Vegas Pro Project Properties) ?.
To render a project in Vegas Pro with the ACEScc workflow you recommended ACES RRT(rec 709 video file) in the color space settings but when I render with the Logarist workflow should the color space setting set to log or default ? (as the only non ACES choices)
thanks for your help wslagter
-
@wslagter, yes, disable ACEScc by setting the View Transform to Off. Once you do that, the color space settings in the media properties and in the render dialog no longer have any effect, so it doesn't matter what you set them to.
-
Can Magix Video Pro X7 load LUTs?
I'm not sure, @balazer I will check next week, I'm on journey now
-
Thanks for the LUTs. I tried them in Resolve and found nothing I could not replicate easily and exactly, using the standard Resolve tools. I don't really understand the benefit of using this approach. Why use 3 nodes when one will create the exact same look? Is this for people who don't know how to grade?
-
@caveport, you don't need three nodes. You can do it all in one node.
Logarist is for people who are very particular about good color, novice or pro. I was never able to achieve the same look with standard tools, no matter how hard I tried. You can come close, sure, but standard tools always left me wanting better color.
A lot of it has to do with how changes in contrast are applied. Anytime a color correction operation adds a curve with a slope other that one, that alters the saturation and shifts the hues. Increasing the contrast, for example, shifts skin tones towards green. In a small-gamut space, that shift is larger than in a wide-gamut space like Logarist. You can compensate for the hue shifts, but that's just extra work. The shift depends on how much contrast you are adding. Of course some shots don't need extra contrast, and so none of this matters. But in my experience, almost every shot benefits from at least a little contrast adjustment. I prefer to minimize the hue shift problem from the outset by operating in the better color space.
Maybe you can post some comparison frames for us and say a little about how you did the correction. It's really hard to say what's going on without seeing the images and knowing what you did.
-
I've always wanted color correction to be this simple. And exposure compenstation has to be done in the linear space... Lift gamma gain and the color wheels, though powerful. Have never felt like simple math, like lightroom does, those wheels are more of a dark art
-
Sony S-Log1/2/3 users: the previous version of Logarist for DaVinci Resolve (Mac and Win) had a level mapping bug. Contrast was lower than it was supposed to be, with elevated blacks. This problem is fixed in Logarist 1.2.0. FCPX and Vegas Pro were not affected. No other color spaces were affected.
Panasonic GH4 users: if you record V-Log L externally and you use a Mac, I have added a "Panasonic GH4 V-Log L external" transform in Logarist 1.2.0. It maps levels differently from the normal (internal) transform. This distinction is necessary on the Mac due to the way QuickTime decodes the video. No such distinction is necessary in Windows.
-
@balazer In Resolve there is no hue shift when applying contrast, luma curves or using the primary controls in rec709 colour space. I have never experienced the issues you mention. Which software displays this problem?
I just finished a more extensive test and I do not like the shadow artefacts that your logarist process adds to the image. I was able to perfectly match the logarist result in Resolve using a single node in rec709 YRGB colour space using only primary sliders for gain, gamma and a little mid tone detail. The main visible difference was that using standard Resolve setting maintained a better and cleaner skin tone. Logarist introduces a contrast change that made the skin tones gradation from the lit side of the face to the shadowed side less smooth and changed the rendition of skin colour in those shadow areas. The skin tone in shadows was less saturated and was a bit less pleasing to the eye.
I think for FCPX it may be OK but for an experienced colourist in Resolve, I think it is unnecessary and creates more issues than it solves.
Don't get me wrong; I think it's a really good idea and I applaud your hard work and thorough approach, but I don't need it for working in Resolve. In Premiere it would be great because of how awful the grading tools are.


Howdy, Stranger!
It looks like you're new here. If you want to get involved, click one of these buttons!
Categories
- Topics List23,992
- Blog5,725
- General and News1,354
- Hacks and Patches1,153
- ↳ Top Settings33
- ↳ Beginners256
- ↳ Archives402
- ↳ Hacks News and Development56
- Cameras2,367
- ↳ Panasonic995
- ↳ Canon118
- ↳ Sony156
- ↳ Nikon96
- ↳ Pentax and Samsung70
- ↳ Olympus and Fujifilm101
- ↳ Compacts and Camcorders300
- ↳ Smartphones for video97
- ↳ Pro Video Cameras191
- ↳ BlackMagic and other raw cameras116
- Skill1,960
- ↳ Business and distribution66
- ↳ Preparation, scripts and legal38
- ↳ Art149
- ↳ Import, Convert, Exporting291
- ↳ Editors191
- ↳ Effects and stunts115
- ↳ Color grading197
- ↳ Sound and Music280
- ↳ Lighting96
- ↳ Software and storage tips266
- Gear5,420
- ↳ Filters, Adapters, Matte boxes344
- ↳ Lenses1,582
- ↳ Follow focus and gears93
- ↳ Sound499
- ↳ Lighting gear314
- ↳ Camera movement230
- ↳ Gimbals and copters302
- ↳ Rigs and related stuff273
- ↳ Power solutions83
- ↳ Monitors and viewfinders340
- ↳ Tripods and fluid heads139
- ↳ Storage286
- ↳ Computers and studio gear560
- ↳ VR and 3D248
- Showcase1,859
- Marketplace2,834
- Offtopic1,320
Tags in Topic
- logarist 1


