-
If just occurred to me... Sorry for all the screen grabs vs. video. They're are just too many perimeters that I'm testing before actually creating something that "moves." Time lapse shot in 4K, rendered out to 1080p.
Exposed for the sky. Even with You Tube's compression - continuous tones look good with low noise.
-
Quick question guys. I haven't gotten my hands on the GH4 yet, but I'm curious to do some testing on GH4 best settings (movin' on from the ol' GH3 Best Settings thread!). Any chance someone can post a clip with CineLike D and everything dialed to -5 as well as highlights and shadows at -5/+5 and master pedestal at +15? Curious to see how flat the flattest image truly is. Also, I only ask of this because I have yet to find someone who has posted something with these settings, but if someone already has on a different thread feel free to shoot me a link! Thanks :)
-
So far, I haven't really liked any of the super flat footage coming out of the camera, especially anything playing with shadows/highlight curves or the master pedestal. Boosting the shadows via curves or the master pedestal adds a crapload of noise that I'll have to denoise at a later point. And lowering the highlight curves shows some weird color shifts in the highlights. However, Contrast -5 looks good as it preserves some shadow detail and you can add contrast back in post. I tried Contrast 0 and boosting shadows and those details didn't come back. The shadows looked more milky to me. I have seen some good results with i.Dynamic Standard.
My settings: Contrast -5, Sharpness -5, Contrast 0, Saturation 0 Shadows/Curves 0,0 i.Dynamic Standard
-
Anyone want to weigh in on your Luminance Level setting preference? I've got mine set at 16-255. I've not tested the other two settings as the results I'm currently getting are quite good. Just wondering if you guys had any more input or enlightenment on this. FWIW: I know they recommend 0-255 setting for photographers just getting into film.
@rNeil What are your thoughts if you could be so kind sir.
-
@maddog15 ...
It will be another couple months or so before my CFO releases funds for a GH4. Sad to say, but with 40 years experience with me she demands performance before cash. Ah well ... ;-)
So ... the only things I know about this 0-255/16-255 bit is theory & what others have posted as results. In theory ... 0-255 gives you more width (depth) of data to work with. However, theory & practice don't always coincide. And I've seen conflicting things from both sides of this question with GH4's ... so I'm pretty puzzled myself.
Might try setting the cam to your preferred-so-far settings, and shooting a static scene with a good range of shadow-to-black tones for a few seconds on both settings, 0- and 16- , and see how they compare on a calibrated monitor. Does the 0- setting give more actual 'ramp' to work with, or just more noise really?
-
Here's what Rarevision (the 5DtoRGB people) has to say about 0-255 vs 16-235. They're quite emphatic about it: http://www.personal-view.com/talks/discussion/comment/137293#Comment_137293
-
@rNeil Thanks much for the input.
There's one thing about this camera that's flat out Awesome. It has many new video settings for files, color and exposure. There's also one thing about this camera that's flat out Exhasting. It has many new video settings for files, color and exposure. Uuuuugh! Sometimes I feel like it's the early 90's and I'm surfing the web for the first time. I start out looking for Peruvian Pan Flutes and - somehow an hour later - I'm reading about the proper way to tie a square knot on a Viking ship! ADD! How'd that happen?!
May the powers that be grant you good fortune in the near future. Preferably in the next couple weeks or so. :)
Thanks again.
-
Read your post to the CFO ... we both had a good laugh. She'd stuck with her beloved Fuji S5 for MANY years ... it finally started just refusing to give crisp images (and she'd done many images for clients past 40" long side over the years that were great) ... so as I'd moved over mostly to the GH3, she started working with my ol' D3 ... and I gotta tell you, THAT was a shock for her. She can master technical stuff (she was a hell of a fine custom color printer) but does as little as she can get away with professionally.
And the S5 was based on a D200 "semi-pro" body ... going to a Nikon single-digit full-frame camera about 4 generations later in menus & options from the ol' S5 ... had her spinning for a while. THEN around Christmas we got her a D600 for most work, though she still pulls out the big ol' D3 at need (especially super-high ISO stuff). ANOTHER different & many-new-thingies menu system to learn.
And I'm the guy what avoided Photoshop like the plague, stayed in Lightroom & shipped all the fancier stuff I needed off to her for PS work ... and then go into video. Right. PrPro, Speedgrade, AME, Encore, AeFx ... all about as simple as Photoshop or worse.
Yea, we know the lookin' fer pan-flutes & realize we're looking at something we never knew existed thing ... :)
And thanks for the good wishes. She laughed at that too. Real good belly laugh that one ... sigh ...
-
I did a test with all 3 level settings 0-255 16-235 16-255. I used manual settings for everything on an interior scene with blown out highlights in a window and papers on a desk. I used DaVinci Resolve and FCPX to examine the files. 0-255 looked good but highlights were clipped hard. 16-255 looked good but highlights were clipped hard. 16-235 looked good and held some highlight detail. This is the standard for pro video cameras, as it allows highlights to exceed the 235 level which is peak white on this setting. Also I found that recording colour bars internally only works correctly for setting 16-235. The other settings cause the bars levels to be incorrect. I will be using 16-235 exclusively from now on as it looks good and allows some headroom on highlights. Keep in mind that zebras can only be set to 95% max using this setting as it corresponds to the 235 level when 255 = 100% zebra setting.
-
I think a lot of people will try to maximize the dynamic range by boosting the master pedestal and doing a reverse S-curve on shadows and highlights. I like doing all of that except I leave the shadows flat. I've noticed that boosting the shadow curve +5 introduces tons of noise and I would rather sacrefice a tiny bit of shadow detail for better noise performance. Boosting the master pedestal in CineD gives a great looking log image though.
-
@IVlaverick52 I agree with you about boosting the shadows. Not a good idea. I haven't tried boosting the master pedestal yet.
-
@caveport Hey thanks for the info and clarification. I've also decided to use 16-235 exclusively for the same reasons you've stated. @IVIaverick52 I've started tests adjusting the master pedestal to get a better flat log image. I too tried adjusting the High/Shadow curve but the results were unacceptable to put it mildly. Waaaaay to much noise.
The attached is a still frame export from Premiere Pro CC. CINE D with all sub settings at "0" but with Master Pedestal set to +15. Much flatter but without the noise you get when trying to obtain a flat image by lifting the shadows via the High/Shad S-curve. ISO was at 800 so that accounts for a lot of the noise. But this is good to my eyes. Looks more like film "grain" as apposed to digital "noise".
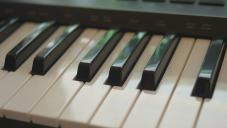 Master Pedestal +15.jpg2513 x 1414 - 850K
 -
Did some quick profile settings. One with Master Pedestal all the way to +15. Wondered how well the footage would hold up at that flat a setting. Not too bad. All 3 tests are CINE D (my preferred setting) but I threw in a CINE V on the last. CINE V is hard contrast, brighter whites, almost crushed blacks with little mids. I think it looks great on its own if that's the look you want with little to no post color work. Grading it can be challenging as there's not as much info there to work with.
-
In 32-bit digital world, going 16-235 is like wearing Steampunk goggles - intricate relics that don't really do much other than look archaic. But they do work, in as much as you can see through them pretty much as well as without.
To see what the GH4 color space options actually do, it's important to understand a subtle point that is usually obscured in such discussions: All 8-bit H.264 codecs produce YUV encodings whose luma channel is scaled to the 16-235 range. There is no question or debate about this, it's built into how these codecs work. The 16-235 choice the GH4 gives you does not alter the range of the YUV data produced by the encoder, it instead scales the range of the RGB data that is input to the encoder and reproduced by the decoder.
Modern 32-bit video editors such as After Effects and Premiere, however, aren't designed to work directly in YUV, they use an internal 32-bit RGB color space. And except for the GH4, when you import an unedited Panasonic, Canon, or Nikon H.264 video into After Effects, guess what its Interpret Footage dialog will tell you? It will insist that the file's embedded 8-bit Rec 709 color space is not scaled to 16-235, but to the full 0-255 range. So what's going on here? Is the original video file 0-255 or 16-235?
It's both. The 8-bit YUV data in the file is scaled to 16-235. But the 8-bit RGB data that it represents is scaled to 0-255. And it works fine that way because there's no direct, pixel-to-pixel correspondence between YUV and RGB image data. H.264-encoded YUV data is not comprised of pixels, it's made of arrays of 2D spatial frequency components. When AE's H.264 decoder converts this YUV data into RGB pixels, it needs to know where to set the 0 IRE black point and the 100 IRE white point. With the full-range 0-255 GH4 option, the 0-100 IRE scale is set to 0-255. With the 16-235 GH4 option, the 0-100 IRE scale is set to 16-235.
When you're working in a 32-bit digital color space, however, the IRE scale is a moot relic of the analog past. All RGB values are calculated in virtually lossless floating point, and hard clipping only occurs when you render the video's internal format into an external codec, or display it in AE or Premiere's composite view or waveform monitors. It will then be clipped to the 0-100 IRE limits set by the Rec 709 color space embedded in the video file.
When video files are tagged with the correct embedded color space, this system works flawlessly in 32-bit RGB video editors, regardless of whether the files are 0-255 or 16-235. It's when a file is mislabeled that problems occur. Before the GH4, all Panasonic files were tagged as 0-255, and it was inadvisable to interpret them as 16-235. With the GH4, you can now choose which color space scaling you want to use. The oddball 16-255 choice however, will likely cause problems, because there is no standard way to properly tag these files with the correct embedded color space.
In practice, the best choice is probably to go with what the rest of the footage in your project uses. If you're planning to intercut GH4 footage with Canon, Nikon, or earlier Panasonic footage, it makes sense to select the same 0-255 color space they use. But if you're working with older videocams that use the 16-235 color space, it will be easier to go with that.
-
@konjow H.264 video files recorded by Panasonic G and GH cameras preceding the GH4 were tagged as using the 0-255 range. Use that if you want the GH4 to work the same way as other Panasonic MFT cameras. Premiere will seamlessly manage the IRE range of each video you import, so long as the file is tagged properly. After Effects in Managed Color mode will read the embedded tag in each video file and remap the imported file's colors when necessary to match the working color space of your choice. When exporting a video, AE will then remap the video to the encoder's color space. This all works without perceptible image quality loss in 32-bit mode. In 8-bit mode, however, quantization and clipping can cause noticeable image degradation.
-
@LPowell thank you for explanation! My conclusion is: Use 0-255 in camera. Premiere has no X-bit to set, so no problem:) AE sets to 16bits minimum.:)
I export to Prores422 usually and then other formats (mp4etc) in AAM from Prores. AAM is taking care of it I believe. I would have one more question in this matter: Is there any reason for use lower slide 0-255 "out" in "Tree way CC" filter in Ppro? Is there any use for it if we export mp4 for online or Prores as a "Masterexport"? If AAM Adobe will remap the video to the encoder's colour space what wor is this setting? Asking because Im using it sometimes but for sure not as it should be used.
-
@LPowell Thanks for the accurate explanation. It is also important to be aware of how the camera deals with mapping levels into the YCrCb format. My test was to determine if the GH4 maps peak white to bit 235, which it does. Using 16-235 levels means highlights indicated by the internal 95% zebra setting will be at bit 235 and have bits 236-255 as headroom. This is the way most broadcast cameras have worked for decades. Also, not every editing or compositing software use the same internal processing. Most of the Post facilities I work in use Avid or Apple products. Avid is natively 16-235 even though it will handle other formats. My main interest is in what happens 'in camera' and if there is any difference in using each of these level settings. The results all looked good in my test, just a tiny bit more detail in the clipped highlights with 16-235, but a VERY small difference! Using 0-255 and being careful not to clip highlights, the images will look great. 16-235 works for my workflow as I am used to the older camera setups and don't need to adjust the way I expose the camera.


Howdy, Stranger!
It looks like you're new here. If you want to get involved, click one of these buttons!
Categories
- Topics List23,992
- Blog5,725
- General and News1,354
- Hacks and Patches1,153
- ↳ Top Settings33
- ↳ Beginners256
- ↳ Archives402
- ↳ Hacks News and Development56
- Cameras2,367
- ↳ Panasonic995
- ↳ Canon118
- ↳ Sony156
- ↳ Nikon96
- ↳ Pentax and Samsung70
- ↳ Olympus and Fujifilm101
- ↳ Compacts and Camcorders300
- ↳ Smartphones for video97
- ↳ Pro Video Cameras191
- ↳ BlackMagic and other raw cameras116
- Skill1,960
- ↳ Business and distribution66
- ↳ Preparation, scripts and legal38
- ↳ Art149
- ↳ Import, Convert, Exporting291
- ↳ Editors191
- ↳ Effects and stunts115
- ↳ Color grading197
- ↳ Sound and Music280
- ↳ Lighting96
- ↳ Software and storage tips266
- Gear5,420
- ↳ Filters, Adapters, Matte boxes344
- ↳ Lenses1,582
- ↳ Follow focus and gears93
- ↳ Sound499
- ↳ Lighting gear314
- ↳ Camera movement230
- ↳ Gimbals and copters302
- ↳ Rigs and related stuff273
- ↳ Power solutions83
- ↳ Monitors and viewfinders340
- ↳ Tripods and fluid heads139
- ↳ Storage286
- ↳ Computers and studio gear560
- ↳ VR and 3D248
- Showcase1,859
- Marketplace2,834
- Offtopic1,320


