-
Hi there PV commune
While I'm thinking in shifting a bit from the soft(ware) posts, as it is very... one-directional, and almost zero feedbackable, je je; I keep running into a myriad promiscuous issues and, as some might come across same demons and ninpho-psico-syrens, thought of sharing themOther than having your display calibrated, if you're using firefox as web browser, it is not a bad idea to tweak its colour settings... not only for the pseudo-geek kick out of it but for practical improvement reasons =)
I'll suggest these light readings
Web browser color management test
Web browser color management guideAnd finally the how to
How to configure Firefox colour managementResources:
ICC Color Inspector
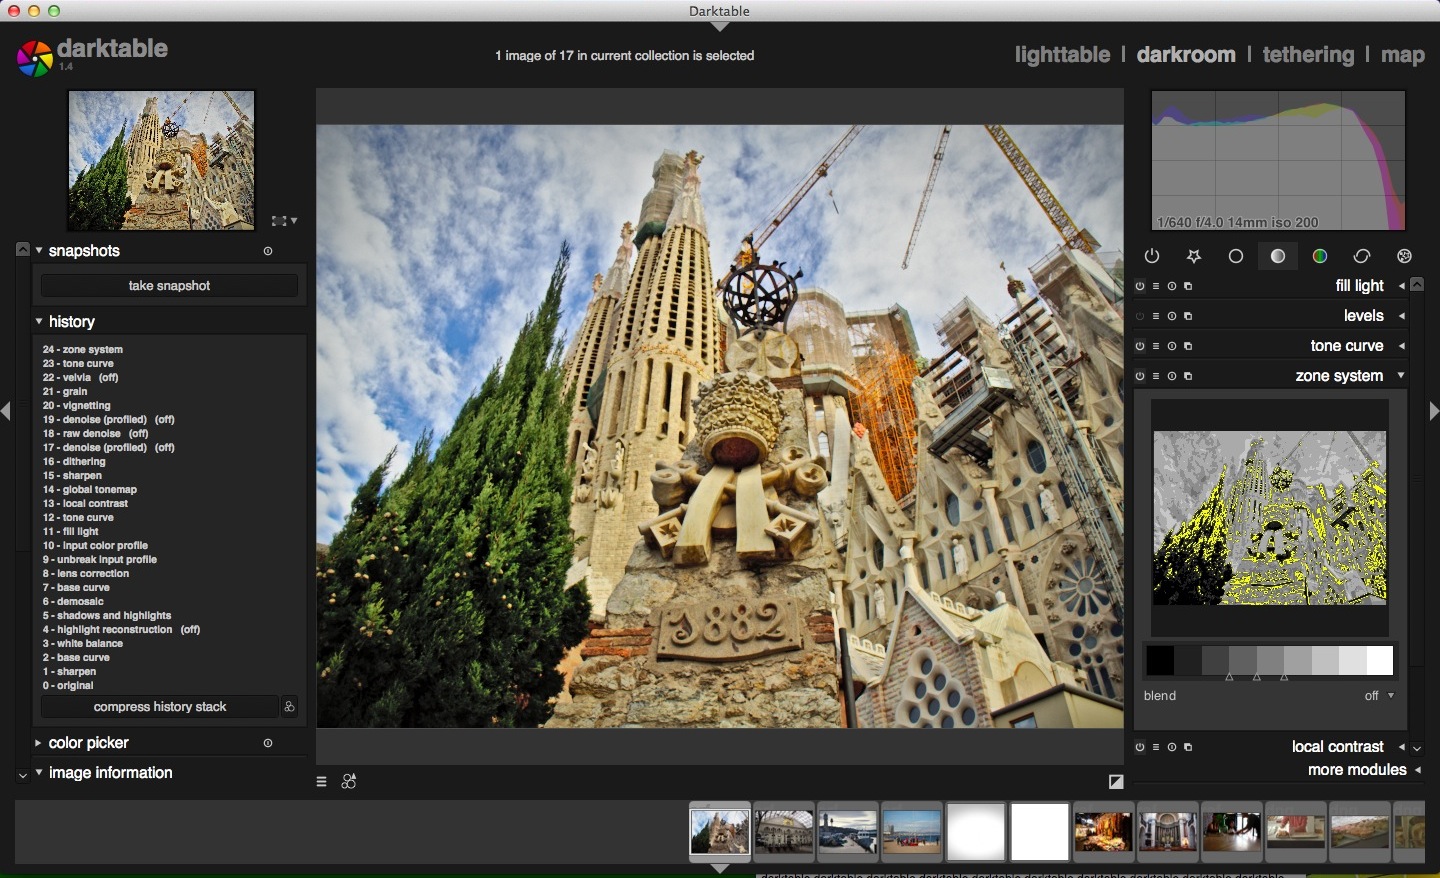
Ok that's it, before going to kill my neighbour's dog, you need to try this piece of open source software, in many departments it's way better than lightroom, easier than rawtherapee, faster than lightzone and not a PITA to build as many other soft (i.e. digikam, mac user here). You can import single images or whole folders into it (it just import the embed jpeg) so works locally, can save styles/presets and exports 32bit depth images. Almost all effects, tweaks and corrections have blend options, loads of them, some even... Bezier region tools, zone system like, tons of interesting tools for further tweaking the look of your images; colorists will feel at home. We're now in version 1.4, it has come a long way =)drakbatle drakbatle drakbatle drakbatle drakbatle drakbatle drakbatle drakbatle drakbatle drakbatle drakbatle drakbatle drakbatle drakbatle drakbatle drakbatle drakbatle drakbatle drakbatle drakbatle drakbatle drakbatle drakbatle drakbatle drakbatle drakbatle drakbatle drakbatle drakbatle drakbatle drakbatle drakbatle drakbatle drakbatle drakbatle drakbatle drakbatle drakbatle drakbatle drakbatle drakbatle drakbatle drakbatle drakbatle drakbatle drakbatle drakbatle drakbatle drakbatle drakbatle drakbatle drakbatle drakbatle drakbatle drakbatle drakbatle drakbatle drakbatle drakbatle drakbatle drakbatle drakbatle drakbatle drakbatle drakbatle drakbatle drakbatle drakbatle drakbatle DARKTABLE drakbatle drakbatle drakbatle drakbatle drakbatle drakbatle drakbatle drakbatle drakbatle drakbatle drakbatle drakbatle drakbatle drakbatle drakbatle drakbatle drakbatle drakbatle drakbatle drakbatle drakbatle drakbatle drakbatle drakbatle drakbatle drakbatle drakbatle drakbatle drakbatle drakbatle drakbatle drakbatle drakbatle drakbatle drakbatle drakbatle drakbatle drakbatle drakbatle drakbatle drakbatle drakbatle drakbatle drakbatle drakbatle drakbatle drakbatle drakbatle drakbatle drakbatle drakbatle drakbatle drakbatle drakbatle drakbatle drakbatle drakbatle drakbatle drakbatle drakbatle drakbatle drakbatle drakbatle drakbatle drakbatle drakbatle drakbatle drakbatle drakbatle drakbatle drakbatle drakbatle drakbatle drakbatle drakbatle
Some quick&dirty developing test with QueSeSabe Oly M10 raws

tschüss
 Om_M10_quesesabe_orig.jpg1440 x 878 - 256K
 Om_M10_quesesabe_edited.jpg1440 x 878 - 354K
 -
Thanks man!
Here's a $5 app that does only one thing, but does it fairly well! And there's something to be said for doing one thing well! :)

It's called PicSketch and lives at this address: https://itunes.apple.com/ca/app/picsketch/id672149251?mt=12
-
At VK, Serge Popov from 3D LUT Creator has shared Julia Trotti, a set of 40 drag&drop curves presets.
Why I share this with you? Because even if you don't use their program it's quite a nice free collection (gotta love some of those names and examples) you can use to grade in Photoshop, Premiere and/or After effects along with the 32bits Curves adjustment =)
I'm not even gonna start praising some LUTs they've been dropping over there, just have a kid-in-the-candy-store-look

-
Indulge me, je je... after all took Victor just 6 months of work ,-)
BTW Adobe DNG converter 8.3 and BTW Lightroom 5.3 are out
New supported cameras:Canon EOS M2
Canon PowerShot S120
Casio EX-10
Fujifilm XQ1
Fujifilm X-E2
Nikon 1 AW1
Nikon Coolpix P7800
Nikon Df
Nikon D610
Nikon D5300
Nokia Lumia 1020
Olympus OM-D E-M1
Olympus STYLUS 1
Panasonic DMC-GM1
Pentax K-3
Phase One IQ260
Phase One IQ280
Sony A7 (ILCE-7)
Sony A7R (ILCE-7R)
Sony DSC-RX10 -
Hehe… OK, you're NOT invited to dinner. :D
Sure tho, I don't care what you do with the images. Don't use them commercially without permission is the only thing I require - and of course give credit to "Tesselator" if you use them for non-commercial purposes. The usual, you know… :)
I like my version best of course - between the three. ;)
-
@Tesselator
Hey mister, I played 5 minutes with your first pano, without desaturating it (my first instinct), I applied 2 layers and 1 effect. As it was too sharp, a blur it with a gaugassian 0.3 filter. Then I applied Kodak LUT that comes inside of photoshop and finally a gentle curves layer with a linear gradient mask disappearing in the sky. If by any reason you want me to erase the image, say it so, I have no problem whatsoever =)
Second one it's also very very nice, more natural, to my tired eye at least
I find PS HDR horrendous, never ever used it. If you want 32bit HDR there are a ton of free programs that perform much much better and give you extensive control which in photoshop are very limited; talking about HDR, panoramic features are pretty ok. I really never felt the need for so much bit depth, If you read back you'll see (why) I'm big fan of open-source ImageFuser. Recently this little fucker greatly helped me making this

look like this - don't even think of asking why the photo was taken like that :P

Have a look at PS built-in LUTs, you're gona have fun. BTW where are those places?
Thank you for sharing
We just posted at the same time...
Nik define for me (only plug solving banding issues) and yes dxo stuff for critical situations is awesome.
Regarding your lens collection I'd like to tell you just 1 thing, never ever ever ever invite me for dinner :P -
I don't think there are any extra tips for using Panasonic GH cameras as compared to any other digital still camera. If you can process RAW then it's basically the same deal with GH1, GH2, or GH3. The in camera JPegs pretty much suck butt but the RAW images are fairly nice (I mean for a $500 (used) GH2 or a $250 (used GH1). Both have more latitude in the darks than the lights. It's easy to blowout highlights on the GH cameras - so Ansel Adams' rule of exposing for the lights and developing for the darks applies directly when using these cameras for still photography.
I've spent a lot of time critically testing and analyzing noise removal tools and the best right now (and for the past 2 years) is Topaz DeNoise. By adjusting a few sliders one can remove all (98%) of the noise from a very noisy photo and still retain all (95%) of the detail. Number two on the list is the new version of DxO's built-in NR. It's quite close to DeNoise but with less control and occasionally more mushy looking details. Number three is Noise Ninja and then you can just take your pick after that. The Nik one and others are all roughly about the same and pretty much forth rate - something to know if you plan on shooting a lot of high ISO images.
Besides that I dunno of any special tips that are needed when shooting the GH cameras. I stick to all adapted glass myself. I've tried all of the Lumix lenses but don't care for them much. And since I prefer manual focus (even for birding BIF and action shots) and manual aperture over AF/AE I can save a bundle while at the same time usually getting better looking images than the Lumix lenses produce. More unique looking images too - as certain lenses are well known historically, for producing certain effects. For example the 3Dishness of some Zeiss C/Y or ZF/ZE lenses - and so on. There are a few good Lumix lenses to be sure but over half of them are pretty junky and overpriced IMO. For example that Nikkor I just mentioned above is typically a $30 to $40 lens and on a µ4/3 sensor produces outstanding results!
It's actually of the same (near identical!!) quality (IQ) to the $1,800 Zeiss Distagon ZF 21mm 2.8 :) and there's a lot of instances such as this where simply because we're shooting the center-most area of the image circle, inexpensive FF lenses can compete favorably with expensive µ4/3 models or high end FF lenses. Legacy glass is also a great hobby and can really enhance your experience shooting both video and stills.

Great fun! If you're about shooting detailed or artsy portraits like Mr. Maxr is showing above I certainly wouldn't recommend any of the µ4/3 cameras… Maybe the D800 would suit you better for that aye?!?
Here's a few folders of images which include some BIF shots so you can see what's doable with MF lenses. And actually I guess most (70% or so) BIF shooters set their lenses to MF when shooting BIF anyway. Or at least the polls I've taken on pro and semi-pro photo-sites reveal the percentage to be about that anyway. AF still isn't good enough these days. High-end AF is good enough for most track & field sports tho. :)
http://tesselator.gpmod.com/Images/_Image_By_Lens/Olympus_300mm_F4.5_AutoT/ http://tesselator.gpmod.com/Images/_Image_By_Lens/Canon_FD_300mm_F2.8L/ http://tesselator.gpmod.com/Images/_Image_By_Lens/Canon_FD_300mm_F4L/
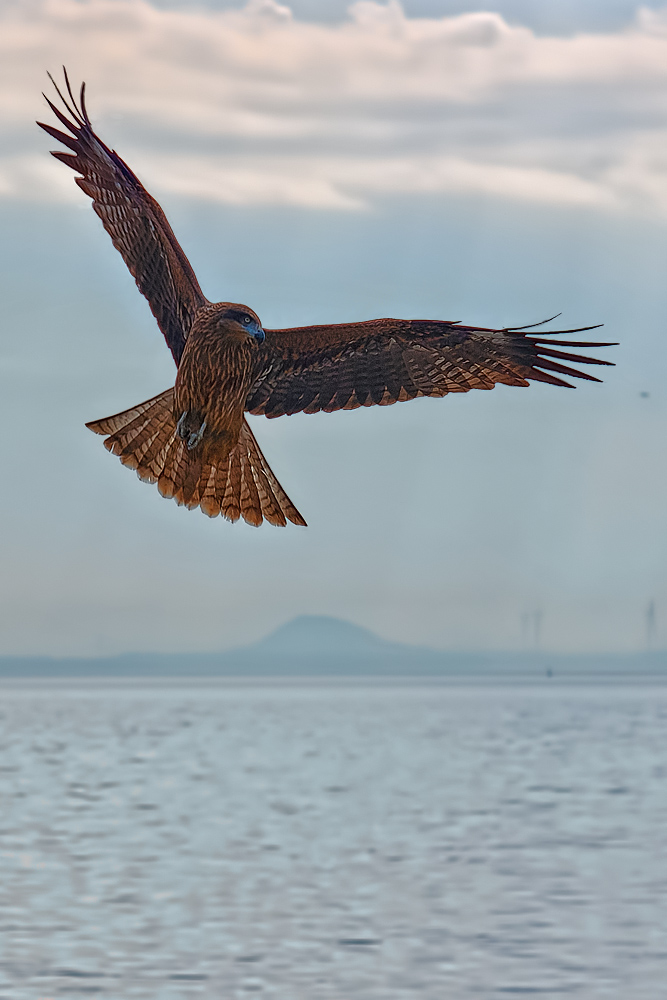
And finally here's a $25 manual focus Rokkor 100mm f/2.5 adapted to the GH1, shooting some Black Tipped Kite at the beach here in Japan:
-
I dig the new PS CC ACR and have pretty much only used ACR for the day-to-day processing of stills in the past as well. I download and compare every app I can get my hands on and keep current with each one as revisions become available - but mostly just testing them for my own information. The current version of ACR is very nice for 32bit HDRIs and is reentrant as well - which makes it all the nicer. Here's an example of a 4-bracket HDRI panorama of about 16 images (16x4=64 exposures) all put together in PS CC just using PS's automatic tools. I didn't have to edit or align anything other than to adjust a couple of sliders in ACR for the exposure level. There was no exporting or formats to deal with. Just straight from the GH2's RAW files to this with a little bit of waiting. :)
Here's another one although this one is 8x3 single row IIRC (both of these are hand-held with a manual focus lens (the Yashica C/Y 24mm f/2.8 for the bottom one and the Nikkor AF 18-70 f/3.5G ED for the one above).
I believe both of these were loaded into PS CS6 for scaling and JPeg output - but not for any other reason than that PS CS6 was still defined as the default image app at the time. All this can be done using CS5 or CS6 alone but I believe there is an extra step or two involved in the process.
Here's a list of RAW processors and/or photo editors I try to keep up with - a few of these are OS specific (only Mac, WinTel, or Linux), and I believe all of them have free timed trials if they aren't share or free-ware:
- Aperture - Download / Site
- CaptureOne Pro - Download / Site
- The Gimp - Download / Site
- CinePaint - Download / Site
- PS Plugins 4 Gimp - Download / Site
- Matlab - Download / Site
- PaintShop Pro - Download / Site
- Photo Impact - Download / Site
- AfterShot Pro - Download / Site
- Pixelmator - Download / Site
- GraphicConverter - Download / Site
- RAW Therapee - Download / Site
- ImageJ - Download / Site
- PhotoLine - Download / Site
- PhotoShop Elements - Download / Site
- PhotoShop CC - Download / Site
- LightRoom - Download / Site
- Acorn - Download / Site
- AVS Photo Editor - Download / Site
- ACDSee Pro - Download / Site
- F-Spot - Download / Site
- PhotoStudio - Download / Site
- Silkypix Dev Studio - Download / Site
- ArtRage Studio Pro - Download / Site
- Photogenics - Download / Site
- Photo Mechanic - Download / Site
- DigiKam - Download / Site
- Erdas Imagine - Download / Site
- Krita - Download / Site
- PhotoPerfect - Download / Site
- Photo Plus - Download / Site
- Zoner Photo Studio - Download / Site
- Project DogWaffle - Download / Site
- UF-Raw - Download / Site
- RawStudio - Download / Site
- DxO Optics Pro - Download / Site
- Forografix - Download / Site
- Photo Filtre - Download / Site
- Paint.NET - Download / Site
- Photo Ninja - Download / Site
-
Hi there folks!!
Though fashion like photo shoots doesn't normally turn me on, these BTS (behind the scenes) videos from fxMEDIA truly show the refined sensitivity behind a superb work in understanding and using photography itself. I did even "forget" there's no live sound whatsoever =)Credits
Photographer: Kirsty Mitchell Photography
Cinematographer: Richard Wakefield, FX Media
MUA: Elbie Van Eeden - elbievaneeden.com
Model: Marianna Toka
Costume made by Kirsty MitchellCredits
Photographer: Kirsty Mitchell Photography
Cinematographer: Richard Wakefield, FX Media
Music: Diego Buongiorno - thebushworld.com
MUA: Elbie Van Eeden - elbievaneeden.com
Model: Marianna Toka
Costume and boat design: Kirsty MitchellOf course saved best for last, Terence Malick you chew on this {evil burning laugh from hell}
Credits
Photographer: Kirsty Mitchell Photography
Cinematographer: Richard Wakefield, FX Media
MUA: Elbie Van Eeden - elbievaneeden.com
Music: Diego Buongiorno@Vitaliy_Kiselev I know we agreed one at the time... hope you find generosity to make an exception, je je. Thanks
PS
I totally forgot, free Mamo's TLtools 3.4.49 is out, download it -- HERE -
@TraumManufaktur thank you =)
Long time android pixlr user here too and though it has nice overlays and effects, recently switch to photo editor as it gives you best extended control over your images, channel levels and curves and a huge array of effects. It is faster to save and allows you to choose quality of compression and file format (jpeg, png, gif and something else I cannot recall).
Quickpick for viewing and Camera Fv-5 to control phone camera :DComputer programs I lost count of how many I tried, currently I use ToyCamera from AnalogColor - mind you it's not free - also randomizable, simple / intuitive, nice and film mode like UI. For HQ tiff work I really think alien skin exposure and colour effex are unbeatable.
You may want to check up S. Swerdlow's Color Wizard it's a free incredibly complex colour tweaking plugin for photoshop, his C3C Image Size it's also pretty good, Vitaliy used to recommend it
Keep bringing fresh air, M mate :P
-
Interesting thread and tips, thanks @maxr. There's one free tool I want to add https://pixlr.com/ available in browser, Android and computer. It has a collection of tints, overlays and borders, so I can create a quick look or put some finishing touches on a picture coming out of Lightroom. Pixlr-O-Matic even has a randomizer for that surprise accident.
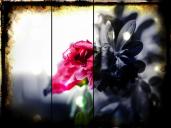 nightSC.jpg1440 x 1080 - 318K
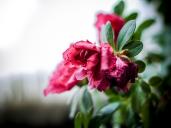 Flower SC.jpg1440 x 1080 - 288K
 -
And while this happens... I think they didn't like my feedback at dpreview as I can not log in anymore... jajajaj
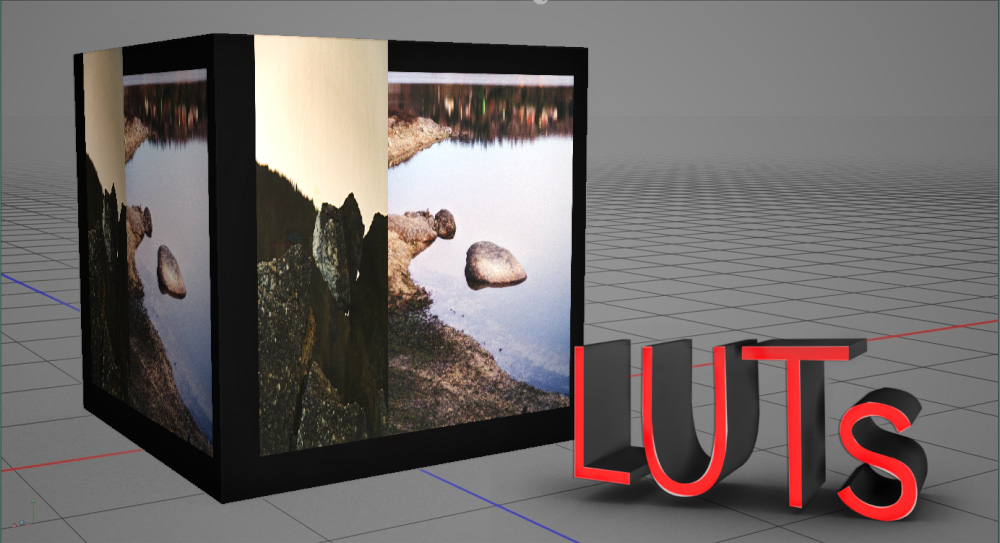
Today I'm sharing some new workflow I'm testing - wonder if I'll test my death too - it's about LUTsWhat is a LUT? Well other than a pattern-running system for torpedoes used by the German navy during world War II, a village in Iran, a prophet of the Qur'an, an abbreviation of London's Luton airport and a Local User Terminal, LUT is an acronym for Look Up Table, 3 different explanation including pizza one :P
OK, I must admit at first I didn't understand the commotion about LUTs and it took me a while to really grasp their potential, I like to blame the lead in the water :P
Meanwhile I developed other heterodox grading methodologies FOR PHOTOGRAPHY and video. Here I must make a pit stop - I know this can be read as an egotrip, I won't even bother to state opposite, but what I would really like is for anyone reading to understand that this is ultimately a journey based in a very personal experience, ok?
Though I never filmed, literally with film, in my early days I used and developed my photos only using negative and positive (slides) films. Kodak, Fuji, Agfa, Ilford, etc. They were my credo, pushing ASA, fucking up the negatives development with strange emulsion mixes, using hand made masks and non standard developed techniques in the lab and so on.
So when I started to really get into digital photography I tried to achieve similar results with photoshop, gimp and that kind of editors which revealed as a big time consuming pain in the ass. Here shamefull picture of girlfriend getting cold in bed. Then I started cooking my own recipes using applications such as oneone's perfect suit, nik (now bought by almighty google) color effex, alien skin exposure, red giant and all sort of more esoteric software "helpers".
I manage to get really nice results and even today a mix of color effex and exposure (really great software) can deliver such an appealing (for me at least) look as this one

The original image, below is from a 1/2.3 inch sensor PS camera.

Even with the shittiest mobile phone (2 megapixel camera) and developing in the phone itself (android cyanogenmod 10) you can achieve some nice organic stuff

Allraich, guess that I made my point there, now here comes the LUTs part.
With LUTs you can achieve this really, really but really fast and in an accurate way (from colour tinkering math POV); you "just" need to know your LUTs and how to mixed them. The other BIG benefit of doing so is that today they're getting pretty much cross-platform so you can develop a grade and apply it to your video footage in your NLE or composite program of choice and then to stills and then mix everything up and there you'll be expecting... babies!!! je je
Now, I've reached this conclusion by my own travelling, pain, discovering, joy, sensibility, exchange, reading, sleepless nights and days and testing, a fucking lot of testing. Here at PV there are way more capable people that developed an extraordinary refined system: ColorGHear by @shian
If I had the cash I would not loose a second and invest it in ColorGHear and I mean it. Unfortunatelly I'm far beyond broke and have to develop my own ways, which are still very time consuming and very often fruitless.I'll leave here 300Mb worth of LUTs; I've taken them from Resolve Lite, Speedgrade, Photoshop, AE, Arri LUT generator, etc. If you download the demos you may as-well extract them out, just look for LUT folder inside the application package. I wanted to save you the trouble (so you can put your energy in testing/playing with them) and some trees :P
To use them in Photoshop together with the Lumetri LUTs, you have to place them - or a shortcut - inside of the application itself: Photoshop/Presets/3DLUTs. I mysel found very fast/convenient to duplicate layers and apply different opacities and transparency modes; it almost banished the need for masking layers, at the most gradient masks… hopefully we will see this capability implemented in future DMA (digital media management) programs such as lightroom; right now only 3D LUT Creator is being integraded.
I know AE cc have an apply LUT thingie, If using other version you may want to download Red Giant's free LUT Buddy (at the end of the list) so to apply them in AE and Premiere and also to be able to translate LUTs to other formats, this is a very big deal for me. It’s free and good to have
That's all for today folks =)
If you liked what you've read click this link
gashôHope you appreciate me tiding the table for the picture, je je je


Some more links
http://www.quelsolaar.com/technology/clut.html
http://opencolorio.org/index.html
http://www.imagemagick.org/Usage/color_mods/#color_lut
Very very very interesting video!!! -
Hi there relentless tech freaks :P
Is there anyone in the forum beta testing Lightzone 4?
Asking 'cause I'm thinking in writing a very quick&dirty user experience and if someone is testing too we could exchange views and opinions. So if there is interest, PM me, please and thank you -
Okay, okay check out this - free image optimiser, for mac only and all X compatible, mavs inclusive =)
-
Feedback to Dpreview
Hi guys :-)
My name is max (registered as putomax) and thought only recently sign in, a long time reader. I have a suggestion for the "real-world samples":
Make it focused. What I mean is instead of just evaluating the potential interest of buyers and delivering a incoherent^ drifting gallery that tries to please all curiosities/eyes, focus on 1 thing, one project, 1 idea, 1 concept, 1 series, as a real-world (awkward expression anyways) photographer would do, YES even the most amateurish one would have something which drove him/her to want to capture a moment of existence, and the inherent conditions that produced it. IMHO that’s where coherence^ lives, with gaps, with chaos, limited thus free
Funny to think that the images he/she took would substitute the reality (looking from the future) which is not same as real-world. Maybe too much Barthes, je je
I imagine that with so many cameras and so little time to think or deepen, must be something quite challenging, but you're Dpreview, the world's nº1 right? Bet on quality, also of thought. That's something everybody in this planet would recognise, would look forward as a true example of real-world SAMPLE WORK… which was never meant to be real, but to MAKE it real.
Also I am pretty sure you guys would have much much more FUN and a "real" possibility of expanding yourselves through and beyond tech specs illustrations.
Try it, at least once =)
I hope these poorly written words are able to carry the little light I tried to put in them and make any sense. I've been freelance image artist all my grown up live, I appreciate and thank you for all the hard work
maxgashô
BTW, changed the thread's title, seems more coherent to me now. Salu2
-
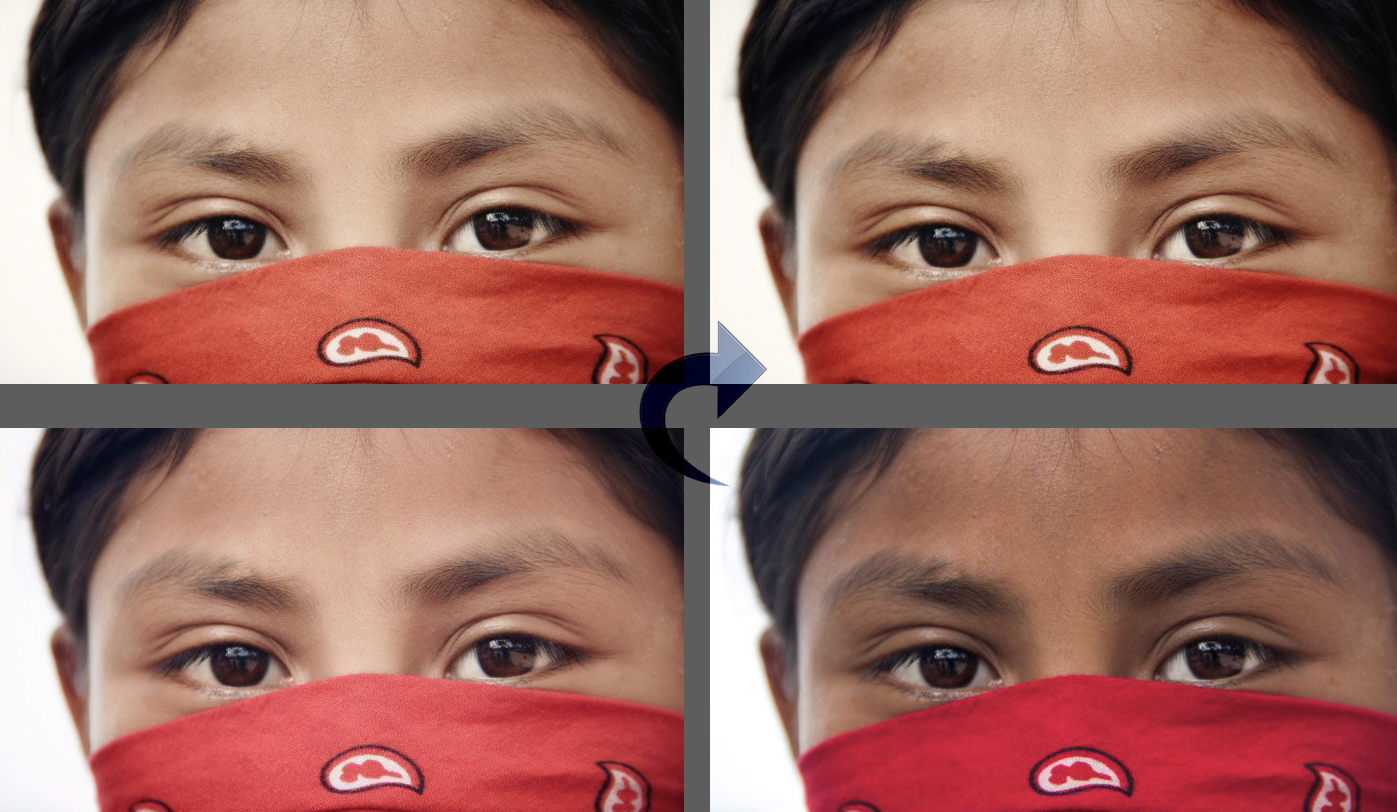
Much appreciated buddy Space, can't really take the credit as I just edited them; they're my good friend ?lex's.
Funny thing is I have "my own view / photos / experience" of the place and for 5 years now hadn't being able to develop the photos... in a way, they portray same people but in very different "context", in such a sincretism they see CocaCola as a sacred beverage, are much much fearless and tough than so called "zapatistas rebels" (without the need of using the masks) and don't really give a fuck about EZLN. They're the most unite people in South America - so they say - and even narcos fear them. But truth would be nowhere in between and it would probably depend more on who you hang out with :P
Hope 1 day we can hang out together, all good • m
-
Max, some really beautiful pictures ... Viva Zapata!
-
a bit offtopic and pace change but interesting and inspirationally ironic :-)
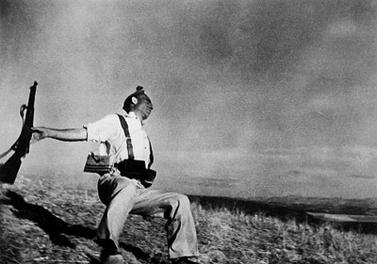
Extract of Robert Capa Interview, October of 1947
{...} That was called the best picture I ever took, I never saw the picture in the frame because the camera was far above my head {...}
-
Thanks for reminding me to download an update for my Silkypix Pro 5 Panasonic edition. I love the HDR slider...
Latest version is 5.0.44.0 and it supports all panny cameras up to and including FZ70 (all cameras released to June 2013). The special offer on this software has been withdrawn now (Sept 2), but you can still download the latest version if you have previously registered an older copy...
-
Hey guys, as feedback is on the weak side, je je, and at the risk of feeding my ego too much, I'll post my own "advances" on editing and workflow techniques
These are photos taken by my good friend ?lex in Nueva Arena, comunidad of the caracol La garrucha, Chiapas, Méjico. I was lucky enough to edit them. Despite the thousands of miles distance, with this collaboration we’ve been able, ?lex and I, to share; share what? the dream of life man!!! :P
Of course this is one subjective and partial POV, but I believe the images are able to transmit more than words, much more... an incredible range of subtleties, interskin irony, unspoken mysteries, gradients of truth, unsettling and surreal nightmares, poetry and beauty
TECHYness
I spent a big deal of time deciding and testing which developer to use. Capture One output was clearly where I managed best results for Canon 60D raw files. Colour control of this app is superb and a must when there are such big colour variations and nuances as in this set. The possibility of using layers inside the app (for gradients and some relight) and toggling them on/off is invaluable, something Lightroom developers could implement if they weren’t so affraid of canibalizing Photoshop. The only image edited differently was the 3rd before the last. This one had such a big DR, I had to export two different bracket versions into free opensource ImageFuser. After exporting the tifs I decided for a different workflow; I edited everything inside of Photoshop using layers as smart objects and actions with my own recipes of Color Effex and Exposure. This takes a long, long time as these are 100Mb tifs. About 40 hours work for these 32, well 31 now, we just decided to take 1 out, wonderful photographies’ journey • gashô
-
Today is short: wanted to tell you guys about latest finding XnConvert, which is a free batch engine that supports almost any format ever invented, including raw (panasonic rw2 too). It is super intuitive, fast, wonderfully designed and very very useful. Can't believe what a quality product this is :D
I'm still squeezing but the resize, autocrop, watermark, text-tool, autolevels and various adjustments, erase metadata and the ability of cueing them as I want trashes from graphic converter to image optimizers and watermarking tools. There are Windows, Linux and Mac, 32 and 64bit versions
Though I knew XnView from long time, this new stuff really surp(ri)ased me, je je
If you use it please consider sharing your "opinion" also here ;-)
gashô
PS
BTW, Tltools version 3.4.48 is out
I got it to work with dng's (little fuckers)... only problem is workflow process gets a tedious extra step = more time
Currently I'm evaluating LRtimelapse 3 (beta) with video output module for use with Lightroom 5
-
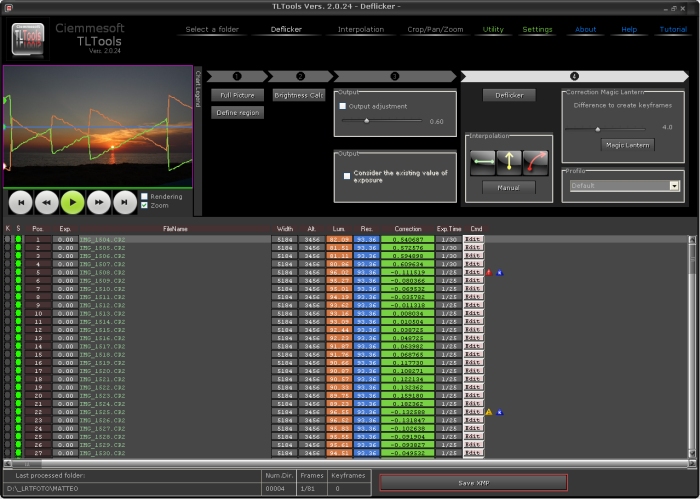
as I keep trying to find nice/optimized workflow for timelapse deflicker than runs natively on mac OS 10.6, I stump with this Ciemmesoft TLtools program. It is free (donationware) and though requirements are Windows XP or later, Lightroom 3.5 or later and screen resolution at least 1280×960, Mauro, the name behind the project, put this simple guide to use it in a mac with winebottler and wine (or emulators like VMware Fusion, Parallels, etc.).
Good news: it works, actually deflicker it is good. The main difference I found with LRtimelapse (free version limited to 400 stills batch) is that it can work as a standalone, better with jpegs. Directly exports uncompressed video. Can create video templates for Lightroom, 2800 and 4k, the catch here is that only through h264 codec :(
Bad News: as in version 3.4.46 doesn't work directly with Panasonic RW2s (for a fast LR integrated metadata workflow), has lots of bugs, though is supposed to be supported, I cannot make it work with DNG (I hate fucking dngs!!!) as prompts error in metadata and whatnot. In my laptop doesn't make full use of dual core processor power... probably window version is more stable and faster. Very picky with file naming, had to rename files to sequences like 0001, 0002, 0003, etc.
Anyway if you're into TL and don't have GBDeflicker (or other AE plugins) or LRtimelapse (needs lightrrom), it's totally worth checking, they webpage is reasonably well documented :D
they even have this link - a PDF guide for constructing a motorized dolly. It is in italian!!!
gashô
-
hey guys :)
still Rawtherapee related, it happened to cross my path this thread at timescapes about a free deflicker plugin for rawtherapee, code name: DeSERt. Unfortunately, as I am very interested in timelapse, right now it is only for windows machines so, being unable to test it, I can't give any feed information
here's DeSERt download link

and a video. TL set with aperture mode
ok, that's it, one more drop of water in this vast ocean of info
-
Hey guys!!!
I've been checking latest open source developers (builds) and cataloging alternatives to lightroom and the kindIMHO Rawtherapee is the most advanced, well thought, well featured and easy to use free application out there. The 4.0.11 build is stable - I'm running it on a mac - has been improved in all aspects: interface, color engine, modules and tools, etc. Certain tools, modules even, are way better (read deeply tweakable and accurate) than LR, i.e sharpening, Lab curves, color profiling and many more. On the other hand it is a no competitor in the quickness field. A good idea is to build a starting point profile (believe me makes all the difference) and from there expand on further presets and tweaks. Though for some years I wasn't able to fully squeeze RT potentiality, I wouldn't be lying if I said now surpasses LR in terms of IQ. Interface is slick and pleasant too. Just takes a bit of testing and time ;-)

Darktable with an interface similar to LR, more basic though, is very fast in the catalog handling and has interesting developing tools options. Problem is learning curve is steep, develop module gets increasingly slow, kinda accumulative and export takes too long. I also checked Photivo, Digikam and a bunch of others. Digikam is interesting but is way too slow, complexified and hard to instal; only through macports on a mac.
That's about it, all good
-
@maxr cheers man! still lots to learn about this odd combination,... and i'll be honest,. had to google Jodorowski :P
and yes, the contax zeiss glass is a very big part of it. Older russian lenses like the MIR or Helios will give a different feel, closer to old school films than a zeiss. some prefer one some prefer the other. but 90% of the "feel" is there after tripping the shutter.
in post i use the Distort function and unsqueeze the photo which naturally produces the black bars,... and after that, its regular processing, but half the time i just adjust levels and a curves a bit and that's it, cos i'm a lazy ass :P
glad you enjoyed my stream and thanks for checking it out :D


Howdy, Stranger!
It looks like you're new here. If you want to get involved, click one of these buttons!
Categories
- Topics List23,992
- Blog5,725
- General and News1,354
- Hacks and Patches1,153
- ↳ Top Settings33
- ↳ Beginners256
- ↳ Archives402
- ↳ Hacks News and Development56
- Cameras2,367
- ↳ Panasonic995
- ↳ Canon118
- ↳ Sony156
- ↳ Nikon96
- ↳ Pentax and Samsung70
- ↳ Olympus and Fujifilm101
- ↳ Compacts and Camcorders300
- ↳ Smartphones for video97
- ↳ Pro Video Cameras191
- ↳ BlackMagic and other raw cameras116
- Skill1,960
- ↳ Business and distribution66
- ↳ Preparation, scripts and legal38
- ↳ Art149
- ↳ Import, Convert, Exporting291
- ↳ Editors191
- ↳ Effects and stunts115
- ↳ Color grading197
- ↳ Sound and Music280
- ↳ Lighting96
- ↳ Software and storage tips266
- Gear5,420
- ↳ Filters, Adapters, Matte boxes344
- ↳ Lenses1,582
- ↳ Follow focus and gears93
- ↳ Sound499
- ↳ Lighting gear314
- ↳ Camera movement230
- ↳ Gimbals and copters302
- ↳ Rigs and related stuff273
- ↳ Power solutions83
- ↳ Monitors and viewfinders340
- ↳ Tripods and fluid heads139
- ↳ Storage286
- ↳ Computers and studio gear560
- ↳ VR and 3D248
- Showcase1,859
- Marketplace2,834
- Offtopic1,320


