-
Hi @tida
Couple of questions:
1) Playing with your new version of the scripts. Just out of interest, while I've changed the path to the program, for some reason it comes up with an error. My path is C:\Program Files (x86)\EDL_Convert\EDL_Convert.exe so I am entering in the js file:
var InstPath = "C:/Program Files (x86)/EDL_Convert/EDL_Convert.exe";
For some reason it's not finding it. Are the spaces causing problems? Not a biggy - I can launch it manually.
2) The thumbnails in Resolve are all wrong because they show the first frame - but each clip has a first frame which is different from the subsequent frames. Again not a biggy but is there something I'm doing wrong? I've tried with "Add 1 extra frame" checked and unchecked but it still does this.
-
Hello @Peter123456 I would like to know more about your Workflow. Might be to work out a mix will even be more effective. In general I would say that your Workflow should work also effective. When I started this project I also thought about this option but for some points I had no idea to overcome it without any subsequent compromises.
I don't know what you are doing if your project does include transitions, black pauses, fade in fade out. I guess that in this case scene detection will have a problem. With my Workflow whole length including transition time of start and end part will be included and rendered out as normal (clean) part. You also have the option to put some additional time to each clip. That has the advantage in case you would like to take some small adjustments in the final edit.
Then I guess you have to render one time more - DNxHD full lenght to DNxHD cut.
Another question is also how do you handle audio in this case. My workflow lets audio untouched. In the final text EDL file audio from clips is still linked to original camera file. Sound etc. is also still linked to it's original. Only video will be linked to now graded .mov file.
Furthermore, you can build easily different Vegas color graded versions. Render different versions in DaVinci and put them into different sub-folders. Move then for excample version1 from the main-folder to a sub-folder and version2 from another sub-folder to the main-folder. Immediately you have a new graded Vegas version2.
Next thing is that you could throw away all original (non graded) DNxHD files. If you need them after some time to make a new graded version in DaVinci, just open linear text EDL file in Vegas and render DNxHD again. Open then DaVinci project and here you are again...
It's fast - starting from the first edit and come back for the final edit Round-Trip (excluding render time and color grading) takes me a little less than 3 minutes to work through all neccecary procedures.
Please tell me any ideas you have.....
-
Hi @tida, Can you tell me the advantage of your workflow over using scene detection in DaVinci?
With my workflow I can render edited MTS files to DNXHD. Then I import it into DaVinci and run the scene detection program to split it up into separate clips that can be individually color corrected. Thanks.
-
I did release a new version of EDL_Convert. This time with changes of the scripts to take care about original footage with mixed framerates in one project.
You can download it at the top of this topic: http://www.personal-view.com/talks/discussion/6238/edl_convert-workflow-developement-for-sony-vegas-pro-davinci-resolve-/p1
Just put all scripts into the customized toolbar and you will be able to make a round-trip with a few clicks.
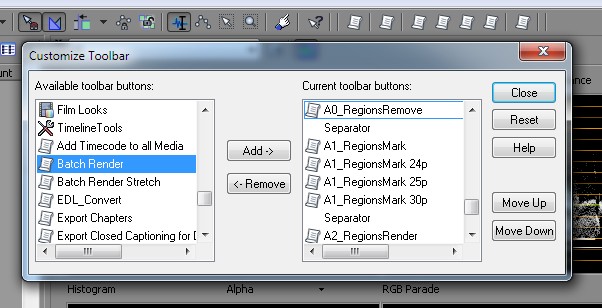
Changes in v1build004:
Did add new scripts A1_RegionsMark 24p, A1_RegionsMark 25p, A1_RegionsMark 30p. They will take care that you can render footage with mixed framerates to the target frame rate either 24p, 25p or 30p. This is done by automatically adjust "Undersample rate" as well as "Playback rate".
All RegionMark scripts will remove regions which might be set before and then subsequently sets the new regions.
Added A0_RegionsRemove which does only remove regions which might be set.
Added A0_RunEDL_Convert which will execute EDL_Convert.exe directly from Sony Vegas
 Option - Customize Toolbar.jpg602 x 308 - 56K
 -
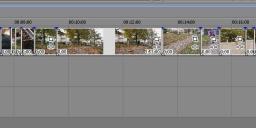
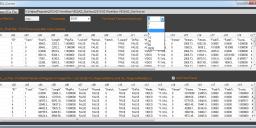
In this screenshot from Vegas you see three different timelines from same Project. I used 42 different clips for a Video of a length of 2:20 minutes.
Usually, I would have to render out overall 28:00 minutes in DNxHD which shows upper timeline.
With "Tail and Head Trim" set to 2 seconds it is only 4:40 minutes shown in the middle timeline.
With "Tail and Head Trim" set to 0 seconds it is only 2:20 minutes shown in the lower timeline.
That means for a typical Project I can safe a little more than 10 times of hard drive space as well as render time. In this case 3.8 GB against 42 GB either with or without trimming for .mov files. Sanity 5 patch took 6.4 GB for these 42 original .mts files.
Before Grading:

Final Edit in Vegas:

By the way Color Grading with ColorGHears in Davinci Resolve is a charm!!!
 Size changes for DNxHD rendering.jpg1893 x 269 - 119K
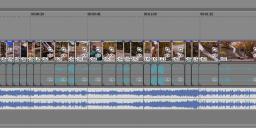 Final edit in Vegas.jpg1804 x 360 - 184K
 -
@Mark_the_Harp one think to note. Just in case if you want to work with footage that include different framerates in one project like 1080p30 and 720p60. Usually for whole project rendering Vegas takes place with frame blending or skipping and rezising.
If you want to batch render regions in Vegas you have to manually equalize framerates at first. Otherwise I get a lot of jumpy .mov files or Vegas passes by from time to time. If you have a 720p60 clip - right click and choose Properties/Video Event/Undersample rate. Instead of 1.000 put 0.500 and it will be fine for batch render regions (incl. rezising) in 1080p30.
Maybe I can take care about this in a new script with an automatic batch resample framerate option for mixed footage. Then you don't have to keep an eye on it manually.
-
@tida Fortunately, I'm not playing as well, otherwise it would be impossible. It's hard enough trying to do various audio and video things, but the recordings are sounding good so far. Your idea about using folders to hold different versions of the files makes perfect sense and I will do that. It will also help me not lose track of which version of things I am working on.
I joined ColorGhears a while back but that was mainly using AE which is something I don't know that well. I've done a few motion-tracked layers in AE but DaVinci seems to do a better job for me, so I might look into @shian's DaVinci tutorials. There are some other good ones out there, which I have found really great. I'm really at the beginning of learning DaVinci but I'm really impressed. Hope to have a proper video to show everyone soon!
-
@Mark_the_Harp didn't know that playable instruments do exists for 4500 years - must be a great honor. Then you must be very busy concentration on lightning, video, audio and playing.
I start to love color correction and grading with DaVinci Resolve more and more. It's easy to perfom different versions of grading for whole projects. If you put each grade in different Vegas output sub folders. Just drag and drop from sub to major folder. As soon as files appears in major folder Sony Vegas does update it automatically and you have a new type of Video.
Signed in for ColorGHear Pro few days ago and even with few yet available tutorials for DaVinci from @shian results are quick and impart the secret professional touch.
-
@tida I'm very happy to report on results - the vimeo video was just a collection of shots I did as a trial (glad I did, as I'm taking some lighting next time). This week as well as more multitrack audio for our eventual CD, I'm hoping to get enough to do a little taster video about the amazing copies of 4500 year old instrumens we're using and that's where resolve / roundtripping will come into its own. I'll report back!
-
@Mark_the_Harp especially if you cannot plan your scene. Like you have mentioned somewhere that you shoot on concerts with multiple cameras. For master cams you need long lasting shots. 5 minutes would end up in a deasaster for DNxHD - and you might need only 5 seconds. It's a waste of render time and space on your hard drive.
I would be happy if you could report on results. Please take for excample an eye on frame accuracy. That means compare your starting project.veg file (linked with .mts) with project_EDLfinal.txt file (linked with .mov). It might be that if you use other frame rates than me that you could observe a shift of one or two frames.
By the way the Vegas EDL text files contain much more information like the standardized EDL CMX3600 which would work in Resolve. I would guess with their 30 different variables they include nearly same information like AAF and XML.
-
@tida That all makes sense (more sense, now that I've played with it). I fully see the advantage of just exporting the bits you need otherwise it's such a huge hit on space. Incidentally hoping to try again next week at the same venue, this time with some lighting! I will definitely be using your scripts now I know roughly how it works - no real point until I have an edited piece with the actual shots I want, but I'm confident I can do it now, thanks to you!
-
@Mark_the_Harp maybe I should look also into Vegas 12 that I would not assume everything. But I bet that the XML-route always assumes that you round-trip original camera files. But for *.mts files you get stuck in Resove. (mp4-files like other cameras do would work)
The pity is that when you start Edit you don't know which clips you want to use and which not. So it's a waste of time and memory to convert everything where you assume you need it and then start editing. Rewrapping is that you start to edit with *.mts files. Convert the used .mts files to same or similar .mov file names. And simply rename all *.mts into *.mov links in the xml.
So you still end up with a waste of memory for the input files as you have to render out the full length. Batch conversion via 5DToRGB or ffmbc remapping tools doesn't allow to cut original files. If you want short .mov files easiest way is still to do it in Vegas by scripts. But then you have to adjust the file length and cutting points in the xml files as well to make roundtrip work - hence you need an additional (self made) program to do that.
If Sony Vegas does integrate that in Version 13 it's worthwhile for me to upgrate it!!!
-
@tida Brilliant - thank you! Getting there - got something into Resolve but not quite sure it's doing what I'm expecting it to do yet. I'll follow your instructions carefully again in the morning. This should be really useful if I can get it working.
-
@Mark_the_Harp sorry I did not realize that it was you on vimeo. As mentioned before I did not try Vegas 12 (even not the trial version). But as far as I understand if you work with XML/EDL/AAF files you end up always with two .mov files. The first one is the ungraded input .mov file and finally you generate the second graded .mov file.
I assume that if you go the XML route in Vegas 12 you have to convert each clip over the whole distance (at least the ungraded; maybe the final graded has the excact cut length and you save at this point space?) .
If you go into Resolve, first check framerate in PRESETS but after that directly go to CONFORM. Right click in the "Timelines" area and "Import AAF/EDL/XML.." If you import your XML whole structure of your edit should show up. (If that doesn't work first import in MEDIA the files then go to CONFORM and Import XML) Please note that the handbook of DaVinci Resolve is very good... Might help also. Also edit your XML-file with notepad and look how the file structure changes.
But just come back also to my route. This will not show excactly the edit structure with transitions in Resolve. But it will show a linear structure where each clip is organized by time one after the other. Thats because I renamed them with 1001_XXX.mov, 1002_XXX.mov, etc. For medium sized projects its OK and you will not get lost. The ungraded as well as the graded .mov file will have the length of the cut or optional an additional length of specific seconds you put in EDL_convert. I did calculate the new clip length in the final EDL-file. Maybe in the future Sony would do that for XML files as well.
Hope this helps....
-
@tida Hi there - I was going to ask this particular question on your vimeo piece, but thought I'd ask it here as it may help more people: I'm using Vegas 12 and can export individual DNxHD clips and an XML file, but I can't for the life of me get it to bring the clips into resolve. I can bring the clips in manually but of course that's a bit of a pain as I want eventually to have the graded clips available back in Vegas 12 for final output.
DNxHD really flies in Resolve (at the expense of big files) but it would be great obviously to only have to output the bits I need to grade, otherwise my PC will get clogged up with huge files.
I can do the round-trip manually but not using XML. Is there something obvious I'm doing wrong - in Vegas or Resolve? Presumably with Vegas 12's ability to export XML (apparently!) I don't need to use @tida's EDL_Convert / EDL_Conform?
I realise you might have answered this one in the Vimeo video but there's no audio so not entirely sure if I'm missing something.
-
Did release EDL_Conform v01 build 003. Now one is able to trim the head and tail of source file. DNxHD .mov files (or mp4 files) can be rendered to the clip length of the original .mts file, to the clip length of the cut or some defined time in between.

 EDL_Convert v1build003.jpg1224 x 578 - 219K
 -
@fatpig, thanks for the link. I have seen this links and others using as a base ffmbc for rewrapping. HD-AWU from HD-CINEMATICS is also an interesting free tool. This can be found here: http://www.hdcinematics.com/tools/AWU.html. But why not using batch rendering by Sony Vegas Pro itself as you have better control.
Batch render by Sony Vegas is known for very long:http://sony-vegas.wonderhowto.com/how-to/batch-render-sony-vegas-329667/ and it's an original script delivered by Sony. I did just changed both scripts mentioned in that video tutorial.
It's of course a pity that Sony Vegas Pro 11 and lower does not support xml export.
-
Just did upload a tutorial to make it easier to follow the steps. A Round-Trip without rendering time and color correction takes less than 5 minutes. Would appreciate if you would give me some feedback...
-
@tonalt did you render the Project_EDL_lin.txt file, where all clips are only located in one track. Furthermore, which kind of DNxHD template did you create. Something like shown in attatched image. Keep also the name of the template simple.
 d3 Render Template.jpg1167 x 808 - 196K
 -
@tida thanks but didn't answer to my problem. d3 failed because A2_RegionsRender.cs script generated black video clips.
-
b2) whether you choose this option or not, it will not give any effect on .mts files
c1) sorry my mistake. Just open EDL_Convert.ini with text Editor and exchange the first line with an existing drive or folder. After that it will save always last folder position. (You can download also again as I changed it. Start folder is now C:)
d1) this procedure will not show crossfates in DaVinci. It will line up all your clips according to start times of edit independent which track you used.
d3) yes same links, install DNxHD, name make a template in Vegas
e1) when you managed to render them as .mov files you have to make a new timeline in CONFORM and drag/drop them. There are some video tutorials which you should use to understand how to setup DaVinci at first. There are sometimes no user friendly "no way backs" - like setting frame rates at first.
Hope this helps....
-
update to vegas 12 and this issue will be solved.
-
Started following your workflow. I'm using Sony Vegas Pro 11. I'm interested if working with Vegas 12 would simplify the process. Notes about the workflow:
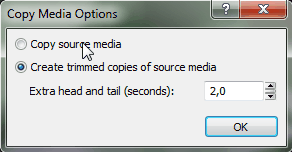
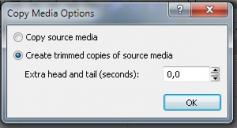
b2) So the option "Create trimmed copies of source media" does not work with Vegas 11 or..? Chose now not to use that option.
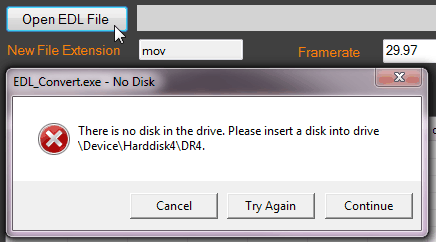
c1) I get this error when pressing button "Open EDL File". Not deal breaker, since I'm able to pass it.
d1) And now I lost all crossfades etc..?! Is it possible to get also those to Davinci?
d3) Remember to select all clips from the timeline (Ctrl+A) before running the scripts. Better to add also instructions where to get DNxHD encoder and how to setup render options (same links as you mentioned in other topic).
e1) Lol this was my first experience with Davinci and it was confusing, I couldn't figure out how to import the damn files. It seems that I'm not the only one and the solution was found here: http://forum.blackmagicdesign.com/viewtopic.php?f=10&t=942#p9179 . And you mean that add the files to the Media Pool?
e2) You mean Conform?
Now things are looking weird. The video clips are black. Just black picture and audio at the background, so step d3 failed. Not sure what I'm doing wrong, if I render clips manually with same render settings from Vegas, it's working fine.
Any ideas?
 ScreenHunter_02 Feb. 25 19.46.gif292 x 152 - 10K
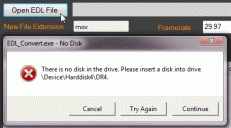 ScreenHunter_03 Feb. 25 19.49.gif436 x 242 - 16K
 -
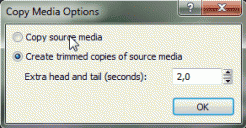
@Rambo Thanks, I know but never tried it. In case you don't want to update to Pro 12 you are somehow lost and that's the reason why I try to develope a convinient workflow. Furthermore you have to render into a .mov or .mp4 format and batch rendering of DNxHD by Sony Vegas Pro is an additional nice option. Did you try AAF or EDL in Sony Vegas Pro 12 and used it with DaVinci. I'm wondering whether you have to completely render out whole clips (events) or are you able to use desired parts.
Described method saves a lot of space because you render out only the used parts of the clips. I'm also thinking about an option to add a few seconds before and after. Similar like in Vegas the Copy Media Options which does not work with .mts files.
 b2 Create trimmed Copies - Does Not Work with mts files.jpg300 x 162 - 14K


Howdy, Stranger!
It looks like you're new here. If you want to get involved, click one of these buttons!
Categories
- Topics List23,993
- Blog5,725
- General and News1,354
- Hacks and Patches1,153
- ↳ Top Settings33
- ↳ Beginners256
- ↳ Archives402
- ↳ Hacks News and Development56
- Cameras2,368
- ↳ Panasonic995
- ↳ Canon118
- ↳ Sony156
- ↳ Nikon96
- ↳ Pentax and Samsung70
- ↳ Olympus and Fujifilm102
- ↳ Compacts and Camcorders300
- ↳ Smartphones for video97
- ↳ Pro Video Cameras191
- ↳ BlackMagic and other raw cameras116
- Skill1,960
- ↳ Business and distribution66
- ↳ Preparation, scripts and legal38
- ↳ Art149
- ↳ Import, Convert, Exporting291
- ↳ Editors191
- ↳ Effects and stunts115
- ↳ Color grading197
- ↳ Sound and Music280
- ↳ Lighting96
- ↳ Software and storage tips266
- Gear5,420
- ↳ Filters, Adapters, Matte boxes344
- ↳ Lenses1,582
- ↳ Follow focus and gears93
- ↳ Sound499
- ↳ Lighting gear314
- ↳ Camera movement230
- ↳ Gimbals and copters302
- ↳ Rigs and related stuff273
- ↳ Power solutions83
- ↳ Monitors and viewfinders340
- ↳ Tripods and fluid heads139
- ↳ Storage286
- ↳ Computers and studio gear560
- ↳ VR and 3D248
- Showcase1,859
- Marketplace2,834
- Offtopic1,320


