Image manipulation techniques
-
This topic is for anyone to add good online resources for learning post production
techniques.
I was hunting around to find something which would explain the differences between using levels and curves, and this tutorial is wonderful. Nicely written and comprehensive.
It's specifically about Photoshop but you can apply the ideas to any editing software:
http://www.chromasia.com/tutorials/online/curves/index.php
If you've found others on any aspect of image manipulation, please add them! -
Starting with Adobe CS 5, you could apply Photoshop effects on video file :)
-
Cool - although I only have CS2 at the mo. @stonebat In CS5, it would be interesting to know if you can do blur as an adjustment layer, because it's really useful for the trick in my next post.
I really like the tips on curves as I've never totally understood them before.
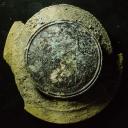
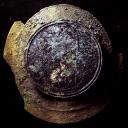
I tried using the ideas on something I'd dug up in my garden. There's no absolute colour reference (it's not a face, or a nature scene) so it's easy to play with the colours. The first image is as produced from the original RAW, the second is taken from the first and uses luma curves and then separate RGB curves to play with the mapping of colours. Without knowing the original you wouldn't be able to say which was truer to life - but the curves one looks more interesting, almost as if it has different lighting. Just imagine that animated with slow moves, with ancient cymbal and low synth sounds, and it would be an amazing cutaway in an archaeology video, for example. The original is very high resolution so could stand zooming in etc.
Since doing this I've also successfully used curves to do great subtle colour corrections on faces etc. Just wonderful stuff. Wish I'd discovered this earlier!
 garrett_find_25Jul11-800.jpg800 x 800 - 410K
 garrett_find_25Jul11_curves-800.jpg800 x 800 - 425K
 -
For anyone into using graphics in their edits, there's a really useful technique for cleaning up scans of monochrome printed text (I use it a lot for music scores) to get crisp images of fairly poor source graphics, but you could use it for any graphic (hand-drawn can look really good if you play with the blurring step) as eg transparent elements which you could colour / as a key source in a video.
Adjustment layers really help in creating this type of crisp graphic as they're non-destructive but unfortunately Photoshop (CS2 anyway) can't do a blur adjustment layer, so you still have to do this destructively. Serif programs can, so I tend to use Serif Photoplus for this technique as you can see the results in real time.
Either way it's a good technique, so here's the lowdown:- Scan in greyscale at 1200dpi or thereabouts (or at lower res then increase res afterwards)
- Paint out / crop out / clone out any bad marks / dirt
- Use levels to get a clean white background with good dark print (white should be white as poss but black doesn't have to be totally black at this stage)
- Apply enough blur to smooth the edges of printed letters (zoom in to check the amount of blur)
- Use a second levels adjustment on this blurred image to clip to very narrow range to get crisp image
- To change the spread of the black areas, go back and alter the blur amount in the step before last (if your software doesn't support adjustment layers you will need to undo, redo the blur, then redo the levels)
There are quite a few uses for this:
I've used it to create a clean graphic from scanned music as a graphic overlay in one of my videos - great fun! So I hope it helps anyone else who might want to experiment with incorporating really crisp graphic layers in a video, using originals which were printed or hand-drawn. You can also take it further with compositing to create interesting colour fill / shadow effects to your graphics.
You can also use it for producing clean images of many pages of a publication, but rather than scan them, use the GH2 to take a photo of each page and edit those. Certainly works well for music scores. A lot quicker than scanning. If you're not breaking copyright, of course :-) - Scan in greyscale at 1200dpi or thereabouts (or at lower res then increase res afterwards)
-
Good topic. There is some vids by Stu Maschwitz, probably better known due to their marketting aim, but i've found two of them well done for the detailled insight it gives on grading examples :
[vimeo]
[vimeo]
You can find the entire serie here :
http://vimeo.com/channels/coloristaii/page:1
Start New Topic


Howdy, Stranger!
It looks like you're new here. If you want to get involved, click one of these buttons!
Categories
- Topics List23,992
- Blog5,725
- General and News1,354
- Hacks and Patches1,153
- ↳ Top Settings33
- ↳ Beginners256
- ↳ Archives402
- ↳ Hacks News and Development56
- Cameras2,367
- ↳ Panasonic995
- ↳ Canon118
- ↳ Sony156
- ↳ Nikon96
- ↳ Pentax and Samsung70
- ↳ Olympus and Fujifilm101
- ↳ Compacts and Camcorders300
- ↳ Smartphones for video97
- ↳ Pro Video Cameras191
- ↳ BlackMagic and other raw cameras116
- Skill1,960
- ↳ Business and distribution66
- ↳ Preparation, scripts and legal38
- ↳ Art149
- ↳ Import, Convert, Exporting291
- ↳ Editors191
- ↳ Effects and stunts115
- ↳ Color grading197
- ↳ Sound and Music280
- ↳ Lighting96
- ↳ Software and storage tips266
- Gear5,420
- ↳ Filters, Adapters, Matte boxes344
- ↳ Lenses1,582
- ↳ Follow focus and gears93
- ↳ Sound499
- ↳ Lighting gear314
- ↳ Camera movement230
- ↳ Gimbals and copters302
- ↳ Rigs and related stuff273
- ↳ Power solutions83
- ↳ Monitors and viewfinders340
- ↳ Tripods and fluid heads139
- ↳ Storage286
- ↳ Computers and studio gear560
- ↳ VR and 3D248
- Showcase1,859
- Marketplace2,834
- Offtopic1,320


