It allows to keep PV going, with more focus towards AI, but keeping be one of the few truly independent places.
-
EDIT: Ignore this post for the time being. Behavior has either changed between Vegas Pro 11 and 12 or is media dependent. Investigating.
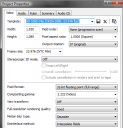
Here's some quick advice to anyone trying Vegas for the for the first time (or that's been having trouble with getting RGB 16-235 vs 0-255).
The attached image shows the settings you should use for your 1080 24P project to display with RGB 0-255 instead of the normal 16-235 that you will get by default.
The relevant part is the Pixel Format, Compositing Gamma and View Transform - though View Transform can be modified if you have special needs (like editing F3 S-Log footage).
I'm hoping this will be useful to people using it for editing GH2 footage that want to color correct.
To get these options go to File>Properties (or press ALT+ENTER). Look at the image to get the settings.
Note that these settings look like an enhanced version of the default ones (e.g. the shadows go to full black and highlights go to full white, better precision during fades, etc.) but performance and general fade curves, etc. respond fairly similarly to the default settings. If you instead change the compositing gamma to "1.000 (Linear)" your render times will typically multiply in length, several of the plug-ins work differently (especially color correction ones so most standard presets are no longer much use) and the behavior of the fades is altered radically. In other words, use Gamma 2.222 unless you have a very specific reason not to.
 Default Vegas Pro Settings.png434 x 451 - 28K
 -
what is your typical vegas workflow & export? I see your settings, but when I use the 32 bit floating it get white blotches in some clips. Also have you ever messed with settings during export settings at customize template,>project>color space I see it offers 10 and 16bit color space, would this only be useful if your footage has the ability?
-
@GravitateMediaGroup I haven't had the issue with white blotches myself. Do you have any problem clip excerpts I could check out?
Workflow depends on the intended path. If I want to collaborate with a DaVinci Colorist, then transcoding to Cineform MOV before starting is helpful. I'm trying the Vegas Pro 12 trial for the first time today and have only worked with the previous versions (Platinum 9 and 10 and Pro 8-11) so the color space is a new concern.
I've only tried "Default" Color Space during export but will let you know if I find out anything useful about the others.
Also, did you look at Slog color management in Vegas 12 topic?
And the Sony White Paper on the workflow. http://dspcdn.sonycreativesoftware.com/whitepapers/vegaspro12_s-log_and_aces_workflow.pdf
-
I adjusted my project to match the settings in your picture. And you are right about my presets, they are useless with those settings lol
-
@GravitateMediaGroup Lol. Is that true with both Gamma settings or only with Gamma 1.000? My old presets worked fine as long as I kept the Gamma to 2.222, but that was in Vegas Pro 11 - I haven't tried loading presets in the new one yet.
-
@thepalalias With 2.222 things seemed a bit over saturated. 1.000 seemed to take things back to normal and allow me to keep my presets the same without minor adjustments.
It's weird that our issues sound opposite lol
-
@GraviateMediaGroup It depends in large part on your output format. I am finding I get very different results when I export as PNGs vs when I export as Cineform AVIs and then open them back up in either Vegas or VirtualDub.
I've used the PNG exports from VirtualDub to illustrate how the Cineform AVI exports from Vegas Pro 12 look when I open them back up in VirtualDub (which mirrors what I see doing the same with Vegas Pro 12 in 8-bit).
The PNG files below are not ideal, since the project is 720 29.970P hacked GH1 footage as opposed to 24H GH2, so you'll note more discrepancies than usual. But here is what the difference look like on that type of footage, with no FX or fades.
 test no fade no fx 8-bit_000000.png1280 x 720 - 1M
 VP12 CF AVI to vd 8-bit0.png1280 x 720 - 1M
 test no fade no fx 32-bit (video levels)_000000.png1280 x 720 - 4M
 VP12 CF AVI to vd 32-bit (video levels)0.png1280 x 720 - 1M
 test no fade no fx 32-bit (full range) gamma 2.222_000000.png1280 x 720 - 4M
 VP12 CF AVI to vd 32-bit (full-range) gamma 2.2220.png1280 x 720 - 1M
 test no fade no fx 32-bit (full range) gamma 1.000.png1280 x 720 - 4M
 VP12 CF AVI to vd 32-bit (full-range) gamma 1.0000.png1280 x 720 - 1M
 -
have you done any testing with the 10/16 bit color space yet?
-
Film Convert plugin coming in the near future for vegas.
-
This guys published update recently
http://www.sonycreativesoftware.com/download/updates/vegaspro
-
Thanks for the heads-up Vitaliy. The bug where it would reset curves if you split the clip (but only sometimes) was really annoying, as I use that a lot in projects where I am doing footage with one single take.
I hope the following tip is useful for those people who occasionally animate the effects (such as curves) during a take: rather than using "animate effects" I find it easier to split the clip on the timeline. For example, I have some footage taken yesterday in a darkish children's playroom with a lot of sunshine at one end. This is observational footage which needs to be kept complete without editing (whip pans and all) and because of the rapid changes in light levels, with my agreement the cameraperson used auto-iris. In Vegas you split the clip where the iris changes, then change the curves after the split, then drag the ends of the clip over each other to do a mix between the two as the camera moves through the transition. It does a mix between the two corrections and you get seamless changes - much easier than using the "animate" thing in the effects chain especially if you are correcting multiple plugins at the same time.
Let me emphasise, I'm not talking "art" with this type of footage - but it must look reasonably good so it's useful for people to analyse and comment on what's going on in the room.


Howdy, Stranger!
It looks like you're new here. If you want to get involved, click one of these buttons!
Categories
- Topics List23,992
- Blog5,725
- General and News1,354
- Hacks and Patches1,153
- ↳ Top Settings33
- ↳ Beginners256
- ↳ Archives402
- ↳ Hacks News and Development56
- Cameras2,367
- ↳ Panasonic995
- ↳ Canon118
- ↳ Sony156
- ↳ Nikon96
- ↳ Pentax and Samsung70
- ↳ Olympus and Fujifilm101
- ↳ Compacts and Camcorders300
- ↳ Smartphones for video97
- ↳ Pro Video Cameras191
- ↳ BlackMagic and other raw cameras116
- Skill1,960
- ↳ Business and distribution66
- ↳ Preparation, scripts and legal38
- ↳ Art149
- ↳ Import, Convert, Exporting291
- ↳ Editors191
- ↳ Effects and stunts115
- ↳ Color grading197
- ↳ Sound and Music280
- ↳ Lighting96
- ↳ Software and storage tips266
- Gear5,420
- ↳ Filters, Adapters, Matte boxes344
- ↳ Lenses1,582
- ↳ Follow focus and gears93
- ↳ Sound499
- ↳ Lighting gear314
- ↳ Camera movement230
- ↳ Gimbals and copters302
- ↳ Rigs and related stuff273
- ↳ Power solutions83
- ↳ Monitors and viewfinders340
- ↳ Tripods and fluid heads139
- ↳ Storage286
- ↳ Computers and studio gear560
- ↳ VR and 3D248
- Showcase1,859
- Marketplace2,834
- Offtopic1,320


