
It allows to keep PV going, with more focus towards AI, but keeping be one of the few truly independent places.
-
I've read and watched all the available info about modifying the lens Pentax/Cosmicar/Rainbow 8-48mm f1.0.
I just received Canon TV C-Mount Lens 8-48mm f1.0 which looks like Rainbow model:
http://www.pentaxforums.com/forums/pentax-q/210138-adapting-rainbow-h6x8-ii-8-48mm-f1-0-cctv.html
But the guides of modifying show difference between Rainbow and Canon at the thread construction inside.
Please anyone who has CANON 8-48mm f1.0 for help about the right modifying!!!
Big thanks in advance!
-
There is more than one Canon 8-48 mm model. (there's more than one Rainbow model also) You'll have to show us exactly which one you mean. I believe the Canon PH6x8-II is identical to the Rainbow H6x8-II.
Other people have modified the Rainbow H6x8-II by affixing an m43 adapter to the rear with three tiny screws, but I think it's far better to modify this lens by securing the lens's own C-mount threads to the back with six new screws.
Remove the rear plate. Separate the C-mount threads from the black CS-mount adapter. It's glued, so you might need to drop the entire rear plate, C-mount, and CS-mount adapter assembly in boiling water to soften up the glue enough to unscrew the CS-mount adapter. Clean out the grease. Remove the rear housing. (it's held on by six screws) Place the now-separate C-mount threads in the rear housing, and use a drill press with an M2.1 bit to drill six holes in the C-mount through the existing six holes in the rear housing. You'll use those existing six holes as guides, and drill from the inside of the rear lens housing towards the back. Then you need six M2 x 8 screws with heads no taller than 1.2 mm. I used flat-head screws. You need a C-mount adapter with a flange no thicker than 1.0 mm. Most of the so-called slim and super slim C-mount adapters have a 1.4 mm thick flange. The thicker flange won't allow you to make this lens parfocal, even using the lens's back focus adjustment.
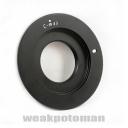
 gaingame-outlet (minus the printing).jpg500 x 500 - 36K
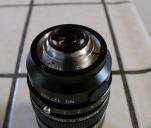
 Rainbow-H6x8-II-modified.jpg1000 x 847 - 349K
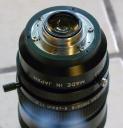
 Rainbow-H6x8-II-modified (2).jpg1000 x 1043 - 211K
 -
Thank you, balazer!
I tried holding by hand the lens as shown on the second picture above EVEN WITHOUT THE WHITE METAL PLATE and still not ok. My c-mount adapter is metal made and it's suitable for c-mount and M42 to m4/3. Maybe the adapter is the issue.
Still trying to find the best way...
-
White metal? The 2-in-1 M42 and C-mount to m43 adapters have a flange that's far too thick for this lens - 5.2 mm. You still haven't told us which Canon lens you're using.
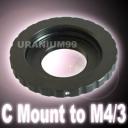
 henry-digital.jpg400 x 400 - 17K
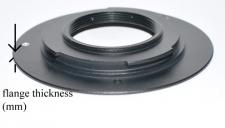
 c-mount-flange-thickness.jpg495 x 282 - 44K
 -
Mentioning the white metal plate I mean the white metal ring shown on the modified lens on the picture you uploaded above.
My Canon lens looks EXACTLY the same as your Rainbow shown above.
So I need thinner c-mount adapter?
-
I've successfully modified dozens of Rainbow H6x8-II, which is the same lens as your Canon version. The Canon version is much more rare...let me guess, did you buy it off Ebay?
The C-mount adapter I've used looks like this: http://www.ebay.com/itm/220873821595
I've sold my modified lenses on Ebay before: http://www.ebay.com/itm/300870921143
There's many pictures of the mod here on PView.
-
@fosterchen - Yes, from eBay, of course, just for £10.
As I see, your c-mount adapter is not thinner than mine.
Anyway, I'm going to separate the c-mount threads of the lens, obviously this is the only way, although I still can't imagine how the boiling water would help eliminating the glue.
-
apefos, I've watched this video long time ago until now many times, but there is a difference.
-
Thicker is stronger and a better solution for a permanent mount on the lens. To get infinity focus, you need to replace the rear metal ring (with the three screw holes) with the c-mount adapter. I drilled 3 holes in the adapter to match the 3 holes of the metal ring, and used a grinding tool to grind out the surrounding area of each hole so that the screws are flush with the adapter. That's the only way it will work to attach lens to the GH2 / GH3.
-
fosterchen, how thick is the flange on your c-mount adapter? I tried a 1.4 mm adapter, and it was too thick to get proper back focus.
In any case, my solution does just fine with a thin adapter, because I don't put any screws through the aluminum adapter. The screws go through the c-mount flange, which is ~2 mm of brass - no grinding.
-
As I see more and more, I need a thin c-mount>m4/3 adapter so that the things work finally.
BUT: what confuses me is that even holding the lens by hand straight to the body of my GH2 (without c-mount adapter attached!), it still can give focusing less than 1 meter distance from an object. Note that I tried that with the c-mount thread removed from the lens, so only the black ring part with the six screws touches the body of GH2!
Hope the Pentax Cosmicar model is much better and easier to modify...
-
That video is of an earlier mod, I've done quite a few since then and have honed my skills so it looks better!
I've never measured the flange on the c-mount adapter, but it's about the same as the metal back plate of the lens. My goal in doing it this way was to keep the lens itself from any modifications so it can easily be put back into its original state with no glue used.
@balazer, do you have final photos of your modded lens? Would like to see it!
-
See post # 2 of this topic for photos. That's the whole mod. The C-mount adapter is not permanently attached. It just screws on to the C-mount threads.
-
Looking at your modification carefully I still can't get how you mounted the silver thread inside of the black 6-screwed part. I tried that, but the silver ring can't go deeper inside as shown on your picture. Would you remove this silver thread and take a picture of it only to see the way of it's modification?
-
@producer, if you want to avoid the hassle, I can trade you my modified Rainbow H6x8-II for your Canon 8-48mm.
Let me know.
-
I'd rather not take the lens back apart if I don't have to. :) If my memory is correct, when you finally get the CS-mount adapter separated from the C-mount, the rear plate is released and you find an o-ring between the rear plate and the C-mount. The circular channel that the o-ring lies in is the space where the heads of my six replacement screws now fit. The C-mount naturally fits into the rear housing deep enough to form that channel. I didn't modify the C-mount in any way to make it fit deeper.
There's virtually nothing in my mod to show. I drilled six holes, removed the six original screws, and put in six longer screws. Perhaps your lens is different from mine & fosterchen's. Post some photos for us, of the whole lens with identifying information, the C-mount from both sides, and of the rear housing with the C-mount removed.
-
Here is everything: the lens and the silver mount thread removed and my c-mount>m4/3 adapter.
As I wrote already, the c-mount>m4/3 adapter obviously must be the thinner version. Once I order such a type, then I think everything will be ok.
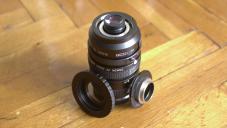
 P1290392.JPG4976 x 2800 - 5M
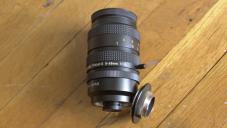
 P1290393.JPG4976 x 2800 - 4M
 -
Your lens looks the same as mine. It appears that you have not yet removed the CS-mount adapter. I believe once you separate the CS-mount adapter from the C-mount, the C-mount will fit deep enough in the rear housing.
Just to be clear, that rear part that you removed from the back of the lens by taking out three screws is actually three pieces (from left to right in your photo): the silver-colored plated brass C-mount, the black anodized rear aluminum plate, and the silver-colored CS-mount adapter. The CS-mount adapter needs to be unscrewed from the C-mount. You'll set aside the CS-mount adapter and the rear plate, and use only the C-mount.
That C-mount & M42 adapter is definitely too thick for this lens.
-
Yes, too thick I realised already. How to unscrew the c-mount from the cs-mount? Boiling water?
-
Vise and pliers? Vise and Vise-Grip? Just do it any way you can without damaging the C-mount. It takes a lot of force. Mine was glued on, and so heating it up in boiling water softened the glue.
-
That is not a CS Mount adapter, but a macro extension, since the end is still a C-mount thread. You will need to heat it up to melt the glue and use pliers to unscrew.
-
CS-mount threads are identical to C-mount threads. The only difference is a 5 mm shorter flange focal distance for CS-mount.
-
The silver c-mount thread of the lens is separated already. After the boiling water I unscrewed its parts very easy without any efforts.
Well, the next absurd: even after getting the result exactly as shown on the pictures of balazer from the 2nd post, the lens doesn't give an infinity focus. Then I removed the c-mount>m4/3 adapter from my GH2 and put the lens right on the GH2's bayonet. With other words, the black 6-screwed circle part of the lens touches the GH2's bayonet. This time an infinity focus is almost available, BUT here is the next absurd: the picture still shows circle vignettings when the lens is zoomed-out (i.e. no zoom) even in ETC mode. How is this possible??? I'm with Moon Trial 3, don't know if the ETC covering is an issue with this patch.
-
Did you adjust the back focus knobs under the rectangle rubber stopper? That's also key. Make sure to be recording video while you adjust so you can see the sharp picture in the viewfinder.
-
Of course, I adjusted it to its maximum outer position, so that's not the reason.
Really don't know what to do more...
Howdy, Stranger!
It looks like you're new here. If you want to get involved, click one of these buttons!
Categories
- Topics List23,992
- Blog5,725
- General and News1,354
- Hacks and Patches1,153
- ↳ Top Settings33
- ↳ Beginners256
- ↳ Archives402
- ↳ Hacks News and Development56
- Cameras2,367
- ↳ Panasonic995
- ↳ Canon118
- ↳ Sony156
- ↳ Nikon96
- ↳ Pentax and Samsung70
- ↳ Olympus and Fujifilm101
- ↳ Compacts and Camcorders300
- ↳ Smartphones for video97
- ↳ Pro Video Cameras191
- ↳ BlackMagic and other raw cameras116
- Skill1,960
- ↳ Business and distribution66
- ↳ Preparation, scripts and legal38
- ↳ Art149
- ↳ Import, Convert, Exporting291
- ↳ Editors191
- ↳ Effects and stunts115
- ↳ Color grading197
- ↳ Sound and Music280
- ↳ Lighting96
- ↳ Software and storage tips266
- Gear5,420
- ↳ Filters, Adapters, Matte boxes344
- ↳ Lenses1,582
- ↳ Follow focus and gears93
- ↳ Sound499
- ↳ Lighting gear314
- ↳ Camera movement230
- ↳ Gimbals and copters302
- ↳ Rigs and related stuff273
- ↳ Power solutions83
- ↳ Monitors and viewfinders340
- ↳ Tripods and fluid heads139
- ↳ Storage286
- ↳ Computers and studio gear560
- ↳ VR and 3D248
- Showcase1,859
- Marketplace2,834
- Offtopic1,320


