
It allows to keep PV going, with more focus towards AI, but keeping be one of the few truly independent places.
-
Some mentioning of contrast filters is here
-
I have a tiffen 1/8 lo contrast filter - only used it once since getting it on sunny exteriors, but it definitely left me with shadow details to work with. Must use it more!
-
Im was just wondering if there is any improvement in the workings of these filters in the past years, or if it is sufficient to get used one from old 35mm camera? :)
-
If what you're aiming for is simply lowering the contrast for a "flatter" image, you may want to look for Ultra Cons instead, which don't have the halation around highlights and what-not a Low Con has. I like the look of Low Cons a lot, but it's a particular aesthetic that is what it is, not a short-cut to creating a flat picture style for grading. The most sterling use of Low Cons must be Kubrick - the #3 on "Barry Lyndon", and a #1 on "Eyes Wide Shut".
-
Nice. I just got an old, but unused 58mm Ultra con #3 from ebay for half the price. :) thanks for the heads up! - As the GH2 doesn't offer me a flat picture style, this is a valuable option :)
what do the numbers indicate, anyway? intensity of the effect?
-
Don't the Ultra Cons produce higher contrast instead on lower? As long as I know they are used for stars and galaxies shots.
Since I use Yashica manual lens 28-105mm 2.8 with rear thread 72mm, it's a real headache to find 72mm low contrast filter.
-
@producer No no, the Ultra Contrast is a series of Tiffen (and other brands?) filters, which spread light from the highlights to the dark parts of the frame -> lowering the total contrast by iluminating the shadows.
-
Like Psyco said, in spite of it's confusing name, the Ultra Con lowers contrast, and the number relates to strength of the effect. Low cons are not technically a mist/diffusion filter, but they do act like one! (I've got #1 thru #3, and like I said I like em, but wouldn't use them on everything, or even most things) Ultra Cons are a more recent invention, which lift the blacks but don't have the misty effect. Ultra Cons will flare on you, though.
Now, how well do any of these do for improving DR? Maybe a little, but unless you want to start and end "milky" in the blacks (sometimes I do for a "pastel" look), I'm not sure it gives you much detail. Especially with the better patches from Driftwood or Lee Powell, you have more detail in those shadows than you might think. With a camera like the GH2, I like getting the look close in-camera. On the other hand, Shian has posted good tips on this sight for lighting to get an image that's very grade-able.
-
Yes, and there is even #4 which I really want to buy.
-
@jeffharriger It looks like it may be good for those cloudless harsh sun days where I have drastic light/dark differences.
-
Probably so, yeah. I just stay in and curse the heavens those days!
-
I'll tell you Jeff, If I need blue sky it rains, If I need rain, it snows, I'm going to the coast again this evening to film the sunset and it probably won't. I need all the help I can get!
-
If you wanted to compress contrast without diffusing effect magenta color correction filter will do that. Useful dynamic range is better.
I have attached three screen grabs from GH1 video from a high contrast scene. I used a Tiffen CC40M filter. In After Effects I applied a green photo filter with 40% value to offset the magenta. Now the image is desaturated and the captured compressed contrast is seen. Values have been shifted to the left, which means dark hues were encoded at higher level. Now there is room to apply curve to simulate blooming high-lights that seems to be the desired look these days. In the final version you could also see that the color gradients are smooth.
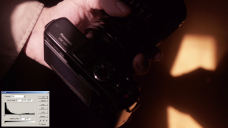
 original.png1920 x 1080 - 914K
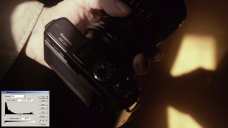
 greenPhotofilter.png1920 x 1080 - 2M
 final.png1920 x 1080 - 2M
 -
I use smoke or haze where I can, if that is impractical I'll use a silk stocking over the rear element which also softens up the image a bit, I'm looking forward to trying a Tiffen Ultra Con 1, to see what it can give me. But I know it will also soften the image a bit.
Haze is my preferred way to really boost shadows, lower the contrast, and not lose sharpness. It also gives you a nice flat image to grade, and some other fun stuff like light rays. But you gotta stop down, cuz it picks up the exposure all over. You'll see what I mean the first time you have your exposure set, and you add smoke and EVERYTHING starts blowing out.
The final thing it gives you, is the white noise you get from the haze usually crushes down to a very nice grain.
My caveat is that you need to have someone who's job it is to the regulate and operate your fogger/hazer or you'll have some continuity issues. To avoid these have a flag or sheet of black wrap on standby. And read that with the spot meter when the fog is perfect, then keep using it as a reference to how thick/thin the haze should be.
-
Also. You'll need a higher data rate for haze. I can't tell you which patches to use for it. But the sub 100 Mb/s patches tend to hate haze and smoke, whereas 130Mb/s and above never have an issue.
The all patches will actually drop the data rate when haze is used, and on the lower Bit rate patches this will create massive macro blocking.
-
I got the Tiffin #3 yesterday. I haven't had a chance to really work with it yet but the limited testing is interesting. It seems to very subtly raise the details in the shadows.
-
To avoid these have a flag or sheet of black wrap on standby. And read that with the spot meter when the fog is perfect, then keep using it as a reference to how thick/thin the haze should be.
Great tip added to my list of tricks.
I have a 3x3 (cokin A sized) Hitech Ultra Con permanently on my 1/3" Sony Handycam .. it helps.
-
I made a small video of the samples above:
This time I used After Effects only for grading. I'm still evaluating the best methods to offset the magenta in AE. For this I used Exposure filter (individual channels). Other filters in AE were curves and levels. It is a bit tricky method but the quality is there, so it just needs some massaging to get the look right. Obviously this scene would have needed some fill light but for low budget movie making the fill light may not be there so I am first trying to get a grip of things using just available light.
Bitrate goes up when using the magenta filter, so there should be more image to grade.
-
I did a very quick comparison with my Tiffen Ultra Con2 a couple weeks ago. Take a look for yourself.
Which one looks more grade-able? Look into the garage bays.
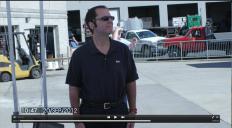
 without UC2.jpg1740 x 960 - 1M
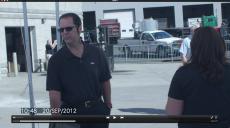
 With UC2.jpg1733 x 966 - 1M
 -
Looks very promissing, but was that really the Ultra Con 2? The effect looks very small - I thought the #2 would give a stonger effect. I have a Tiffen Ultra Con 1/4, but have not used it yet, so maybe I won't hardly see anything difference with mine.
-
@Psyco - That was a 2. It's the only one that I have at the moment. You have to be very careful as to any lens hits. The subject was under an ez up tent, so his lighting was very even, I wanted to see more of what the filter would do in regards to the background holding exposure as well as, seeing more detail in the bays. I think it worked pretty well. I think the 1/4 may be a little too little, but it may work for applications inside better. The 2 can get pretty milky...
-
I noticed more banding with Low con filters, just something to look for.
Howdy, Stranger!
It looks like you're new here. If you want to get involved, click one of these buttons!
Categories
- Topics List23,980
- Blog5,725
- General and News1,352
- Hacks and Patches1,152
- ↳ Top Settings33
- ↳ Beginners255
- ↳ Archives402
- ↳ Hacks News and Development56
- Cameras2,362
- ↳ Panasonic992
- ↳ Canon118
- ↳ Sony156
- ↳ Nikon96
- ↳ Pentax and Samsung70
- ↳ Olympus and Fujifilm100
- ↳ Compacts and Camcorders300
- ↳ Smartphones for video97
- ↳ Pro Video Cameras191
- ↳ BlackMagic and other raw cameras115
- Skill1,960
- ↳ Business and distribution66
- ↳ Preparation, scripts and legal38
- ↳ Art149
- ↳ Import, Convert, Exporting291
- ↳ Editors191
- ↳ Effects and stunts115
- ↳ Color grading197
- ↳ Sound and Music280
- ↳ Lighting96
- ↳ Software and storage tips266
- Gear5,417
- ↳ Filters, Adapters, Matte boxes344
- ↳ Lenses1,580
- ↳ Follow focus and gears93
- ↳ Sound498
- ↳ Lighting gear314
- ↳ Camera movement230
- ↳ Gimbals and copters302
- ↳ Rigs and related stuff273
- ↳ Power solutions83
- ↳ Monitors and viewfinders340
- ↳ Tripods and fluid heads139
- ↳ Storage286
- ↳ Computers and studio gear560
- ↳ VR and 3D248
- Showcase1,859
- Marketplace2,834
- Offtopic1,319


