
It allows to keep PV going, with more focus towards AI, but keeping be one of the few truly independent places.
-
Anyone who is on a tight budget and really wants to spend their money where it counts might benefit from this. I am not a professional photographer and I don't do event shooting or any other type of situation where I'm getting paid to shoot photos/video. Its just myself and a small crew who are into shooting short films. I try to spend what little money I have on the camera and sound gear and improvise using DIY lighting, dollies, rigs, etc...That being said, I really don't care if someone notices that I'm using a VHS box and cut up plastic blinds for a matte box..its only the finished product I care about.
This is also a prototype, there are many ways this can be improved, but its fully functional in its present state. Sorry for the lousy photo, but my Canon Powershot is half dead. I still need to do a few adjustments such as replace my plastic and rubber mounts with metal plates, spray the matte box with a flat, non-glare paint, attach a black elastic bag between the matte box and lens so when I use smaller lenses there will be no light seeping through on the sides, etc.
If anyone is interested, I'll give you the full details. The whole thing was built using these two racks and scraps of items I found laying around in my garage/tool room. It holds my GH2, and Juicedlink nicely. I have my NTG-3 on a boom pole ($17), so there is no mic support arm. It would be easy enough to attach one.
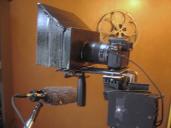
 Rig.JPG2272 x 1704 - 677K
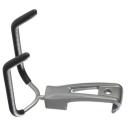
 Juicedlink rack.jpg400 x 400 - 28K
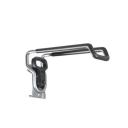
 ladder hook cam.jpg500 x 500 - 14K
 -
I'd like details, thanks. Any chance you could link to the items online, for example home depot?
-
Sure thing Dan..here are the barcodes...071691422846 071691230144 ( I bought them at Lowe's). So start by holding the big rack (the one in the third photo) by the handle and face it away from you like you would a gun. The take the smaller rack with the hooks on the left and it slides perfectly up into handle of the bigger rack. These are precision made to slide onto a long track, so they slide onto one another beautifully. There is a screw hole on the back of the small rack and it looked like I would be able to screw it in to lock it in place, but its deceiving. I actually had to take two large washers and really jam them up there with a screwdriver. Its not going anywhere now, it locks them together nice.
What I did next was I found an old bathroom blind I refused to throw out because it was made from a nice 2" wide hard foam/plastic strips and I figured I'd find a use for them someday. I cut them into 4" long strips. I also had a wafer-like piece of plastic with a rubber matting on top ( available at Lowe's) that I cut up into same size strips and layered it on top of the blind pieces. These just give it an added grip, they are meant for putting under lamps, etc so they don't slide on tables..you don't need these, you can use a metal plate, or any hard plastic, stuff you can usually find around the house, but I just liked the grip they gave..I then drove a screw on each side of the plastic blind pieces so they created an adjustable bracket for the camera. I screwed these together using one screw on each side, outside the rails of the rack. I took a 3/8" screw I had from one of my tripods and screwed it up from the bottom so the screw head faced up from this bracket...this my camera mounting screw. Since it came from a tripod it has a convenient knob attached. I made a similar bracket, same size for the smaller rack. I drove another 3/8" screw through the plastic mount to serve as my Juicedlink mounting screw.
For the Matte Box, I did the old VHS box trick...I cut a hole in the VHS box for the lens to go through and used the lid as my top door. I had a nice piece of round plastic laying around (probably belongs to my wife, she'll kill me for this, but I'll worry about that later) and stuck it through the hole. It makes a perfect receptacle for the end of my 14-140mm lens to sit in. You could cut the top off a like-sized juice or detergent bottle or something. I took two strips of that plastic blind on each side and cut them so they matched the angle of the top door and used them for the side doors. I actually used black electrical tape to connect all these pieces together and it worked great and then spray painted over it. I don't use a matte box for filters, I don't have a need for changing them quickly on the fly, if I do use one I put it on the lens itself, so I didn't make one of those. I generally use the matte box because I find its way more effective than a lens hood with some lenses when it comes to glare and sudden shifts in brightness. I used the same materials to mount the matte box to the frame as I used on the camera and juicedlink. These are all adjustable too, so its just a matter of loosening two screws to slide the brackets around on the rack to fit just right. Just cut the hole low enough in the plastic case so the lens will fit..and if you need to raise the matte box with more strips of plastic underneath on the mounting or bracket..or if you devise a mounting bracket with screws to adjust the height of the matte box (I'm working on that next) its even better...but much easier than making the hole in the matte box too high and then trying to adjust the camera to fit the level of the hole.
I grabbed a handle from an old Makita drill I had. It was one of those screw on handles so you get better leverage with the drill. I screwed that up into the matte box bracket from the bottom. THIS IS NOT STURDY ENOUGH TO HOLD THE RIG WITH..the rig is held from the metal "handle" of the large rack, just under where the small rack slid up from. The black handle is just for added support while handheld.
The bad.....I have to use a clamp to connect it to my tripod...although it does fit snugly and securely on there once clamped. I didn't devise a mounting plate yet for that. I had no tools to build it other than a screw driver, a tap drill set (my power drill is broken) a razor blade to cut the blinds. If you have a nice drill, you can really make some quality mounting plates for this....also you hold the whole rig by the "handle" of the large rack, underneath where the smaller rack slid up into. Its not the most comfortable grip when you have all the weight of a 14-140 lens, juicedlink and gh2 on it...but with the black handle displacing some of the weight its not too uncomfortable either...it would be nice to devise some sort of attachment handle to give more comfort there.
There are so many ways to improve on this design, like I said its a prototype, but these racks give you a great base to work with....$16 you won't regret spending.
-
Dan I'm going to make a video next week on Vimeo showing how to construct it I think. When I do I'll attach the link here. I'm probably not the best at describing it in words, visual is always better.
-
I had to laugh, I just saw the Ladder hook (camera frame) on ebay for 27.95...$9 at Lowe's...DO NOT buy it on ebay!
-
I've made some new improvements with the rig, in particular with the matte box and flags. It has a much more professional look than the old VHS box....all made out of free stuff!
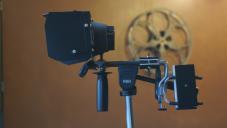
 P1000572.JPG4976 x 2800 - 4M
 -
I've updated my $16 Rig....This rig is awesome and allows for extremely smooth camera movement, no jello or shaking going on during filming. I've attached my Juicedlink under my camera and used the side bracket for my Rode NTG-3. I can easily detach it and attach it on my boom pole if needed. The shoulder stock comes from a hook-like piece that came with a Home Depot construction lighting kit. You can use it like you would a rifle, or put the hook behind your shoulder, which allows better utilization of the viewfinder. I've been able to use some of my favorite lenses with this rig, lenses that do not have any internal stabilization and the result is very professional looking...all for $16, plus a few items anyone can find around their house or garage.
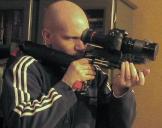
 IMG_4792.JPG827 x 655 - 154K
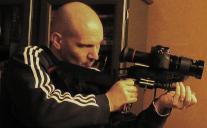
 IMG_4793.JPG932 x 577 - 137K
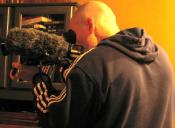
 IMG_4794.JPG1174 x 857 - 257K
 -
@bostonmike, it looks nice and compact. Funny cuz a while back I thought of using one of those brackets. I often cruise the Hardware isles looking for things like this that can be turned into a rig. There's so much stuff out there if you keep your eyes open.
-
@bostonmike great! It's a very cheapy solution for these little cameras..!
-
I'm the same way Aria, always keeping my eyes open for interesting gadgets...the setup in the photo, including GH2 with an old Vivitar Series 1 28-90mm, Juicedlink CX-231 and rode NTG-3 weighs just under 6 pounds. The only thing I don't have is a focus wheel.
Albertz, it works out great, extremely comfortable. The "hook" used for the mount also has an 80 pound capacity, so it is very sturdy.
Howdy, Stranger!
It looks like you're new here. If you want to get involved, click one of these buttons!
Categories
- Topics List23,992
- Blog5,725
- General and News1,354
- Hacks and Patches1,153
- ↳ Top Settings33
- ↳ Beginners256
- ↳ Archives402
- ↳ Hacks News and Development56
- Cameras2,367
- ↳ Panasonic995
- ↳ Canon118
- ↳ Sony156
- ↳ Nikon96
- ↳ Pentax and Samsung70
- ↳ Olympus and Fujifilm101
- ↳ Compacts and Camcorders300
- ↳ Smartphones for video97
- ↳ Pro Video Cameras191
- ↳ BlackMagic and other raw cameras116
- Skill1,960
- ↳ Business and distribution66
- ↳ Preparation, scripts and legal38
- ↳ Art149
- ↳ Import, Convert, Exporting291
- ↳ Editors191
- ↳ Effects and stunts115
- ↳ Color grading197
- ↳ Sound and Music280
- ↳ Lighting96
- ↳ Software and storage tips266
- Gear5,420
- ↳ Filters, Adapters, Matte boxes344
- ↳ Lenses1,582
- ↳ Follow focus and gears93
- ↳ Sound499
- ↳ Lighting gear314
- ↳ Camera movement230
- ↳ Gimbals and copters302
- ↳ Rigs and related stuff273
- ↳ Power solutions83
- ↳ Monitors and viewfinders340
- ↳ Tripods and fluid heads139
- ↳ Storage286
- ↳ Computers and studio gear560
- ↳ VR and 3D248
- Showcase1,859
- Marketplace2,834
- Offtopic1,320


